The Cats licked the Croquembouche

This entry is VERY late, three days late to be exact. Humidity turned caramelized sugar to croquembouche goo and well, I almost gave up.  I’m glad I didn’t, so better late than never (are you listening, BOT?).

When I was in my early 20’s, I constructed my first croquembouche (aka Piece Montee).  I saw it on the cover of a Good Housekeeping magazine at the market and bought that magazine because I had to attempt it.  That combined with having seen a classic Martha Stewart repeat, in all of her 90’s wedge-cut glory, dipping a snipped whisk into caramelized sugar and spinning it around and around this extraordinary, cone-shaped tower of cream puffs. I watched in awe as she formed golden strand after golden strand around that croquembouche, which was seducing me like no pastry had before.  Before I continue, the infamous blog checking lines;

Croquembouche Vase with cut-out fruit flowers

The May 2010 Daring Bakers’ challenge was hosted by Cat of Little Miss Cupcake. Cat challenged everyone to make a piece montée, or croquembouche, based on recipes from Peter Kump’s Baking School in Manhattan and Nick Malgieri.  Thanks, Cat!

So, I decided that a croquembouche would be the perfect, and most impressive, dessert to bring to a boyfriend’s Christmas day family gathering.  After a few issues with the creme patisserie, which I hadn’t made before, I spent hours building this tower of beauty, decorating it like the one on the cover of the aforementioned Good Housekeeping issue, with silver dragees, red and green Jordan almonds, and of course, that gorgeous angel hair mane of spun sugar.  It was ahh-mazing; it actually looked like a golden Christmas Tree! I was ecstatic to show this baby off, but even more excited for everyone to take a bite of the caramel coated cream puffs and discover the rich, creamy centers in various flavors (vanilla ginger, chocolate truffle, and salted caramel).

Surely they would marvel at my artistry and ability to make something that looked so good, taste SO delicious!!

Cream puffs for Croquembouche Vase with cut-out fruit flowers

When we got there, the both of us holding a side of the croquembouche platter like it was a newborn baby; walking in slow motion, then scoping the room for any stable place to put it down, everyone did marvel.   Excited gasps and exclamations of  “WOW, I can’t believe you made that!” and “HOW GORGEOUS!!”, peppered the room .

I was totally basking in a  “D’s chick is a supergirl – what a catch!” kind of moment.

His brother took a side of the platter and helped us place it smack dab in the middle of the main dinner table; the centerpiece!! As more people arrived, their eyes went straight to my croquembouche, asking where they bought this amazing, edible tower.  Of course they were shocked to find out that I made it all by my  lil’ ol self.  To say I was lovin’ it is such a freakin’ understatement, it isn’t even funny.  I was the bomb diggity bomb that day! I was SO full of my pastry self (inwardly, of course) it was almost humorous, and I couldn’t wait until everyone experienced crispy, creamy profiterole pleasure on their palates!

Croquembouche Vase with cut-out fruit flowers
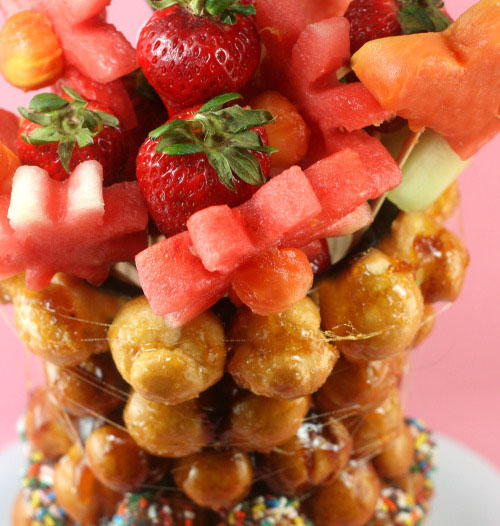
Notice the pool of melting sugar at the bottom from the humidity.  It seeps through the dang walls no matter how high you have the AC or CA blasting. Within an hour, the puffs started to keel over and roll off.  Even the perfect dip of sprinkles on several of the cream puffs wouldn’t hold and started to melt off – as well as the spun sugar, which literally disintegrated before I took photos. This is why croquembouche is NOT a summer dessert, IMO.

Well, you all know what’s coming.  This kind of self-congratulatory euphoria cannot take place without some form of karma, can it?

We were all sitting in the living room, our bellies full after a lovely dinner, chatting away until said bellies made room for dessert. Everyone kept commenting on how they couldn’t wait to dig into my tower of croquembouche cream puff gorgeousness, so much so, that the Italian pastries, pies and cakes were all but kicked to the side of the table. My croquembouche stood in full view; grand, tall and proud, glistening like an actual Christmas tree with lights; lights that were winking at us in a come hither way, luring all to pull off a cream puff or three.

Suddenly, someone said “Oh, look, Socky and Basher love the croquembouche too!”  I looked over and saw that their cats were ON THE TABLE investigating this odd upside- down cone, with intense curiosity.

We all watched in horror as both cats started licking my croquembouche.  Not just little licks, but rapid, ravenous licks, along with (which was sort of even worse), long, sensuous rubs against the sides of the croquembouche with their flanks, their hair sticking to every puff.  They were courting my croquembouche! They even sat up on their hind legs and licked the top and all around the top! OMG, they weren’t going to leave one area untouched!

Croquembouche Vase with cut-out fruit flowers

Soon, everyone started to laugh, and I had to join in so the sight of my head deflating wouldn’t be too obvious. It went from light laughter to extremely loud guffaws, with comments like..

Looks like we won’t be eating THAT for dessert!

and..

I had no idea your cats were into French desserts, Jack!

I wanted to crawl under the table and remain there for eternity, or at least until I didn’t feel like sulking or crying anymore.

Of course everyone was nice, sweet, and apologetic about it, but I was so disappointed because no one was going to be able taste it, unless they liked cat hair cream puffs.

I did make several more of the croquembouche in coming years, with no kitty foreplay rendering them inedible, but whenever I make or even hear the word ‘croquembouche’, my mind always races back to that first moment of glory turned gloom.

Croquembouche Vase with cut-out fruit flowers               I cut and pulled off the bottom layer of puffs to give it a more ‘vase’ shape.

Onto the challenge.  No tower this time, but a croquemVASE filled with fruit! Papaya hearts (dipped in strawberry sugar, which melted, on one side, just because..), watermelon flowers with mango centers, pineapple-melon kebabs (there is actually a few chunks of Yubari King Melon on some of them!), strawberries etc.  It turned out messy because the fruit was drippy and slippery due to the weather, and by the time I got to the fruit kebabs, I just shoved uneven chunks (instead of the beautiful balls of fruit I was going to scoop) onto the skewer because I was fed up and DONE!

Initially, I was going to make a croquem’bowl’, but as I kept building toward the ceiling, I realized a bowl wasn’t to be had. In France, a croquembouche is usually presented as a wedding cake, but I always associate it with cold weather holidays, so an elaborate cone tower in this sweltering heat was not in the cards.  Well, since we’re in the dog days of summer, why not morph the croquembouche into ‘springy/summery’ goodness with a bouquet of fruits in a VASEmbouche?

Well, that’s what I did.

I filled the pate a choux puffs with a simple soft chocolate ganache, sort of emulating a chocolate fondue you’d be dipping the fruit into.  Bite of fruit, bite of crispy with oozing chocolate, bite of fruit, bite of crispy with oozing chocolate, lather, rinse, repeat et al.

To be honest, I always felt a croquembouche could do without the hard caramel coating as far as the taste and texture goes, but it makes such a pretty presentation, I can never resist.  Next time I may just use chocolate and save the ‘shimmer’ for holidays.  At the very least, cool weather eliminates the muggy humidity that results in gooey, melting sugar, also known as the croquembouche killer.

How to Make a Croquembouche

For the master recipe for croquembouche, click HERE.


Bookmark and Share

Posted in Candy, Daring Bakers, Dessert, Fruit, Pastry | Tagged , , , , , , , , , , , , | 60 Comments

Enchilada Time! Green Eggs and Porkchiladas, plus a Chickenchilada Bake!

Porkchiladas? Chickenchiladas? I’m betting those are the strangest terms for an enchilada you may have ever heard. But, yes, they are 100% enchilada, though stacked/layered instead of rolled.

In this case, the pork is carnitas, braised, juicy chunks of pork shoulder torn into irregular pieces, then crisped in the oven prior to serving. Sounds delicious, right? Well, let’s make it even more delicious and bathe it in Rick Bayless’ beautiful, rich, but uber involved, classic red mole sauce. Then we’ll stack it between homemade flour tortillas along with some queso fresco, cheddar and asadero cheeses melted into an amalgam of silky, stringy goo, and then top it with a poached egg drizzled with green chile sauce and more mole. Tell me that doesn’t sound pretty amazing? Well, it was!

As you can already tell, there will be no guacamole and refried beans today (although I do love them both!).

Chicken Enchilada Bake, Stacked Porkchiladas, Carnitas, and Green Eggs!

All that being said, yes, we’ve gone south of the border this month to beautiful and delicious Mexico with Chicken and Pork enchiladas! Cue blog checking lines…

Our hosts this month, Barbara of Barbara Bakes and Bunnee of Anna+Food have chosen a delicious Layered and Stacked Green Chile & Grilled Chicken Enchilada recipe in celebration of Cinco de Mayo! The recipe, featuring a homemade enchilada sauce, was found on www.finecooking.com and written by Robb Walsh.

Ingredients for Green Chile Sauce in Chicken Enchilada Bake, Stacked Porkchiladas, Carnitas, and Green Eggs

Naturally, I didn’t follow this enchilada challenge word for word. Yes, as you read in the first paragraph, I stacked them. Yes, I made the green chile sauce provided to us by Barbara and Bunnee. However, as always, I have to complicate things, but it’s always in a good way, and this enchilada was no exception to the rule. I made Rick Bayless’ Classic Red Mole Sauce. Granted, we were given the option to use any red and/or green chile sauce we preferred, but when traveling to Mexico through the eyes and minds of the Daring Cooks, who better to go to than Rick Bayless? I did make one minor change to his perfect recipe, and that was to add one roasted plum tomato along with the tomatillos. Hey, they’re relatives..right? Right?

Ingredients for Classic Red Mole Sauce for Chicken Enchilada BakeSome of the many ingredients in the classic red mole :  Upper Left – Toasted sesame seeds, roasted tomatillos plus one tomato, almonds, golden raisins and garlic in the middle.  Upper Right: Dried chiles.  Lower Left –  Chocolate from Mexico.  Lower Right – Dark toast and spices.

First off, I’ve never made mole sauce before, and now I know why.  This sauce contains a myriad of ingredients and loads of steps.  I made the full recipe, which included a good amount of dried ancho, mulato and pasilla chiles, torn into flat pieces and fried prior to soaking.  Well, I don’t know what kind of dried chile peppers Rick gets, but tearing them into ‘flat’ pieces for frying is just not possible. Yes, you will get some flat pieces, but for the most part, since these peppers are shriveled to the maximum shrivel unit, most will curl when torn. This was a problem when frying them, albeit a small problem, but kind of a pain in the tush.

On the bright side, while tearing these peppers into pieces for what seemed like hours, it smelled like really good popcorn. Have you ever smelled your pup’s paws or hot buttered white rice? That kind of ‘good’ popcorn smell.  However, when sniffed close to the nose, they smelled like spicy raisins, which is also pretty nice. BUT, a warning: just because a hot pepper has been dried doesn’t mean the seeds are any less hot.  Yep, I accidentally rubbed my eyes after tearing them (staring back at you all with bulbous, red burning, tearing eyes).

Chicken Enchilada Bake, Flour Tortillas, Stacked Porkchiladas, Carnitas, and Green EggsReady for basic asssembly.  Upper Left – Carnitas.  Upper Right – Flour tortillas.  Lower left – Top to Bottom: Queso fresco, cheddar and asadero.  Lower right – Red Mole and Green Chile sauces.

Does it sound like I’m complaining about this sauce? Yeah, I know it does..but I would make it again, and again and again. I would toast, fry, soak, mix, blend, strain, and cook it down for eternity because it’s so.worth.it. But here’s a tip: if you make this sauce, make sure you have a MEDIUM mesh strainer.

I used a fine mesh strainer to push the chile mixture, the tomatillo mixture, and the final sauce through (although the recipe didn’t call for pushing the final sauce through..I wanted it super silky) and boy did I pay. It took at least an hour of my life and left me with a very sore wrist. The word STRAIN definitely covered both a noun and verb in this case, BUT, my mole was smoother than a baby’s bottom and like silk on the tongue. Unfortunately, you can’t really see the silkiness because I took a photo of  it straight out of the fridge. Why? Because I rushed this entry since it was late, (which is pretty much the norm ’round here).

Sometimes I just don’t think.

Chicken Enchilada Bake

A few days later, I used the mole sauce to make the recipe almost as written; stacked/layered in a roasting pan, using chicken; sort of like a chicken mole lasagna using flour tortillas. The photo stinks, but it was extraordinarily delicious, and the pan was empty in minutes.

I suppose you could call my take on this month’s challenge Enchilada Benedict. You’ve got the pig, you’ve got the poached egg, and even though I didn’t, you could always mix some of the green chile sauce (which was also fabulous) into some Hollandaise sauce. When it comes to the bread part, anything really goes..English muffins being the classic route, but why not cheese loaded flour tortillas filled with carnitas in mole? Instead of one big pan of cheese loaded, meaty, saucy stacked stuff, I made individual stacks, using a 3-inch round cookie cutter to cut circles from the flour tortillas; a great podium for the creamy, little poached eggs.

Can I still call this an enchilada? Hmm, I may have taken a road way, way off the beaten enchilada path, but it’s definitely a delicious path!

Stacked Pork Carnitas Enchilada with Green Chile Sauced Poached Egg

Anyway, I loved this stacked and layered enchilada challenge, as did everyone who gorged on both the stacked/layered pork enchilada aka porkchiladas, and the chicken enchilada bake (Chickenchilada Bake)! Thank you for a delicious and fun enchilada challenge, Barbara and Bunnee!

FINALLY, I didn’t forget, although I am a day late (a day late with this challenge too – sometimes life just gets in the way). the winner of The Sweet Melissa Baking Book!  Random Integer chose number….

This corresponds to Becca of My Kitchen Quest.  Congrats, Becca!  I’ll send you an email ASAP and get the book right out to you as soon as I get your info!

Homemade Flour Tortillas for Chicken Enchilada Bake

Cheesy, Gooey Chicken Enchilada Bake - Everything from Scratch

Flour Tortillas
Recipe from the Authentic Mexican by Rick Bayless
Makes 12 tortillas

2 3/4 cups all-purpose flour, plus a little extra for rolling the tortillas
5 tablespoons lard or vegetable shortening, or a mixture of both
3/4 teaspoon salt
about 3/4 cup very warm water

DIRECTIONS:
1. Make the dough. Combine the flour and fat in a large mixing bowl, working in the fat with your fingers (like you would a pie dough), until completely incorporated. Dissolve the salt in the water, pour about 2/3 cup of it over the dry ingredients and immediately work it in with a fork; the dough will be in large clumps rather than a homogeneous mass. If all the dry ingredients haven’t been dampened, add the rest of the liquid (plus a little more, if necessary). Place the dough onto your work surface and knead until smooth. It should be medium-stiff consistency — definitely not firm, but not as soft as most bread dough either.

2.Rest the dough. Divide the dough into 12 portions and roll each into a ball. Set them on a plate, cover with plastic wrap and let rest at least 30 minutes (to make the dough less springy, easier to roll).

3. On a lightly floured surface, roll out a portion of the dough into an even 7-inch circle.

4. Heat an ungreased griddle or heavy skillet over medium to medium-high heat.

5. Lay the tortilla on the hot griddle (you should see an almost immediate bubbling across the surface). After 30 to 45 seconds, when there are browned splotches underneath, flip it over. Cook the other side 30 – 45 seconds until it also has brown splotches; don’t over cook the tortilla or it will become crisp.

6. Remove and wrap in a cloth napkin placed in a tortilla warmer or warm oven. Roll and cook the remaining tortillas in the same manner and stacking them one on top of the other.

Chickenchilada Bake

Red Mole Sauce and/or Green Chile Sauce – OR Mexican sauce(s) of your choice
2 boneless chicken breasts (you can also use bone-in chicken breasts or thighs)
3 tablespoons olive oil or other neutral vegetable oil (use more as needed)
Kosher salt and pepper
12 flour tortillas from recipe above
6 ounces Monterey or Pepper Jack Cheese, grated
6 ounces Cheddar Cheese, grated
Chopped cilantro for garnish – optional

DIRECTIONS:
1. Heat a grill or grill pan to medium high or build a medium-hot charcoal Coat the chicken with olive oil and season well with salt and pepper. Preheat oven to 450 degrees.

2. Grill the chicken until just cooked through, 4-5 minutes a side for boneless chicken breasts.
3. Cool and then slice into thin strips or shred.

4. In a small skillet, heat 3 tablespoons oil over medium-high heat until very hot. Dip the edge of a tortilla into the oil to check – it should sizzle immediately.

5. Using tongs, put a tortilla into the pan and cook until soft and lightly brown on each side, about 15-20 seconds per side (at the most).

6. Drain on paper towels.

7. Add oil as needed and continue until all 12 tortillas are done.

8. In a baking dish large enough to hold four separate stacks of tortillas, ladle a thin layer of sauce.

9. Lay four tortillas in the dish and ladle another ½ cup (4 ounces/112 grams) of sauce over the tortillas.

10. Divide half the chicken among the first layer of tortillas, top with another ½ cup of sauce and 1/3 of the grated cheeses.

11. Stack another four tortillas, top with the rest of the chicken, more sauce and another third of the cheese.

12. Finish with the third tortilla, topped with the remaining sauce and cheese.

13. Bake until the sauce has thickened and the cheese melted, about 20 minutes. Let rest for 5-10 minutes.

14. To serve, cut into squares like you would a lasagna and transfer each cut enchilada stack to a plate. Spoon any leftover sauce over the stacks and sprinkle with cilantro, if you wish. The stacks may also be cooked in individual gratinee dishes.

Carnitas

Adapted from a combination of recipes by Elise Bauer of Simply Recipes and David Lebovitz

4 to 5 pounds boneless pork shoulder, cut into 5-inch chunks
1 tablespoon coarse sea salt
2 tablespoons canola or neutral vegetable oil
1 quart chicken or beef broth or stock
2 cups chunky tomato salsa either prepared or homemade
water
1 teaspoon chile powder
2 bay leaves
2 cloves of garlic, peeled and thinly-sliced

DIRECTIONS:
1. Rub the pieces of pork shoulder all over with salt. Refrigerate, wrapped, for 1 to 3 days. (You can skip this step if you want. Just be sure to salt the pork before searing the meat in the next step.)

2. Heat the oil in a roasting pan set on the stove top. Cook the pieces of pork shoulder in a single layer until very well browned, turning them as little as possible so they get nice and dark before turning them over. If your cooking vessel is too small to cook them in a single layer, cook them in two batches.

3. Once all the pork is browned, remove it all from the pot and blot away any excess fat with a paper towel, then pour about a cup of the stock or broth into the hot pot, scraping the bottom of the pot with a flat-edged utensil to lift up all the tasty brown bits (aka fond).

4. Return the pork chunks to pot and add the remaining broth or stock, salsa, bay leaves, chile powders, garlic, and enough water so the pork is completely covered.

5. Cover and bring to a boil. Reduce heat to low and simmer, covered, for 3 to 4 hours (or longer) until the pork pulls apart easily. Add salt to taste if needed.

6. Preheat oven to 400 F. Remove meat from liquid in pot (discard the liquid) and spread the meat out in a roasting pan. Break the meat into small chunks. Roast meat for 15 to 20 minutes until brown and crispy.

7.  Drizzle the carnitas with Rick Bayless’ red mole sauce, linked above, for my porkchiladas, (add a poached egg and green chile sauce, also linked above, along with queso fresco, cheddar or asadero cheeses) or just enjoy as is with lots of guacamole and tortillas!


Bookmark and Share

Posted in Breakfast, Daring Cooks, Dinner, Giveaway, Lunch, Pork, Vegetables | Tagged , , , , , , , , , , , | 50 Comments

Roasted Butter Pecan Cake and Orange Macarons

Warning: This is going to be a very long post. I guess you could call it somewhat of a disaster novella involving these lovely macarons.  The cake was a piece of cake (pun intended), so no kvetching there.

Roasted Butter Pecan Orange Buttercream Cake and Orange Macarons

It all started as a mission to use up leftovers.  I had a ton of egg whites left over from making the infamous Momofuku Crack Pie and a jar of orange marmalade from the Daring Bakers Orange Tian challenge.   I typed egg whites and orange marmalade into a search engine, and came across a cake by a baker whose amazing butterscotch ‘custardy’ pudding is one I’ve made and deemed the perfect butterscotch ‘custard’ pudding – Melissa Murphy of Sweet Melissa Patisserie in Brooklyn.

Apparently, there’s  a challenge online called Sweet Melissa Sundays where they have been baking from her book, The Sweet Melissa Baking Book , for some time now.  I’m not a member, but one benefit of these challenges is you can grab recipes from cookbooks you don’t happen to own a copy of (I know, that sounds kind of awful, huh?)  Well, in this case, no need to label me a pilferer because I went out and bought the book, (but not before Leslie of Lethally Delicious, who hosted this particular Sweet Melissa Sunday, went out of her way to correct a small part of the recipe left out, for me.  Thank you, Leslie!)  In fact, I bought two cookbooks, one of which I would like to give away to one of my readers, but I’ll get to that later.

Roasted Butter Pecan Orange Buttercream Cake and Orange Macarons

The cake I’m speaking of is called Roasted Pecan Cake with Caramel Orange Marmalade and Burnt Orange Buttercream.  If you recall..I don’t flip over orange marmalade.  However, this wasn’t a cake for me..it was a Birthday slash Easter cake for a friend who happens to love anything and everything orange. After seeing the theme for last month’s Mac Attack. which was Holidays in April, I thought, why not accessorize the Easter cake with a macaron for Passover using the same flavors in the cake? However, several heartbaking MACcidents that took place (I just love word play, even though I suck at it.), hindered that idea to the point where this whole post almost didn’t happen.

Roasted Butter Pecan Orange Buttercream Cake and Orange Macarons                            
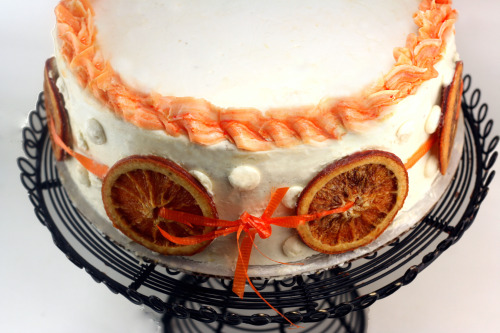
I ripped the dang ribbon trying to tie a perfect bow.

The first batch of Macs I made were perfection.  It was the first time I turned out a full batch of perfect macaron shells – no duds! I was ecstatic!! I thought the Mac gods had blackballed me and I was destined to turn out lumpy, uneven macs for eternity.  I was so thrilled with this sheet of perfect macaron shells, that I could not stop looking at them.  Every time I walked by the baking sheet of superbness, I had to check and make sure they were still superbness.

Since I wasn’t filling them until the next day, this occurred quite a bit.  Soon, a little paranoia crept in..

What if someone accidentally eats them? 

What if my cat runs across the counter and crushes them?

What if a 6.5 on the Richter scale earthquake strikes and they crash to the floor in pieces?’

Let’s not get into minor details about my living on the Northeast Coast. We do have the Ramapo Fault, you know!

Roasted Butter Pecan Orange Buttercream Cake and Orange MacaronsUnwaxed, unflavored dental floss makes a great cake ‘torter’.  Just cut around the perimeter of the cake, not going through, then slide the dental floss into the cut and pull both ends through in a criss-cross manner.

Due to this paranoia, I decided to put them in my turned off oven, slightly ajar, for ‘safekeeping’.  I think you all know how this is going to turn out. Now, I’m not naming names as I would never want to embarrass anyone I love because they made a little mistake. SO, I’ll refer to this person as someone.

Roasted Butter Pecan Orange Buttercream Cake and Orange Macarons                    Crumb coat, final coat, rickety decor, and the piece de resistance.

One hour before I was going to fill them, I get a phone call from someone on my cell while out.

Someone:  Hiya..did you leave some chocolate cookies in the oven?

Me: Um, yeah, why?  (I instantly knew what happened.  My macarons were orange)

Someone:  Yeah, I turned on the oven to preheat for the chicken I’m making tonight, then smelled something.  They look great!

Me:  OH NO, they were orange macarons and you just burned them to a crisp!!! (sob, sniff)  They were perfect, I’ll never get another batch like them!

Someone:  Uhh..well..you never told me you left something in the oven! (He’s right, but I suppose my habit of always looking in the oven prior to preheating isn’t a habit possessed by all.)

Me: I know (sob, sniff) it’s not your fault (although I was almost wishing it was so I could blame someone – anyone!)

After mourning the most perfect sheet of macarons, it was time to move on.  I cracked the eggs, separating the whites from the yolks to age, made another batch of  tant pour tant, then emailed Jamie of Life’s a  Feast, the Mac Tweets co-founder, to ask for an extension, along with a very detailed explanation of what went wrong.  THEN, my descent back into macaron hell began.

Batch #2 – I left the aging egg whites uncovered to rush the aging process.  Umm..egg whites exposed to air eventually dry up.  I know this, so why did I forget this? I used what egg white was still liquid and folded in as much tant pour tant as it would hold.  Added too much, resulting in a thick paste. I knew it was going to be a failure as I squeezed the batter in the piping bag onto the baking sheet, popping a few blood vessels along the way.  Hoped for an oven miracle.  No dice.  Trashed.

Batch #3 –  Couldn’t wait for the egg whites to age for 24 hours, so I cut it short.  This time I over-folded which deflated the meringue, and again, I knew they were going to be an epic failure as I watched the non viscous batter dribble out of the pastry tip onto the baking sheet.  Hoped for an oven miracle.  No dice.  Trashed.

Emailed Jamie and bowed out of April’s Mac Tweets Attack.  Okay, so I would enter these macs in May’s Mac Attack instead, informing Jamie that I would find a way to wrap them around the next new theme because Easter and Passover are over.

Batch #4 –  Not as perfect and gorgeous as that first sheet, but they turned out okay.  Asked someone to pull them out of the oven when the timer goes off since I needed to run out for a few.  When I got home, he looked worried.  The macarons were squashed and/or dented.  He used my giant Hamburger Helper ‘hand’ pot holder to pull the cookie sheet out, one I never use because it’s too big and squishes most everything on a cookie sheet.  Macarons trashed.

Batch #5 – These turned out ‘meh’, but at this point I’ll take anything.  Took some photos of them sandwiched together and planned to take photos of them with the cake later on.  Two other someones came over for dinner.  They move everything over on my table to make room, piling some stuff on top of the cookie sheet of macarons.  Cracks, cracks, cracks.  Macarons trashed. Well, some eaten, but still falling into the  ‘Trashed’ category because I have to do them again. (sigh)

Batch #6 – Not even coloring the tant pour tant orange this time.  Instead, colored the burnt orange buttercream.  These turned out somewhat okay, so this was it for me.  Tucked in some of the cracked orange colored macs for photos, turning them so you can’t see the cracks, and left it at that. No more mac making for at least 2 weeks! Oh, did I mention I got sick after the final batch, further delaying this entry another two weeks? Yep, it was just one of those months.  I’m convinced it’s Mercury retrograde.  Esoterically, the color orange is associated with Mercury. Hmmmm.

After all of this, I check the May theme at the Mac Attack site.  Pair your macarons with a book you  like, whether it be from your childhood or present.  This all started as an Easter/Passover cake and macaron entry.  Now it’s a cake and macaron entry pertaining to a book my grandmother used to read to me as a child called The Duchess Bakes a Cake by Virginia Kahl.

Basically, I’d be lying if I said this came to mind initially, but I remember the kitchen disaster where she added way too many things to the cake, including leavening, so…the cake rose, and the Duchess with it; and how were they to get her down again? The cake I had no problem with other than decorator’s block, hence the polka dots, ribbon of dried oranges and odd border, so it’s kind of far-fetched.

Yeah..I know, it’s a half-assed book pairing/analogy.  There really IS a book I initially thought of that I read as a kid, when I thought of my macarons.  In it, the lead character’s little brother stuffs his teddy bear with orange pits for its life force.  I couldn’t remember the name of it until 2014, so this paragraph is an update. The book is called The Cat Ate my Gymsuit, by Paula Danziger. Definitely a better pairing with my macarons than the aforementioned read.

Roasted Pecan Orange Cake and Orange Macarons

As for the cake, yes, I emphatically stated in my Orange Tian post that I did not like orange marmalade or any dessert laden with orange pieces of any sort.  In this case, the marmalade is stirred into a caramel, so it tasted like orange candy, really good orange candy. No bitterness, no aftertaste.  The roasted pecan cake is amazing too; moist, light, toasty, and tender.  My one caveat is the buttercream.  I think it needs more of the orange juice  reduction, or maybe a few grates of orange zest would suffice.  The orange flavor just didn’t come through.  However, it was still smooth, silky, rich and delicious, delicious enough that next time I may mix a little of it into the orange marmalade filling and suggest you do the same..not only for taste, but for prettier layers.

Speaking of buttercream, have you ever heard of ermine buttercream? It’s buttercream made with flour. I tasted it on some pecan pie cupcakes, and I’m kinda on the fence about it. Will have to try it again.

Roasted Pecan Orange Cake and Orange Macarons                    Photo shamelessly stolen from the Barnes and Noble website.

FINALLY, my GIVEAWAY!   As mentioned 1000 miles ago (the start of this entry), I would like to give away a brand spanking new copy of The Sweet Melissa Baking Book.  No need to subscribe to my blog, post it on your Facebook and Twitter, take out an ad in the NY Times singing the praises of my blog, or offer up your first born.  Just leave a comment and  I’ll announce the winner a week from today.

One last thing for fun, although it probably wasn’t fun at the time.  Has a kitchen disaster ever reduced you to tears?   Would love to hear your stories! An answer is NOT required to enter the giveaway. 🙂

One more thing. The one big change I made to this cake was to butter toast the pecans, because butter toasted pecans are so much better than just toasted pecans, In my kitchen, no pecan will ever go un-buttered.

Roasted Butter Pecan Cake with Caramel Orange Marmalade and Burnt Orange Buttercream

Roasted Butter Pecan Cake with Caramel Orange Marmalade and Burnt Orange Buttercream
Prep time: 
Cook time: 
Total time: 
Yield: 1 9-inch cake
 
ingredients:
Roasted Butter Pecan Cake
  • 1⅔ cups coarsely chopped pecan pieces
  • 3 to 4 tablespoons melted butter
  • 2 cups sugar
  • 1¼ cups all-purpose flour
  • 1 teaspoon baking powder
  • ¼ teaspoon salt
  • ½ pound (2 sticks) unsalted butter
  • 2 teaspoons pure vanilla extract
  • 12 large egg whites, at room temperature
Caramel Orange Marmalade
  • ½ cup sugar
  • ¼ cup water
  • 3 tablespoons fresh orange juice
  • 1 cup orange marmalade
Burnt Orange Buttercream
  • ¾ cup fresh orange juice (I suggest doubling the juice, it really cooks down a lot)
  • ⅔ cup plus 3 tablespoons sugar
  • ¼ cup water
  • 3 large egg whites, at room temperature
  • ¾ pound (3 sticks) unsalted butter, at room temperature
  • 1 tablespoon pure vanilla extract
Decor
  • 1 cup pecan pieces, buttered and toasted
directions:
Toast Buttered Pecans
  1. Preheat the oven to 350 degrees. coat pecan pieces in melted butter, then spread in a single layer on a cookie sheet. Bake for 10 to 12 minutes or until lightly golden and you can smell them. Remove to a wire rack to cool.
Make Cake
  1. Prepare three 9-inch round pans by greasing them, then placing a circle of parchment paper in each, greasing the parchments circles too. If you don't have parchment, just grease and lightly flour each pan.
  2. In the bowl of a food processor fitted with the metal blade, combine the toasted, buttered pecans with ⅔ cup of the sugar and pulse grind until it is a coarse flour. Transfer to a large bowl. Add the all-purpose flour, an additional ⅔ cup of the sugar, the baking powder and salt. Whisk to combine.
  3. Have ready a fine-meshed strainer. In a medium heavy-bottomed saucepan, brown the butter over medium heat. (The butter will melt first, and then the milk solids will settle to the bottom. After a little while, the milk solids will start to turn golden.) When the milk solids have reached a nutty brown color, immediately remove from the heat.
  4. Using the fine-meshed strainer, strain the butter into the flour mixture. Stir to combine. Discard the butter solids. Stir in the vanilla.
  5. In the very clean bowl of an electric mixer fitted with the very clean whip attachment, beat the egg whites on medium-high speed until they hold soft peaks. In a slow steady stream, with the mixer on medium speed, add the remaining ⅔ cup of the sugar and increase the speed back to high. Beat until there are firm--not dry--glossy peaks of meringue.
  6. Using a rubber spatula, briskly fold in one-third of the meringue mixture into the batter to lighten it. Add the remaining meringue and gently fold it in until just combined.
  7. Divide the batter evenly between the prepared pans. Spin the pans to level the batter. Bake for 25 minutes, or until a wooden skewer inserted into the center comes out clean. Remove to a wire rack to cool in the pans for 20 minutes before turning the layers out onto the rack. Cool completely before filling or frosting.
Make the Caramel Marmalade
  1. In a small heavy-bottomed saucepan over medium heat, heat the sugar with the water until amber in color, like clover honey. Immediately remove from heat and stir in the orange juice to stop the cooking.
  2. Add the marmalade and stir to combine. Set aside to cool.
  3. The marmalade may be stored in an airtight container in the refrigerator for up to 2 weeks.
Make the Buttercream
  1. In a small heavy-bottomed saucepan over medium heat, reduce the orange juice until it is syrupy and just starts to caramelize (it turns brown). Watch it closely; don't let it burn! Add a splash of water to the caramel orange syrup to stop the cooking. Set aside to cool.
  2. In another small heavy-bottomed saucepan over medium-high heat, combine the ⅔ cup of the sugar and water and cook to 240 degrees on a candy thermometer, about 7 minutes.
  3. Meanwhile, in the bowl of an electric mixer fitted with the whip attachment, beat the egg whites on high speed until they hold soft peaks. Slowly add the 3 tablespoons sugar and beat until there are medium-stiff peaks of meringue.
  4. When the sugar syrup reaches 240 degrees, decrease the speed of the mixer to medium, and immediately but slowly pour the hot liquid sugar in a steady stream down the side of the bowl and into the meringue. (Or, if the syrup is not yet 240 degrees when the meringue is ready, turn off the mixer until it is. Then turn the mixer to medium and add the syrup.) Beat together until stiff glossy peaks form.
  5. With the mixer still on medium, add the butter in pieces to the meringue. The mixture will break, but just keep beating and it will come together beautifully. Add the vanilla and reserved caramel orange syrup and mix to combine.
  6. If using the buttercream immediately, set aside at room temperature. If not, refrigerate in an airtight container for up to 2 weeks. If the buttercream has been chilling, let it reach room temperature before beating it in the electric mixer. The buttercream will break, but then it will come together beautifully.
Assemble the Cake
  1. Split each cake layer in half, and spread one-third of the marmalade over each of the interior layers. Crumb coat the cake,then chill for 30 minutes. Remove after 30 minutes and fuly frost the cake.
  2. After frosting the cake, gently press the toasted, buttered pecans against the sides of the cake with your fingers.
  3. This cake keeps very well, in a cake saver in the refrigerator for up to 5 days. The cake should come to room temperature before serving.
  4. HOW TO ASSEMBLE A LAYER CAKE
  5. Assembling a layer cake seems as though it would be pretty straight forward, but there are a few tips I use so that my results look consistent and professional.

Orange Pecan Matzo Meal Macarons
Prep time: 
Cook time: 
Total time: 
Yield: About 25 macarons (more or less depending on the size)
 
Macaron shells adapted from Tartelette
ingredients:
Orange Pecan Matzo Meal Macarons
  • 1 cup powdered sugar
  • ½ cup almond meal
  • ¼ cup toasted, ground pecans
  • 2 tablespoons matzo meal
  • 2 large egg whites (aged overnight, at the least - I age them 48 hours)
  • 3 tablespoons granulated sugar
  • 1 tsp finely grated, dried orange zest, powdered (dry zest in a 200F oven for about 30-40 minutes, then grind until powder like consistency, or dry strips of the peel minus the pith, grind to a powder, use one teaspoon and bottle the rest for all kinds of uses)
  • orange food coloring (optional)
Burnt Orange Marmalade Buttercream Filling
  • 1 half recipe burnt orange buttercream, recipe above
  • 1 half recipe caramel orange marmalade, recipe above
  • orange food coloring (if not coloring the shells)
directions:
Make Macarons
  1. In a stand mixer fitted with the whisk attachment, whip the egg whites to a foam, gradually add the sugar. Do not overbeat your meringue or it will be too dry. You should have glossy peaks that bend at the tip.
  2. Place the powdered sugar, almond meal, ground pecans, matzo meal and dried orange zest in a food processor and give them a good pulse until everything is finely ground.
  3. Add them to the meringue along with some orange food coloring, if using. Fold all carefully until you obtain a batter that falls back on itself after counting to 10. The whole process should not take more than 50 strokes. Test a small amount on a plate: if the tops flattens on its own you are good to go. If there is a small peak, give the batter a couple of turns.
  4. Fill a pastry bag fitted with a plain tip (Ateco #807 or #809) with the batter and pipe small rounds (1.5 inches in diameter) onto parchment paper or silicone mats lined baking sheets. Let the macarons sit out for 30 minutes to an hour to harden their shells a bit. In the meantime, preheat the oven to 300F.
  5. When ready, bake for 15 to 20 minutes, depending on their size. Let cool. If you have trouble removing the shells, pour a couple of drops of water under the parchment paper while the sheet is still a bit warm and the macarons will lift up more easily do to the moisture. Don't let them sit there in it too long or they will become soggy. Once baked and if you are not using them right away, store them in an airtight container out of the fridge for a couple of days or in the freezer.
  6. To fill: pipe or spoon about 1 tablespoon of burnt orange marmalade buttercream in the center of one shell and top with another one.
Make the Filling and Fill the Macarons
  1. Combine the buttercream and caramel orange marmalade, then pipe or spoon onto every other macaron cookie. Top with another macaron cookie. If you don't color the shells orange, add a few drops of orange food color to the buttercream for contrast, if desired.


Tender, fluffy and moist roasted butter pecan cake with an orange caramel filling that tastes like the best orange candy ever. Oh, and the white orange frosting is pretty good too! #orangecake #butterpecancake #butterpecan #orange #cake #orangepecan


Bookmark and Share

Posted in Cakes, Cookies, Giveaway | Tagged , , , , , , , , , , , | 81 Comments