Strudel and StrIUdel – Strudel meets BBQ Pork, plus Pineapple Cheese Strudel

balloonsBefore I begin my adventures in strudel and strudeling, I’d like to preface this entry by letting you all know that today (May 27th – I posted this 20 minutes early) is my 1 year Blogiversary.  Time sure flies since it seems like just yesterday that I started this blog.  OK, balloons, streamers, whoot whoots, et al.  Yay for me *twirling finger*.

Now onto the important stuff. YES, the title of this entry is a little confusing isn’t it? For this month’s Daring Bakers Challenge we were challenged to make a strudel the authentic way; authentic as in rolling and stretching out a somewhat small piece of dough to 2 by 3 feet across a table until it’s so paper thin, you could read the NY Times through it without having to even squint.  We’re talking phyllo dough thin here!

Now, I’ve seen this done many times before, but my first thought was always the same..

Not in a million years, unless I have at least three people with NO fingernails and a soft touch, helping me.

Well, I had none of the above, but I had a rolling pin and my knuckles.  I’ve made many a strudel in my lifetime, but I always use phyllo dough, so this was definitely a first for me, and a daunting first at that!

Homemade and stretched strudel dough.

Unfortunately, unlike most of the Daring Bakers, I was only able to get this dough to 2 by a little over 1 foot, and it was so thin, I could barely lift it without tearing it.  I marveled at how some of my fellow Daring Bakers were able to stretch this dough into giant sheets of translucent perfection.  They could probably make 20 wrap around skirts with it, or end up with enough ‘stretch’ to turn out the largest strudel ever known to man, resulting in some kind of strudel world record.  Howdchoo all do that??

Char Siu Pork and Sauce (BBQ Chinese Pork) for Char Siu Strudel!

Alright, back to my somewhat confusing title.  We were given full reign when it came to fillings for the strudel, the dough being the main factor.  I decided I would attempt both a sweet and savory strudel, edging on tropical with a pineapple-cheese strudel, but going utterly fusion crazy with the savory, as in a Char SIU (get it,Striudel?) pork filling with water chestnuts and scallions.

For those who don’t know, Char Siu pork is the base for the filling you find in Char Siu Bao, those delicious steamed or baked buns you find at Dim Sum, Asian bakeries, and any pork you find in any dish containing pork at your local Chinese takeout; you know, the meat with the reddish tinge in your rice?

Let’s just say that China and Austria make a lovely couple in my savory take on this preparation.

Asian BBQ Pork (Char Siu) Strudel!

Before I continue to ramble on, how could I forget the ‘paragraph’? The DB-BOT has yet to infiltrate the DC challenge, so that was a little less typing on my part, but Big Brother is watching keenly over this one, so here we go…!

The May Daring Bakers’ challenge was hosted by Linda of make life sweeter! and Courtney of Coco Cooks. They chose Apple Strudel from the recipe book Kaffeehaus: Exquisite Desserts from the Classic Cafés of Vienna, Budapest and Prague by Rick RodgersThank you for a great challenge, and I DO mean CHALLENGE, Courtney and Linda!

Two takes on homemade strudel! BBQ pork strudel and Pineapple Cheese strudel!

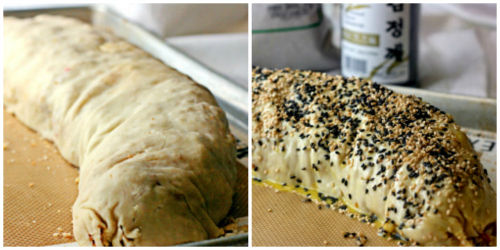
Due to the amount of Char Siu filling, and the fact that I could not elongate, prolongate, roll, pull, plead with, or beg that damn dough to stretch more than 2 feet, I was only able to achieve about two layers.  Not only that, but my dough stuck to the well floured white cotton sheet I used.  With each half roll, the Char Siu filling just dying to burst out and turn the sheet crimson, I delicately chiseled the dough off the sheet with a bench scraper, millimeter by millimeter across the roll, to release it without tearing.  That in itself was a feat, and I could have swam across the English Channel and back in the time it took.

With each release, the dough rolling over cleanly, I let out an audible “YESSSS!” a la Marv Albert prior to his back biting follies.  Regardless, it still turned out ‘okay’ looking and was devoured by all.

Asian BBQ Pork (Char Siu) Strudel!

With that said, when I decided to go with the Char Siu Pork and sauce, I contemplated panko bread crumbs, but then thought..Chinese, Japanese and Austrian? Hmm..there could be trouble in that menage a trois, a la Jackie Chan, Michiko Nishiwaki, and Arnold Schwarzenegger fighting over who gets to play the action hero, so I just used some fresh, plain, toasted bread crumbs as the recipe suggested, and decided to leave Japan for another day or strudel.  A topping of egg wash, coarse sea salt and black and white sesame seeds was the finishing touch.

A friend made a good point.  Why wrap up the delicious char siu pork in strudel dough when there’s barely any strudel dough (due to my inability to stretch the dough to give me loads of layers)? He’s right, but I just felt like it. Had I gotten more strudel layers, it would have been better. Maybe? Yeah, this char siu pork is pretty darn amazing on its own; no need for any kind of wrapper.

I should have just done my savory strudel with vegetables or seafood, like a spinach crab or shrimp strudel, or maybe something ‘potatoey’ with cheese and maybe beef, BUT, I do have a pineapple cheese strudel; UP NEXT!

Asian BBQ Pork (Char Siu) Strudel!

SO, I had a slightly easier time with the dough for the pineapple cheese strudel, as in 2 by 2 feet, which gave me about 3 to 4 layers.  But, you know the old adage..practice makes perfect, and now that I’ve gotten the technique that I avoided for so long, out of my system, there just might be plenty of strudel making in coming months.  I’ll do this until I master it and achieve layers upon layers upon layers of flaky love.

Wait, who am I kidding? That will never happen.  I’m guessing there may be one or two more homemade strudel dough stretchings in my future, and that’s being generous. I think I’ll stick to phyllo when I get the urge to strudel splurge.

Speaking of love, I haven’t given much attention to my pineapple-cheese strudel, so, here she is.  Yes, I’ve decided this strudel is of the female persuasion, while it seems apropos that the pork strudel is a guy. Heh.

Homemade Pineapple Cheese Strudel

By the way, the recipe for the pineapple-cheese strudel is straight from my late paternal grandma’s weathered recipe box, with a few tweaks by me, like cutting the cream cheese with chevre.

To finish it off, I brushed the top with reduced pineapple juice and a little sanding sugar, and after baking and cooling, plated it with a take on Claudia Fleming’s passion fruit caramel, substituting pineapple for the passion fruit.

Homemade Pineapple Cheese Strudel

How to Make Strudel

I can’t help thinking of Apfelkuchen, this easy German Apple cake my friend’s Mom, who was from Weisbaden, used to make. Even better than French Apple Cake, IMO.

Apple strudel
from “Kaffeehaus – Exquisite Desserts from the Classic Cafés of Vienna, Budapest and Prague” by Rick Rodgers

Preparation time
Total: 2 hours 15 minutes – 3 hours 30 minutes

15-20 min to make dough
30-90 min to let dough rest/to prepare the filling
20-30 min to roll out and stretch dough
10 min to fill and roll dough
30 min to bake
30 min to cool

Apple Filling
2 tablespoons (30 ml) golden rum
3 tablespoons (45 ml) raisins
1/4 teaspoon ground cinnamon
1/3 cup plus 1 tablespoon (80 g) sugar
1/2 cup (1 stick / 115 g) unsalted butter, melted, divided
1 1/2 cups (350 ml) fresh bread crumbs
strudel dough (recipe below)
1/2 cup (120 ml, about 60 g) coarsely chopped walnuts
2 pounds (900 g) tart cooking apples, peeled, cored and cut into ¼ inch-thick slices (use apples that hold their shape during baking)

1. Mix the rum and raisins in a bowl. Mix the cinnamon and sugar in another bowl.

2. Heat 3 tablespoons of the butter in a large skillet over medium-high. Add the breadcrumbs and cook whilst stirring until golden and toasted. This will take about 3 minutes. Let it cool completely.

3. Put the rack in the upper third of the oven and preheat the oven to 400°F (200°C). Line a large baking sheet with baking paper (parchment paper). Make the strudel dough as described below. Spread about 3 tablespoons of the remaining melted butter over the dough using your hands (a bristle brush could tear the dough, you could use a special feather pastry brush instead of your hands). Sprinkle the buttered dough with the bread crumbs. Spread the walnuts about 3 inches (8 cm) from the short edge of the dough in a 6-inch-(15cm)-wide strip. Mix the apples with the raisins (including the rum), and the cinnamon sugar. Spread the mixture over the walnuts.

4. Fold the short end of the dough onto the filling. Lift the tablecloth at the short end of the dough so that the strudel rolls onto itself. Transfer the strudel to the prepared baking sheet by lifting it. Curve it into a horseshoe to fit. Tuck the ends under the strudel. Brush the top with the remaining melted butter.

5. Bake the strudel for about 30 minutes or until it is deep golden brown. Cool for at least 30 minutes before slicing. Use a serrated knife and serve either warm or at room temperature. It is best on the day it is baked.

Strudel dough
from “Kaffeehaus – Exquisite Desserts from the Classic Cafés of Vienna, Budapest and Prague” by Rick Rodgers

1 1/3 cups (200 g) unbleached flour
1/8 teaspoon salt
7 tablespoons (105 ml) water, plus more if needed
2 tablespoons (30 ml) vegetable oil, plus additional for coating the dough
1/2 teaspoon cider vinegar

DIRECTIONS
1. Combine the flour and salt in a stand-mixer fitted with the paddle attachment. Mix the water, oil and vinegar in a measuring cup. Add the water/oil mixture to the flour with the mixer on low speed. You will get a soft dough. Make sure it is not too dry, add a little more water if necessary.
Take the dough out of the mixer. Change to the dough hook. Put the dough ball back in the mixer. Let the dough knead on medium until you get a soft dough ball with a somewhat rough surface.

2. Take the dough out of the mixer and continue kneading by hand on an unfloured work surface. Knead for about 2 minutes. Pick up the dough and throw it down hard onto your working surface occasionally.
Shape the dough into a ball and transfer it to a plate. Oil the top of the dough ball lightly. Cover the ball tightly with plastic wrap. Allow to stand for 30-90 minutes (longer is better).

3. It would be best if you have a work area that you can walk around on all sides like a 36 inch (90 cm) round table or a work surface of 23 x 38 inches (60 x 100 cm). Cover your working area with table cloth, dust it with flour and rub it into the fabric. Put your dough ball in the middle and roll it out as much as you can.

Pick the dough up by holding it by an edge. This way the weight of the dough and gravity can help stretching it as it hangs. Using the back of your hands to gently stretch and pull the dough. You can use your forearms to support it.

4. The dough will become too large to hold. Put it on your work surface. Leave the thicker edge of the dough to hang over the edge of the table. Place your hands underneath the dough and stretch and pull the dough thinner using the backs of your hands. Stretch and pull the dough until it’s about 2 feet (60 cm) wide and 3 feet (90 cm) long, it will be tissue-thin by this time. Cut away the thick dough around the edges with scissors. The dough is now ready to be filled.

Tips
– Ingredients are cheap so we would recommend making a double batch of the dough, that way you can practice the pulling and stretching of the dough with the first batch and if it doesn’t come out like it should you can use the second batch to give it another try;
– The tablecloth can be cotton or polyster;
– Before pulling and stretching the dough, remove your jewelry from hands and wrists, and wear short-sleeves;
– To make it easier to pull the dough, you can use your hip to secure the dough against the edge of the table;
– Few small holes in the dough is not a problem as the dough will be rolled, making (most of) the holes invisible.

Char Siu Pork (Strudel or not)
Prep time: 
Cook time: 
Total time: 
Yield: 2 lbs char siu pork
 
Pork marinating time: 2 - 4 hours or overnight
For just the Char Siu Pork, (Red Roast Pork) omit the strudel dough.
ingredients:
  • Dough from apple strudel recipe above (only if you're making the pork strudel. Otherwise, the pork on its own is AMAZING!)
Red Roast Pork
  • 2 pounds boneless pork butt or shoulder OR a nice 2 lb pork tenderloin
  • ⅔ cup chopped water chestnuts or 1 cup sliced water chestnuts
  • ½ cup chopped scallions
Red Roast Pork Marinade
  • 2 tablespoons firmly packed brown sugar
  • 2 tablespoons honey
  • ¼ cup ketchup
  • ½ teaspoon 5-spice powder
  • 2 tablespoons soy sauce
  • 2 tablespoons hoisin sauce
  • 1 tablespoon dry sherry
  • 2 garlic cloves - minced
  • 1 tablespoon fresh minced ginger
  • 1 teaspoon toasted sesame oil
  • About 2 teaspoons of red food coloring or 2 drops of red gel paste (optional)
Red Roast Pork Sauce
  • 2 tablespoons cornstarch
  • 2 tablespoons dry sherry
  • 2 tablespoons peanut oil
  • ⅔ cup chopped onion
  • 2 large cloves of garlic, minced
  • 2 tablespoons low sodium soy sauce
  • 2 tablespoons hoisin sauce
  • 1 teaspoon toasted sesame oil
  • ½ cup chicken stock or broth
  • Additional red food coloring or gel paste if desired
    egg wash
    black and white sesame seeds
directions:
Marinate and Roast the Pork
  1. Preheat oven to 375 F. Line a sheet pan with foil or parchment paper.
  2. In a blender container or food processor bowl with metal blade, combine all the marinade ingredients except pork, water chestnuts and scallions; blend until smooth. Place pork in a zip lock bag and pour marinade over it. Let it marinate for at least 2-4 hours, or overnight.
  3. Remove pork from marinade and generously brush with the marinade, reserving remaining marinade as a basting sauce. Place pork butt on lined pan and bake at 375 F for 30 minutes. Remove pork from oven. Baste pork butt or shoulder with remaining basting sauce. Bake an additional 20 - 30 minutes or until no longer pink in the center, or until the internal temperature reaches 145 degrees F. Remove from oven, let cool.
  4. When cool, chop the pork into small cubes or slices and stir in water chestnuts and scallions. Place in the refrigerator until ready to combine with the sauce
Make the Sauce
  1. In small bowl or cup, combine the 2 tablespoons of cornstarch and 2 tablespoons sherry. Blend well.
  2. Heat oil in wok or large skillet over high heat. Add onion, cook and stir 2 to 3 minutes or until onion begins to soften and turn slightly golden. Add garlic, and cook for another minute (be careful it doesn't burn). Add the 2 tablespoons soy sauce and 2 tablespoons hoisin sauce to the pan and stir to coat. Add broth and toasted sesame oil and stir until combined. Let cook for about 1 more minute. Stir in food coloring if using.
  3. Stir in cornstarch mixture, and cook while stirring until mixture begins to thicken. Remove from heat, and stir in the chopped pork. Transfer to a bowl, and let cool, then refrigerate until ready to use for strudel, or any preparation like pork buns or fried rice. OR just eat as is because it's phenomenal as a main dish!
Make the strudel
  1. Follow the exact directions from apple strudel recipe above subbing the char siu pork for the apple filling, but still using the breadcrumbs. The only difference will be the addition of black and white sesame seeds and coarse sea salt to top the egg washed strudel prior to baking.

Pineapple Cheese Strudel using Phyllo
Prep time: 
Cook time: 
Total time: 
Yield: 2 strudels
 
ingredients:
Pineapple Filling
  • ½ teaspoon salt
  • 3 tablespoons cornstarch
  • ⅓ cup sugar
  • 1 tablespoon sugar
  • 1 can crushed pineapple (20 ounces), packed in its own juice, if fresh pineapple is not available. Set aside 3 tablespoons of the juice for brushing on strudels before baking.
  • 4 tablespoons butter
Cheese Filling
  • 12 ounces of cream cheese, at room temperature
  • 4 ounces chevre
  • ½ cup powdered sugar
  • 1 egg
Strudel
  • 12 sheets phyllo dough
  • ¾ cup melted unsalted butter
  • Granulated, sanding or turbinado sugar, for sprinkling on top
directions:
Make the Pineapple Filling:
  1. In heavy saucepan combine cornstarch, sugar and salt. Add the can of pineapple and mix everything together until the pineapple is coated well. Cook over medium heat until mixture comes to a boil, stirring constantly.
  2. Once mixture comes to a boil continue stirring constantly for approximately 5 minutes, or until thickened and like lemon curd.Remove from heat and add butter, stirring to melt.
  3. Let cool, then place a piece of plastic wrap directly on the surface. Chill in the refrigerator until set.
Make the Cheese Filling:
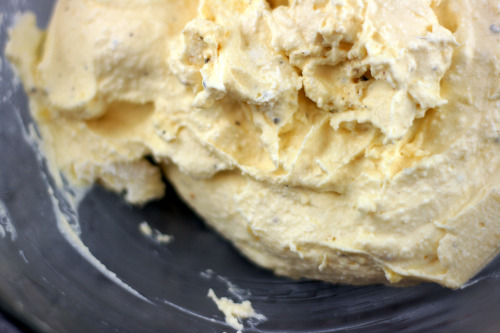
  1. Combine the cream cheese, chevre and powdered sugar in a stand mixer bowl. With the paddle attachment beat the mixture on medium speed until light and creamy. Add the egg and beat until well blended.
Assemble and Bake the Strudel:
  1. Preheat oven to 375 degrees F. Line a baking sheet with parchment paper.
  2. Lay a sheet of phyllo on a surface with the long end facing you. (Keep remaining phyllo under a damp tea towel.) Brush with melted butter. Lay another sheet on top and continue brushing and layering until you have 6 sheets of phyllo layered and buttered.
  3. Spoon half the cheese filling onto the bottom third of the phyllo, leaving a 6-inch border along the bottom and 1½-inch border along the sides. Form the cheese mixture into a log. Using the handle of a wooden spoon, press the log in half and spoon half the pineapple in the center space created. Roll the strudel away from you, turning once. Fold the sides in (letter style), securing well, and then roll it the rest of the way.
  4. Repeat all of the above with the remaining phyllo and fillings to make another strudel.
  5. Place the 2 strudels side by side, at least 2 inches apart, on a large, parchment lined (12 x 17) baking sheet seam side down. Brush with any remaining melted butter and reserved pineapple juice and sprinkle with granulated sugar, Cut two small slits in the top of the phyllo to let steam escape.
  6. Bake for 17 to 20 minutes or until golden and puffy. Remove from oven and let cool.

Well…that’s all folks!

Red Roast BBQ Pork (Char Siu Pork). Tender, melt-in-your-mouth pork shoulder, almost like candy! #pork #charsiu #porkshoulder #charsiupork


Bookmark and Share

Posted in Breakfast, Daring Bakers, Dessert, Dinner, Fruit, Lunch, Pastry, Pork | Tagged , , , , , , , , , , , , | 121 Comments

Zuni Cafe Ricotta Gnocchi (Gnudi) – The First Daring Cooks Challenge

Yeah, I know, not the most original title, is it? To be honest, I barely pulled this one out.  Some life altering stuff has happened in the past two weeks that has frozen me completely. Without getting into details, I NEARLY lost someone I love with all my heart (Dad). It’s a good thing I started this challenge 3 weeks ago; making the homemade ricotta cheese, then the ricotta gnocchi, and freezing them, or else this entry would probably cease to exist.

Homemade Ricotta for Ricotta Gnocchi or Gnudi (dumplings) from the Zuni Cafe CookbookIt started with this…remember this?  Very dry Homemade Ricotta is definitely the best option for these fluffy dumplings.

To add insult to injury (literally), I had to see my surgeon today because my knee felt wobbly and it hurt to walk. He fiddled with it and immediately ordered X-Rays. Turns out my knee has weakened because I haven’t done much with it the past two weeks, and I’m not getting enough nutrition due to the usual loss of appetite that plagues a person when they almost lost their Dad. OK, I’m stopping here since I don’t want to depress anyone any longer. However, I’m not feeling my usual chatty self, so anything funny or witty might be in low supply. How funny is it that I’m mixing photos of food in with my tales of woe? Score 1 for the use of the word ‘funny’ twice!

Homemade Ricotta Gnocchi or Gnudi from the Zuni Cafe Cookbook

On to the brand new, first ever, Daring Cooks Challenge. I’ll just start by adding THE paragraph. Wait there is no paragraph. Could it be that the DB-Bot has snubbed the DCC? Oh well, I’ll post what they posted in the DBK forum.

We have chosen a recipe from the stunning cookbook by Judy Rodgers, named after her restaurant, The Zuni Café Cookbook.

Homemade Ricotta Gnocchi or Gnudi from the Zuni Cafe Cookbook                                        I added some black pepper to the batter

OK, that was easy, but a ‘recipe’? I’ll go one further and add that they have chosen the Ricotta Gnocchi from The Zuni  Café Cookbook.  Thanks Lis and Ivonne!

When this ricotta gnocchi challenge was announced, I had several sauces in mind, such as an amazing turkey sausage bolognese or wild mushroom ragu.  I was also going to add some vanilla bean to another half batch of gnocchi batter (yep, this recipe for gnocchi is literally a batter) and float them in a chocolate soup; a dumpling soup for the sweet tooth.  But due to the aforementioned scary circumstance, I lost the desire, so I quickly thought something up this morning, prior to my doctor appointment.

I roasted some fresh corn and then some tomatoes with olive oil (which gave me caramelized tomatoes! The sweet factor was amazing!), salt and pepper (always season!) and sauteed some cremini, oyster, and shiitake mushrooms with butter, shallots and a little dry white wine to deglaze. I also took advantage of my sprouting herb garden and julienned some fresh sage to top off whatever it turned out to be. Finally, I shredded and baked some parmesan cheese (frico) to make little bowls and curled crisps, still not knowing where it was going to end up, but hey, at least I had something percolating for my ricotta gnocchi.

Homemade Ricotta Gnocchi or Gnudi from the Zuni Cafe Cookbook                    I tried to form little squares or shells, but the batter was too delicate, so I sort of turned them into Gnudi.

As I surveyed everything in front of me, while my mother was in my kitchen under-cooking and annihilating my gnocchi (DAMN), I started to think about what I could do. Using what ricotta gnocchi I could salvage, which was small considering they were not cooked properly, I took a parmesan ‘frico’ bowl and started to build, and build, and build.  Soon I had two little towers of wild mushrooms, corn, tomato, ricotta gnocchi and sage.  Oooh, pretty – now what would make it better? Of course, a drizzle of  white truffle oil! I usually don’t flip over truffle oil because there’s not many that are good, but the one I used was okay, and it just seemed to fit. But, seriously, try not to use truffle oil unless you happen to have one gifted to you and you’re desperate for something; anything!

But what to do with the rest of the ricotta gnocchi? AHA, gratinee! I tossed the rest of the ricotta gnocchi (now known as gnudi) with the rest of the mushrooms, corn, and tomatoes, divided them into gratinee dishes, poured on some cream, black pepper, and a good sprinkling of shredded parmesan cheese, and under the broiler they went. A bit of itty bitty ripped baby sage leaves finished it off.  The gratinees were served with the remaining parmesan crisps.

I did it, I managed to pull this one out even though I feel like a zombie.  Score another one for me and my almost bleeding heart (insert empty sarcasm).

Homemade Ricotta Gnocchi or Gnudi from the Zuni Cafe Cookbook

I really can’t review this ricotta gnocchi properly since most of it was under-cooked, but hey, everyone else seemed to like it, so I’ll just say they are extremely delicate. I wish I had the photos to show you how much so, but at the time I was making them there was no one around to hold the camera and snap away while I scooped with the spoon and rolled them in flour. Not to mention, no boiling photos either, since 1) As you already know, I can’t use the kitchen yet, and 2) I wanted to spare you all the mess dear old mom made of them. BUT, it was sweet of her to help since she hates to cook.

UPDATE: I made the ricotta gnocchi again, at a later time when I was finally able to walk again and cook them myself. So, light, fluffy, flavorful and tender! Zuni’s batter gnocchi is definitely worth its weight in gold! See the photo of them in a tomato butter sauce beneath the recipe!

Finally, I just snapped a few photos this time, as opposed to the usual 100, not even caring about the lighting or settings. Just for the hell of it, even though I knew they weren’t up to par, I submitted one to foodgawker.  As expected, it was rejected as ‘dull and unsharp’, and I thought to myself .. Isn’t it amazing how my photo reflects how I feel at this time? 

Homemade Ricotta Gnocchi or Gnudi from the Zuni Cafe Cookbook

Homemade Ricotta Gnocchi or Gnudi from the Zuni Cafe Cookbook

How to Make Zuni Cafe Ricotta Gnocchi

Equipment required:

– Sieve
– Cheesecloth or paper towels
– Large mixing bowl
– Rubber spatula
– Tablespoon
– Baking dish or baking sheet
– Wax or parchment paper
– Small pot
– Large skillet
– Large pan or pot (very wide in diameter and at least 2 inches deep)

Videos that might help:

Judy Rodgers Gnocchi Demo
Making fresh ricotta demo
Making ricotta gnocchi

Zuni Cafe ONE BOWL Ricotta Gnocchi (Gnudi)
Prep time: 
Cook time: 
Total time: 
 
ingredients:
For the ricotta gnocchi:
  • 1 pound (454 grams/16 ounces) fresh ricotta (2 cups)
  • 2 large cold eggs, lightly beaten
  • 1 tablespoon (1/2 ounce) unsalted butter
  • a pinch or two of freshly grated nutmeg, or a few pinches of grated lemon zest (both optional)
  • ½ ounce Parmigiano-Reggiano, grated (about ¼ cup very lightly packed)
  • about ¼ teaspoon salt (a little more if using kosher salt)
  • all-purpose flour for forming the gnocchi
For the ricotta gnocchi sauce:
  • 8 tablespoons (227 grams/1/4 pound/4 ounces) butter, sliced
  • 2 teaspoons water
directions:
Step 1 (the day before you make the gnocchi): Preparing the ricotta.
  1. If the ricotta is too wet, your gnocchi will not form properly. In her cookbook, Judy Rodgers recommends checking the ricotta’s wetness. To test the ricotta, take a teaspoon or so and place it on a paper towel. If you notice a very large ring of dampness forming around the ricotta after a minute or so, then the ricotta is too wet. To remove some of the moisture, line a sieve with cheesecloth or paper towels and place the ricotta in the sieve. Cover it and let it drain for at least 8 hours and up to 24 hours in the refrigerator. Alternatively, you can wrap the ricotta carefully in cheesecloth (2 layers) and suspend it in your refrigerator for 8 to 24 hours with a bowl underneath to catch the water that’s released. Either way, it’s recommended that you do this step the day before you plan on making the gnocchi.
Step 2 (the day you plan on eating the ricotta gnocchi): Making the ricotta gnocchi dough.
  1. To make great gnocchi, the ricotta has to be fairly smooth. Place the drained ricotta in a large bowl and mash it as best as you can with a rubber spatula or a large spoon (it’s best to use a utensil with some flexibility here). As you mash the ricotta, if you noticed that you can still see curds, then press the ricotta through a strainer to smooth it out as much as possible.
  2. Add the lightly beaten eggs to the mashed ricotta.
  3. Melt the tablespoon of butter. As it melts, add in the sage if you’re using it. If not, just melt the butter and add it to the ricotta mixture.
  4. Add in any flavoring that you’re using (i.e., nutmeg, lemon zest, herbs, etc.). If you’re not using any particular flavoring, that’s fine.
  5. Add the Parmigiano-Reggiano and the salt.
  6. Beat all the ingredients together very well. You should end up with a soft and fluffy batter with no streaks (everything should be mixed in very well).
Step 3: Forming the ricotta gnocchi.
  1. Fill a small pot with water and bring to a boil. When it boils, salt the water generously and keep it at a simmer. You will use this water to test the first gnocchi that you make to ensure that it holds together and that your gnocchi batter isn’t too damp.
  2. In a large, shallow baking dish or on a sheet pan, make a bed of all-purpose flour that’s ½ an inch deep.
  3. With a spatula, scrape the ricotta mixture away from the sides of the bowl and form a large mass in the center of your bowl.
  4. Using a tablespoon, scoop up about 2 to 3 teaspoons of batter and then holding the spoon at an angle, use your finger tip to gently push the ball of dough from the spoon into the bed of flour.
  5. At this point you can either shake the dish or pan gently to ensure that the flour covers the gnocchi or use your fingers to very gently dust the gnocchi with flour. Gently pick up the ricotta gnocchi and cradle it in your hand rolling it to form it in an oval as best as you can, at no point should you squeeze it. What you’re looking for is an oval lump of sorts that’s dusted in flour and plump.
  6. Gently place your ricotta gnocchi in the simmering water. It will sink and then bob to the top. From the time that it bobs to the surface, you want to cook the gnocchi until it’s just firm. This could take 3 to 5 minutes.
  7. If your ricotta gnocchi begins to fall apart, this means that the ricotta cheese was probably still too wet. You can remedy this by beating a teaspoon of egg white into your gnocchi batter. If your gnocchi batter was fluffy but the sample comes out heavy, add a teaspoon of beaten egg to the batter and beat that in. Test a second gnocchi to ensure success.
  8. Form the rest of your ricotta gnocchi. You can put 4 to 6 gnocchi in the bed of flour at a time. But don’t overcrowd your bed of flour or you may damage your gnocchi as you coat them.
  9. Have a sheet pan ready to rest the formed gnocchi on. Line the sheet pan with wax or parchment paper and dust it with flour.
  10. You can cook the gnocchi right away, however, Judy Rodgers recommends storing them in the refrigerator for an hour prior to cooking to allow them to firm up.
Step 4: Cooking the ricotta gnocchi.
  1. Have a large skillet ready to go. Place the butter and water for the sauce in the skillet and set aside.
  2. In the largest pan or pot that you have (make sure it’s wide), bring at least 2 quarts of water to a boil (you can use as much as 3 quarts of water if your pot permits). You need a wide pot or pan so that your gnocchi won’t bump into each other and damage each other.
  3. Once the water is boiling, salt it generously.
  4. Drop the gnocchi into the water one by one. Once they float to the top, cook them for 3 to 5 minutes (as in the case with the test gnocchi).
  5. When the gnocchi float to the top, you can start your sauce while you wait for them to finish cooking.
  6. Place the skillet over medium heat and melt the butter. Swirl it gently a few times as it melts. As soon as it melts and is incorporated with the water, turn off the heat. Your gnocchi should be cooked by now
  7. With a slotted spoon, remove the ricotta gnocchi from the boiling water and gently drop into the butter sauce. Carefully roll in the sauce until coated. Serve immediately.

Variations: For the ricotta gnocchi, you can flavor them however you wish. If you want to experiment by adding something to your gnocchi (i.e., caramelized onion, sundried tomato), feel free to do so. However, be forewarned, ricotta gnocchi are delicate and may not take well to elaborate additions. For the sauce, this is your chance to go nuts. Enjoy yourself!

Freezing the ricotta gnocchi: If you don’t want to cook your gnocchi right away or if you don’t want to cook all of them, you can make them and freeze them. Once they are formed and resting on the flour-dusted, lined tray, place them uncovered in the freezer. Leave them for several hours to freeze. Once frozen, place them in a plastic bag. Remove the air and seal the bag. Return to the freezer. To cook frozen gnocchi, remove them from the bag and place individually on a plate or on a tray. Place in the refrigerator to thaw completely. Cook as directed for fresh gnocchi.

Easy Ricotta Gnocchi. No kneading, resting, rolling or cutting dough!I made these ricotta gnocchi smaller and served them with a simple, but amazing tomato butter sauce. Man, tomato sauce plays so well with butter! UPDATE –  I made these last night with an All’amatriciana sauce for an All’amatriciana Gnocchi, which I usually make with spaghetti for a beautiful plate!


Bookmark and Share

The EASInocchi you will ever make. All in one bowl, no kneading, rolling or cutting, and so fluffy and delicious! #gnocchi #ricottagnocchi #ricottacheese #ZuniCafe #ricottadumplings #dumplings #Itlian
Posted in Daring Cooks, Dinner, Italian, Lunch, Pasta, Vegetables | Tagged , , , , , , , , , , , , | 66 Comments

Homemade Ricotta Cheese – Eating my Curds and Ditching the Whey

I’ve always wanted to dabble a bit in cheese making, and after seeing a recipe for homemade ricotta cheese, I knew I had to try it! In the end, it not only worked out beautifully, but it served another purpose, a pretty important one at that!.

Last Friday I was babysitting my amazing and adorable 10-month old nephew.  I love this kid to pieces, so I look forward to being able spend time with him, especially since I have all the time in the world at this juncture!  Naturally, the best part of being with him is cuddling him and playing with him, and the diaper changes are no big whoop because nothing ‘baby Zach’ is gross to me.  He’s my little banana puff puff!

Anyway, one game he really loves I call ‘Bouncy Bouncy Boo Boo’.  I lie on my back and lift him up and down, bringing him all the way to my face so we touch noses, then all the way back up so he can ‘fly’.

While we do this, I repeat “BOUNCY BOUNCY BOO BOO” sporadically, in a silly voice, which makes him laugh hysterically.  His sweet and goofy laughter just fills my heart and makes it impossible not to smile so wide that my cheeks hurt.  Well, he got into such a fit of laughter during Bouncy Bouncy Boo Boo last Friday, that when I brought him back down to touch noses, my gaping grin so wide that you could probably see my wisdom teeth from a mile away, he suddenly dropped his head full force, right onto my right front tooth.  PAIN plus a cracking noise, then numbness.  It felt like an anvil had crashed through my roof and onto that tooth.

Homemade Ricotta Cheese                                               My sis and baby boulder head

Of course my first concern was him, but he was fine, still laughing.  The babe has one hard head!  After checking his head, looking into his eyes, and panicking briefly, I afforded myself a nano-second to examine my tooth.  A little blood, and boy did it hurt, but of most concern, after him, was the fact that it felt a little loose. OH NO! (stereotype alert) Is it time to pack me off to Appalachia with a case of pork rinds and a banjo?? Should I take up ice hockey? (Disclaimer: This is not meant to hurt or insult anyone. I’m referring to the movie, ‘Deliverance’, not the actual, beautiful and ‘toothy’ people who live in Appalachia.  I never, ever saw a person with a missing tooth when I was there.).

Homemade Ricotta Cheese

Just my luck, my dentist wasn’t going to be back in the office until Wednesday for evening hours, but I was told that if there’s only slight mobility, the tooth will tighten up on its own within a few days to a week and to just stay away from hard foods like apples, hard pretzels etc.  Well, it has tightened up a little, and the pain has subsided, but it still feels weird, so I’m setting up an appointment for Tuesday or Wednesday, just to be safe.

Homemade Ricotta Cheese

Homemade Ricotta Cheese

Because of this, I’ve been existing on soup for the past week. I don’t want to take ANY chance of a chunk of even soft fruit in yogurt jostling that tooth. What a perfect time to try homemade ricotta cheese! It’s soft, no biting down..no gaping hole smile.

Homemade Ricotta Cheese

Technically, this isn’t how ricotta cheese is made, but it tastes exactly like (but better) the ricotta cheese we’re all used to and it IS ricotta cheese. Ricotta (meaning recooked) is usually made out of whey, the liquid separated out from the curds when cheese is made, like mozzarella, and recooked.  In this recipe, you’re using whole milk and cream plus acid to make the ricotta, and discarding the whey (although you can use it in homemade breads, or other preparations which I can’t conjure up at this moment).  This is the perfect time to ask, Can anyone think of any good uses for the liquid whey outside of watering the garden?

I have this weird obsession with waste.

That being said, not only is ricotta cheese easy to make with just 4 ingredients and a super rapid cooking time, but the results are well worth it.  You’ll never want to eat store bought again, well, to a degree, since you don’t always want nor have the time to make cheese  However, it does take quite a bit of milk..as in 8 cups of milk plus 1 cup of cream for a yield of about 2 plus to 3 plus cups ricotta,  OK, maybe you shouldn’t completely rule out store-bought, but trust me, homemade ricotta cheese is well worth tackling every so often, and the fresh, creamy result is to die for.

By the way, my tooth is back to normal, so I may not have to relocate after all.  NOT that I would mind because Appalachia is beautiful. Maybe a second home when I hit the lottery.

Homemade Ricotta Cheese                                      MY ‘soft’ dinner – with honey and black pepper

Finally, there’s another reason I made ricotta cheese from scratch, but you’ll have to stay- tuned to find out (don’t you hate when people do that?) I know I’ve said this before and not come through (I accidentally deleted the photos of what I did with the dark chocolate Valentino, so I will tell you. I paired it with spiced poached pears, walnuts and creme fraiche, plus, the supposed coming soon post on the A-Rod deal), but this time it’s for real.  I think. I hope.

Homemade Ricotta Cheese

Homemade Ricotta Cheese                          

Homemade Ricotta Cheese
Prep time: 
Cook time: 
Total time: 
Yield: 2 plus to 3 plus cups fresh ricotta
 
Straining time: 1 to 2 hours or overnight.
Recipe from Brooklyn Farmhouse
ingredients:
  • 8 cups whole milk
  • 1 cup heavy cream
  • 1 teaspoon kosher or sea salt (more or less to taste)
  • 3 tablespoons fresh lemon juice or white vinegar
directions:
  1. Line a large strainer or sieve with a double layer of cheesecloth * and place the strainer over a large bowl.
  2. In a large pot or saucepan, bring the milk, cream, and salt to a boil over medium heat, stirring occasionally to keep milk mixture from scorching. If you have a good kitchen thermometer, about 180 to 185 F is the ideal temperature to bring it to.
  3. Add all the lemon juice or vinegar, then reduce the heat to low and simmer, stirring gently once or twice, for 2 minutes. The mixture will curdle immediately. When you've got a ton of curds, remove the pot from the heat and let it sit for about 20 minutes to 30 minutes.
  4. After 20 minutes to 30 minutes, slowly pour the mixture into the cheesecloth lined strainer (or, with a slotted spoon, gently spoon out the curds into the cheesecloth lined strainer) and let strain for an hour or two. Do not press down on it, let it strain itself. Discard the liquid whey (or keep it and use it for bread baking!) and refrigerate the ricotta or use immediately. If you want it really dry, wrap it back up with the cheesecloth, leave it in the strainer over the bowl, weighted down with something heavy, and refrigerate overnight.
notes:
* If you can't find cheesecloth, paper coffee filters work well.

Homemade Ricotta Cheese - 4 Ingredients, 2 minutes cooking time. SO much better than store bought! Outside of the typical uses, try it with honey and black pepper!
Bookmark and Share

Posted in Amuse Bouche, Appetizers, Cheese, Dinner, Gluten Free, Lunch | Tagged , , , , , , , , | 96 Comments