Holiday BAKING PALOOZA DOOZA, and my fear of THE TRIPOD.

Today I’ve got a bunch of unique cookies, macarons, and a brownie recipe that will knock your socks off, for your holiday baking! Swedish butter cookies called Mandel Kakor which are twice-baked like biscotti, Tiramisu sandwich cookies, luscious, classic Linzer Tart cookies, Minty Brown Sugar Chocolate Chip Cookies, Brown Butter Melty Middle Chocolate Hunk Cookies, Apple Cider Caramels (some of it used as a filling), and TWO awesome macaron recipes!

Anyway…

To start off, this was supposed to be my entry for Jamie (of Life’s a Feast) and Deeba’s (of Passionate About Baking) MacTweets MacAttack last week.  Now that it’s 10 days late, and pretty much null and void,  I’m turning this post into a holiday baking post with several recipes for amazing holiday cookies, along with the now orphaned macarons meant for the MacTweets challenge.

Plus, a kind of weird tripod phobia story.

So, the obvious; I love cooking and baking. It’s a passion that oozes from my pores; but let’s face it, eventually you realize you can’t give enough away and end up eating it all or throwing a lot of it out so you don’t eat it all.  I’m actually looking forward to the day I have a hungry brood to feed.

That said, I baked all of these goodies in one week. Fortunately, most were given away in holiday cookie baskets, because I most certainly could have finished them off in a week!

Fleur de Sel Cinnamon Caramel Apple Macarons and Holiday Cookie Baking! I've got 5 unique cookie recipes, the best brownies ever, and two unique macaron recipes for your holiday cookie baking!

Fleur de Sel Cinnamon Apple Cider Caramel MacaronsNotice the oozing caramel in some of them? The caramel for those was cooked to about 230-235 F.  I cooked it up to 240ish for the next batch of filling, so no more oozing, although I wouldn’t say ‘oozing’ is a bad thing!

OK, one more diatribe before I get to the macarons.  I must admit something to you all, and it’s weird, really weird.

I’m afraid of my tripod.

For those who don’t know me or haven’t followed this blog, you’re probably thinking “This girl is afraid of a piece of equipment that holds a camera steady? What a freak!”.  For those who do know me and/or my blog, you know I annihilated my knee trying to save my camera when I knocked against THE TRIPOD atop a staircase (because there was a patch of natural light coming through a window on that staircase)  as I was setting up for photos for the Daring Bakers Lavash challenge.

Because of this little phobia, my photos suffer. It’s bad enough I have no natural light, which is all the more reason I need to use a tripod, but one look at this piece of equipment, and I shudder.  Memories of my leg flopping all over the place as I tried to crawl to the phone, and the year I’ve spent rehabilitating that leg, are pretty much the reason.  I need a much sturdier tripod since mine possesses legs that even a modeling agency would call too skinny, and what looks to be balls instead of feet (My father gave it to me. He found it in the attic of an abandoned estate, along with other antique camera equipment, a few years before I was born).

As I look below at the blurry spinach and peppers in my Beef Wellington post, and know this freaky phobia is partially the cause, I have to laugh..really.  If I don’t, I just might scream!!

Fleur de Sel Cinnamon Caramel Apple Macarons and Holiday Cookie Baking! I've got 5 unique cookie recipes, the best brownies ever, and two unique macaron recipes for your holiday cookie baking!

Now that I’ve vented my weird phobia to you all, on to the macarons.  I made two kinds, since I couldn’t decide on one; fleur de sel topped cinnamon macaron shells filled with spiced apple cider caramel, and a pure, fresh roasted maple pumpkin filling between two pumpkin pie spiced macaron shells, topped with spicy toasted Jack Be Little pumpkin seeds, which are the itty bitty baby pumpkins you can hold in your hand.  The seeds are super tiny, perfect to top a macaron shell without any craters forming, but next time I think I’ll use baby pepitas, which are shelled pumpkin seeds.

Salted Apple Cider Caramels and Holiday Cookie Baking! I've got 5 unique cookie recipes, the best brownies ever, and two unique macaron recipes for your holiday cookie baking!Salted Apple Cider Caramels  (I added orange zest and toasted walnuts to make apple cider walnut orange caramels. Totally on a whim and totally worth it!)

The best part of this macaron endeavor was the spiced apple cider caramel filling.  This is because once I cooked it to spreadable filling temp, about 235 – 40 degrees on a candy thermometer, I took out what I needed to fill the macarons and cooked the rest to the soft – medium ball stage, about 250-60, to make buttery soft salted apple cider caramel candies.  You can’t beat one recipe that results in cookies and candy.

I found the recipe for the apple cider caramels HERE, I added ground ginger, cinnamon, nutmeg, and a bit of cardamom to the above recipe, for the ‘spiced’ aspect, and, of course, a sprinkle of crunchy sea salt on top.

'The Whole Pumpkin' Macarons and Holiday Cookie Baking! I've got 5 unique cookie recipes, the best brownies ever, and two unique macaron recipes for your holiday cookie baking!‘The Whole Pumpkin’ Macarons.  I gave them a spritz of orange spray food color for photos, so no, nothing cool here.

Having said all that, I was extremely flattered last month when Kitty of Fahrenheit 350° asked me to participate in her Blogiversary giveaway.  This meant baking something and sending it to the winner, along with a few other bloggers she’d chosen.   The winner, Heather of Utah (no last names here) made out like a bandit.  You should see the loot she hauled in from me!

Every day of the week, for one week, leading up to her Blogiversary, a new blogger was in the spotlight along with the goodies to be sent to the winner.  Isn’t that a great idea? Naturally, as I always do, I went overboard..way overboard, and started experimenting with recipes I’d never tried before.  I wanted to blow the winner away with goodies she wasn’t expecting along with the two cookies I offered up.

BEST EVER BROWNIES and Brown Sugar Mint Chocolate Chip Cookies. Plus, Holiday Cookie Baking! I've got 5 unique cookie recipes, the best brownies ever, and two unique macaron recipes for your holiday cookie baking!                       “Greatest Ever” Brownies and Minty Brown Sugar Chocolate Chip Cookies

One of the cookies I baked was a Tiramisu cookie I got from the Domino’s Sugar site (which is no longer there as of 2015, but I’ve got the recipe for the filling, below, since I did not use their cookie recipe).  Domino’s Sugar sent me a $20.00 gift card for my holiday baking and wanted me to  bake something from their recipe page, or just use their sugar in my holiday baking in general.  Well, no need to ask, since I use Domino’s sugar in all of my baking, and have been doing so since I was in high school.  I’m never, ever without it; brown, dark brown, granulated, powdered etc..so, in retrospect, it was like them asking me to brush my teeth every day.

Apparently this gift card was to help with ingredients for whatever cookie(s), cakes, pies I was going to bake, but the thing is, I’m never without every baking essential possible.  I have everything at all times, always on hand until I run out, in which it’s immediately replaced, unless it’s a rare ingredient that a particular recipe calls for.  When I received this gift card, there was nothing I needed, so I bought lobsters.  Thank you for my awesome lobster dinner, Domino’s Sugar and Hilary from Domino’s Sugar!

           Tiramisu cookies and Holiday Cookie Baking! I've got 5 unique cookie recipes, the best brownies ever, and two unique macaron recipes for your holiday cookie baking!                                The aforementioned Tiramisu cookies

In any event, I didn’t particularly like the cookie part of this Tiramisu cookie recipe, so I used THIS COOKIEminus the nuts (and using mini chocolate chips), BUT, used the fillings from the Domino’s sugar recipe.  Fudgy, creamy, luscious tiramisu in a compact sandwich cookie.  Enough said.

Swedish Biscotti, Linzer Tart Cookies and Holiday Cookie Baking! I've got 5 unique cookie recipes, the best brownies ever, and two unique macaron recipes for your holiday cookie baking!                 Mandel Kakor (I call them Swedish Biscotti), and Raspberry Linzer Tart Cookies

Well, I think I covered every corner as far as my cookie baking went.  Please be sure to stop back December 27th to see my Daring Bakers Gingerbread House (HINT: it won’t be a house).  I have never, ever built one before, so you just might get some laughs.  I have less than 5 days to knock this one out, and I haven’t even made the gingerbread yet.  Wish me luck, because I’ll need it!

Melty Middles Chocolate Chip Cookies and Holiday Cookie Baking! I've got 5 unique cookie recipes, the best brownies ever, and two unique macaron recipes for your holiday cookie baking!

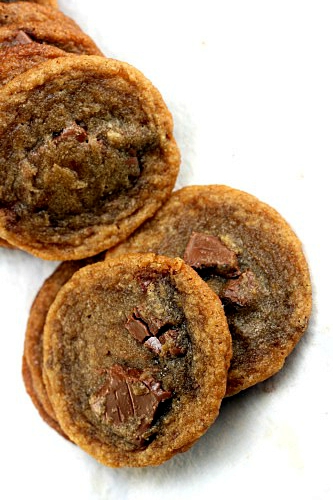
                                         Brown Butter-Melty Middle Milk Chocolate Chunk Cookies

Holiday Cookielicious Baking

Salted Apple Cider Caramels

Raspberry Linzer Tart Cookies

Deep Chocolate Chippy Tiramisu Sandwich Cookies
Prep time: 
Cook time: 
Total time: 
Yield: About 20 sandwich cookies
 
Cookie part adapted from Epicurious
ingredients:
Cookies
  • 1 cup all purpose flour
  • 3 tablespoons unsweetened cocoa powder
  • 1 teaspoon baking soda
  • ½ teaspoon salt
  • ½ cup (1 stick) unsalted butter, room temperature
  • ⅔ cup (packed) golden brown sugar
  • ¼ cup sugar
  • 1 large egg
  • 2 teaspoons water
  • 1 teaspoon vanilla extract
  • 1 to 2 teaspoon(s) instant coffee or espresso powder *
  • 1 cup mini semisweet chocolate chips
Topping
  • ⅓ cup powdered sugar
  • 1 teaspoon unsweetened cocoa powder
Mascarpone Filling
  • 4 oz. mascarpone cheese, at room temperature
  • 3 oz. cream cheese, at room temperature
  • ⅓ cup sugar
  • 2 teaspoons instant coffee or espresso powder *
  • 2 teaspoons coffee liqueur (you can use 1 tablespoon strong coffee or espresso if you don't want to use liqueur)
Chocolate Filling
  • ⅓ cup confectioners (powdered) sugar (plus more to thicken as needed)
  • 1 tablespoon unsweetened cocoa powder
  • 2 teaspoons instant coffee or espresso powder *
  • 1 to 2 tablespoons cool coffee or espresso (or just enough to wet the filling so it's spreadable)
  • 1 tablespoon coffee liqueur (optional) **
directions:
Make the Cookies
  1. Combine the sugar and cocoa topping in a small bowl. Set aside.
  2. Preheat oven to 325°F. Line 2 baking sheets with parchment paper. Sift flour, cocoa, baking soda, and salt into bowl. Using electric mixer, beat butter and both sugars in bowl until well blended. Add egg, 2 teaspoons water, vanilla, and instant coffee; blend well. Beat in flour mixture. Stir in mini chocolate chips. Drop dough by tablespoonfuls onto prepared sheets, spacing 2 inches apart. Sprinkle each dough ball with a bit of the sugar-cocoa topping. Bake until tops are just firm to touch and no longer shiny, about 13 minutes. Cool cookies on sheets 10 minutes. Transfer to racks and cool.
Make the Mascarpone Filling
  1. In a stand mixer bowl or a bowl using electric beaters, beat together the mascarpone cheese and cream cheese, about 3 minutes. Add sugar and coffee liqueur, and beat for an additional 2 to 3 minutes.
Make the Chocolate Filling
  1. Mix all the ingredients together in a small bowl, adding powdered sugar, if needed, to get it to a consistency where it will spread, but it's not too stiff.
Assemble the cookies
  1. Place all of the cookie flat side up on work surface. Spread half the cookies with 1 tablespoon of the mascarpone filling and the the other half of the cookies with about 1 teaspoon chocolate filling. Sandwich the chocolate spread cookies with the mascarpone spread cookies. Arrange on platter; cover and chill at least 2 hours. (Can be made 2 days ahead. Keep chilled).
  2. Store covered in the fridge IF there's any left!
notes:
* If you prefer a stronger coffee flavor, add more. Less, add less. Taste both fillings and adjust the coffee flavor and/or liqueur, to your liking.
** If you want more liqueur in the chocolate filling, by all means add it. Just compensate with more powdered sugar and/or cocoa so it remains thick and spreadable; not soupy.

 
Mandel Kakor (Swedish Butter Cookies aka Swedish Biscotti)
Prep time: 
Cook time: 
Total time: 
Yield: 70 cookies
 
Recipe from Relish Magazine
ingredients:
  • 1c up unsalted butter, room temperature
  • 1 cup sugar
  • 3 cups all-purpose flour
  • 1 tablespoon baking powder
  • ½ teaspoon salt
  • 1 tablespoon almond extract
  • 3 tablespoons cream
  • 1 egg, beaten
  • Pearl sugar or any kind of decorating sugar that doesn't melt, like sanding sugar
directions:
  1. Preheat oven to 350F.
  2. In a large bowl or the bowl of your stand mixer, beat the butter and sugar together until it's light and fluffy. Combine the flour, baking powder and salt, then add it to the butter mixture on low speed, in increments, until a dough has formed. Beat in the almond extract and heavy cream.
  3. On a work surface lightly dusted with flour, turn out the dough and work it to a ball. Divide the ball into 4 equal pieces and roll each piece into a ball.
  4. Flatten each ball into a 4-inch circle and chill for 10 minutes in the refrigerator.
  5. Place chilled dough circles on a silpat or parchment lined baking sheet, Brush the tops of the circles with the beaten egg, then sprinkle each circle with the pearl or sanding sugar.
  6. Bake 20 minutes, then remove from oven. Lower the oven temperature to 300F.
  7. Cut each circle into 10 slices, then cut each slice in half horizontally (except the short ends).
  8. Return to the sliced cookes to the oven and bake 20 minutes for crispy cookies (like biscotti) or 10 minutes for chewier cookies..

 
Minty Brown Sugar Chocolate Chip Cookies
Prep time: 
Cook time: 
Total time: 
Yield: two dozen cookies
 
ingredients:
  • 1 cup butter (2 sticks), room temperature
  • ½ cup firmly packed light brown sugar
  • ½ cup firmly packed dark brown sugar
  • ½ cup granulated sugar
  • 2 eggs, beaten
  • 2 teaspoons pure vanilla extract
  • 2½ teaspoons peppermint or spearmint extract
  • 3 cups all-purpose flour
  • 1 teaspoon salt
  • ½ teaspoon baking soda
  • 2 cups dark chocolate chips (milk or white chocolate is nice too, or a combo of two or all three)
directions:
  1. Preheat the oven to 375 degrees F. Line a baking sheet with parchment paper.
  2. Cream the butter and sugars. Add eggs, peppermint extract and vanilla extract.
  3. Sift together flour, salt and baking soda and then add to the egg mix and beat until just combined.
  4. Stir in the chocolate chips.
  5. Form the dough into 2-inch balls. Place on prepared baking sheet and bake until golden, about 9 minutes for chewy and 12 for crunchy. Repeat with second baking sheet. Cool on rack. Store in an airtight container.

 
Whole Pumpkin Macarons and Fleur de Sel Cinnamon Apple Cider Caramel Macarons
Prep time: 
Cook time: 
Total time: 
Yield: about 16 macarons
 
Basic macaron recipe from Helene of Tartelette
ingredients:
Macaron Batter
  • 90 grams of egg white (about 3 - but do weigh them!)
  • 30 grams of plain white granulated sugar (1/4 cup)
  • 200 grams of icing or powdered sugar (1½ cups)
  • 110 grams of finely ground blanched almonds (1 cup + 4 tablespoons + 2 teaspoons)
    Add 1 tablespoon cinnamon to batter above for caramel apple macarons
    Add 1 tablespoon pumpkin pie spice to batter above for whole pumpkin macarons. I add either to almost beaten egg whites along with the sugar.
Fresh Pumpkin Filling
  • 1 cup fresh roasted pumpkin puree. If using canned, let drain in a colander overnight prior to making filling.
  • 1 tabelspoon pure maple syrup
  • 2 tablespoons brown sugar
  • ¼ teaspoon kosher salt
Spicy, Toasted Baby Pumpkin Seeds
  • The seeds from one Jack Be Little pumpkin or pepitas
  • 1 tablespoon canola or vegetable oil
  • ¼ teaspoon allspice
  • ¼ teaspoon ground cinnamon
  • ¼ teaspoon ground ginger
  • ⅛ teaspoon cayenne pepper, or to taste
  • ¼ teaspoon salt
  • ⅛ teaspoon black pepper
directions:
  1. In a food processor, run the nuts and powdered sugar until the nuts are finely ground. Run through a sieve if needed.
  2. Whip the egg whites until foamy, slowly add the granulated sugar, until they are glossy and stiff.
  3. Slowly sift in and fold the nut/sugar mixture into the whites with a wide spatula, in several increments. The mixture should remain shiny and flow easily (like magma).
  4. Fill a pastry bag with the batter and pipe small rounds (about 1 to 1.5 inches - an Ateco #807 tip works well for this) onto parchment lined baking sheets.
  5. Let the macarons dry for anywhere from 30 minutes to 1 hour. Preheat the oven to 300F.
  6. When they are dry (touch one lightly, a dry shell will have formed - but do NOT push in), bake them for 12-15 minutes.
  7. Let cool, remove from the paper and fill 2 shells with filling of your choice.
For Fleur de Sel Cinnamon Caramel Apple Macarons
  1. Add 1 tablespoon of cinnamon to the batter (I add it to almost beaten egg whites with the sugar), then sprinkle half of the piped mounds with coarse sea salt (preferably fleur de sel), and a little extra cinnamon, prior to drying and baking.
For the Apple Cider Caramel Filling
  1. Add about 1 teaspoon cinnamon, ½ teaspoon ground ginger, ¼ teaspoon nutmeg and ⅛ teaspoon of cloves to the hot caramel (linked above) prior to setting. For filling consistency, only cook the caramel to about 240 degrees on a candy thermometer. Let cool, then fill a pastry or ziplock bag (end snipped off once filled) with caramel and pipe onto bottom shells, topping each one with salted shells. For caramel candies, follow the directions linked above.
For Whole Pumpkin Macarons
  1. Add 1 tablespoon of pumpkin pie spice to the batter (I add it to the almost beaten egg whites with the sugar) and gently top half of the macaron batter mounds on baking sheet with three spicy, toasted baby pumpkin seeds, (directions below)
For the Fresh Pumpkin Filling
  1. Beat all of the ingredients together until smooth. In a saucepan, cook down the mixture until dark and thickened. Let cool. Spoon into pastry bag and pipe onto macaron shell bottoms. Top each macaron shell bottom with a seed coated macaron shell, then sandwich gently.
For Spicy Toasted Baby Pumpkin Seeds (or pepitas)
  1. Cut the pumpkin open and remove the seeds. Rinse to remove all the pulp then let air dry. Preheat oven to 250 F.
  2. Combine the seeds with oil and the next 6 ingredients. Spread onto a parchment lined baking sheet.
  3. Spread the seeds on the prepared baking sheet in an even layer. Bake until dry, stirring occasionally, about 1 hour. Let cool.
notes:
MACARON TIPS:
Age the egg whites in a covered container at room temperature for 24 to 48 hours. I sometimes age them longer, uncovering the container for the last few hours.
I like to dry my tant pour tant (the almond meal-confectioner's sugar amalgamation) prior to making macarons. I let it sit out uncovered at room temperature the night before making them. I get super smooth shells that way for some reason.

Double baking sheets for better 'feet'.

 
The Greatest Brownies Ever
Prep time: 
Cook time: 
Total time: 
Yield: one 9-inch square pan brownies
 
Adapted from Baking with Julia aka Velvet brownies because the soft, fudgy interior is REALLY as soft as velvet!
ingredients:
  • 1¼ cups sifted all-purpose flour — measure after sifting
  • 1 teaspoon salt
  • 8 ounces unsalted butter
  • 4 ounces unsweetened chocolate, coarsely chopped
  • 2 ounces bittersweet chocolate, coarsely chopped
  • 2 cups sugar (divided use)
  • 1 teaspoon pure vanilla extract
  • 4 large eggs
directions:
  1. Line a 9-inch square pan with foil or parchment paper Bottom and up the sides, making sure you have some overlapping over the sides of the pan to use as handles to lift the whole square of brownies out once baked. . Preheat oven to 350 degrees F
  2. Stir the sifted flour and salt together in a small bowl; set aside.
  3. Melt the butter over medium-low heat in a small saucepan. When melted, reduce heat to low and add chopped chocolate, stirring often until completely melted. Add 1 cup of the sugar to the butter-chocolate mixture and stir for about a minute. Remove pan from heat and pour into a mixing bowl. Stir in the vanilla.
  4. Whisk the remaining 1 cup sugar and the 4 eggs in a second bowl – only until combined – do NOT over-whisk. Gradually pour half of the sugar-egg mixture into the bowl with the chocolate mixture, stirring quickly so that eggs don’t cook/scramble from the heat of the chocolate mixture.
  5. Using a hand or stand mixer with the whisk attachment, beat the remaining sugar-egg mixture on high speed until it turns light in color, thick and doubles in volume - about 3 to 4 minutes.
  6. Carefully fold the beaten egg-sugar mixture into the chocolate, sugar, egg mixture. When everything is almost completely incorporated, gently fold in the dry ingredients. I like to sift the dry ingredients over the mixture, then fold.
  7. Scrape the batter into the lined 9-inch square pan and bake on the middle rack for 25 to 28 minutes. They will rise and the top will turn shiny.
  8. Cut into the center of the brownies after 22-23 minutes to see how they are baking. They should be barely set and gooey, which means you're on the right track. In fact - you can take them out now, since they will set up more while cooling, OR continue to bake another 2 to 5 minutes until a little more set. A matter of preference.
  9. Let the brownies cool for 10 minutes..then lift them out of the pan using the edges of the foil or parchment paper, Cool completely on a wire rack, then cut into squares and enjoy!

 
Brown Butter Melty Middle Milk Chocolate Hunk Cookies
Prep time: 
Cook time: 
Total time: 
Yield: 20 to 22 cookies
 
Adapted from Cook's Illustrated
ingredients:
  • 1¾ cups unbleached all-purpose flour (8¾ ounces)
  • ½ teaspoon baking soda
  • 14 tablespoons unsalted butter
  • ½ cup granulated sugar
  • ¾ cup packed dark brown sugar
  • 1 teaspoon table salt
  • 2 teaspoons vanilla extract
  • 1 large egg
  • 1 large egg yolk
  • 1¼ cups milk chocolate chunks plus 20 to 22 chocolate chunks for the middle of the cookie.
directions:
  1. Adjust oven rack to middle position and heat oven to 375 degrees. Line 2 large (12 x 17-inch) baking sheets with parchment paper. Whisk flour and baking soda together in medium bowl; set aside.
  2. Heat 10 tablespoons butter in 10-inch skillet over medium-high heat until melted, about 2 minutes. Continue cooking, swirling pan constantly until butter is dark golden brown (there will be white milk solids floating on top. This is normal, do not skim them off) and has a nutty aroma, 1 to 3 minutes. Remove skillet from heat and, using heatproof rubber spatula, transfer browned butter to large heatproof bowl. Stir remaining 4 tablespoons butter into hot butter until completely melted.
  3. Add both sugars, salt, and vanilla to bowl with butter and whisk until fully incorporated. Add egg and yolk and whisk until mixture is smooth with no sugar lumps remaining, about 30 seconds. Let mixture stand 3 minutes, then whisk for 30 seconds. Repeat process of resting and whisking 2 more times until mixture is thick, smooth, and shiny. Using a rubber spatula or wooden spoon, stir in flour mixture until just combined, about 1 minute. Stir in milk chocolate chunks,
  4. Divide dough into about 20 balls, each about 1½ tablespoons (a heaping tablespoon should be about that amount if you do not have a half tablespoon measuring spoon, or 1½ teaspoons equals ½ tablespoon)). Arrange 2 inches apart on prepared baking sheets. Stick an extra chocolate chunk smack in the middle of each ball,,pushing it in so it's covered.
  5. Bake cookies one tray at a time until they are golden brown and puffy, and the edges have begun to set but centers are still soft, anywhere from 10 to 12 minutes, rotating the baking sheets halfway through the bake. Transfer the baking sheet to a wire rack and let cookies cool on sheets for a few minutes, then using a spatula, transfer each cookie to the wire wrack to cool completely.

Salted Cinnamon Caramel Apple Macarons and Holiday Cookie Baking! I've got 5 unique cookie recipes, the best brownies ever, and two unique macaron recipes for your holiday cookie baking!

Brown Butter Milk Chocolate Melty Middle Cookies. Crispy and chewy gooey brown butter cookies with pools of milk chocolate throughout; oozing out of the middle when bitten. SO decadent and delicious! #cookies #milkchocolate #meltedmiddlecookies #brownbutter

Brown Butter Milk Chocolate Melty Middle Cookies. Crispy and chewy gooey brown butter cookies with pools of milk chocolate throughout; oozing out of the middle when bitten. SO decadent and delicious! #cookies #milkchocolate #meltedmiddlecookies #brownbutter
Chocolate Chocolate Chip Tiramisu Sandwich cookies! One side is the creamy mascarpone mixture you love in a tiramisu; the other side is a rich coffee chocolate ganache! Pure tiramisu in a delicious chocolate chocolate chip cookie sandwich (with or without liqueur! #tiramisu #chocolatecookies #chocolatechips #mascarpone #coffee #liqueur #ganache


Bookmark and Share

Posted in Bars/Brownies, Candy, Cookies, Dessert | Tagged , , , , , , , , , , , , , , , | 54 Comments

Individual Beef Wellingtons

Where’s the Beef? It’s in the pastry!

I love miniature versions of well known dishes, and these spinach, mushroom, roasted pepper and cheese filled individual Beef Wellingtons are one of my favorite takes on classic Beef Wellington.

Anything Wellington or En Croute always conjures up weddings for me.  It seems every nuptial I’ve ever been to gives you a choice between some kind of naked protein and some kind of protein wrapped in pastry.

Your choices are usually something like, Chicken Francese or the Beef Wellington? Eeny meeny miny mo. Oh, of course there’s always a V option, (Vegan or Vegetarian), but I’m not going there today.  Today I’m wrapping up a ton of beef with a ton of filling in a ton of pastry. Translation – I’ll have the Beef Wellington, please.

And that is what I usually choose at most weddings, if offered.

Recipe for Individual Beef Wellingtons with Mushroom, Spinach, Roasted Pepper, and Blue Cheese Filling. Decorate them like little gifts for the holidays!

When this month’s Daring Cooks challenge was announced, it was for a salmon en croute, with the choice of using another meat such as beef, a la Beef Wellington.  I love salmon, especially smoked, but unfortunately, so does everyone close to me (the people I’d be serving it to), but ONLY smoked.  Can you believe it? Every single person I might feed does not like salmon unless it’s smoked.  I always get the same line..

“I just don’t like salmon unless it’s smoked – you know, like lox”.

When inquired as to why, it’s also always the same answer;

“I dunno, it tastes too fishy.”

Well, apparently they’ve never had a good piece of salmon, but what was I going to do? Prepare a beautiful salmon en croute and beg them to try it again? No, I was going to play it safe and stick with good ole’ beef.  Beef tenderloin is wicked expensive, but at least they’ll eat it. (Ironically, I made salmon patties one night, and they loved them. Maybe because I didn’t tell them it was fresh salmon?).

Recipe for Individual Beef Wellingtons with Mushroom, Spinach, Roasted Pepper, and Blue Cheese Filling. Decorate them like little gifts for the holidays!Photo of seared beef filet in tongs courtesy finecooking.com

The 2009 Daring Cooks challenge was hosted by Simone of Junglefrog Cooking. Simone chose Salmon en Croute (or alternative recipes for Beef Wellington or Vegetable en Croute) from Good Food Online. Thanks for a great challenge, Simone!

Now that I got that out of the way, may I say I had to wrestle with a cow to complete this challenge? Okay, a little bit of an exaggeration.  What went from four 5-6 oz center cut portions of filet mignon, magically morphed into a whole beef tenderloin.  Yep, I decided to make individual Beef Wellingtons, and in order to do so, I had to clean (silver skin, fat etc) and portion up a tubular behemoth of beef that was presented to me;

“It was on sale, Lisa..$18.00 a pound!”

I was initially going to post a few photos of the tenderloin and my butchering mastery (HA!), but reconsidered, figuring that most people had probably seen the Texas Chainsaw Massacre or some Rob Zombie remake (insert favorite slasher movie) at some point in their lives.

Plus, I like to keep it clean for my beautiful and amazing vegetarian and vegan readers.

Recipe for Individual Beef Wellingtons with Mushroom, Spinach, Roasted Pepper, and Blue Cheese Filling. Decorate them like little gifts for the holidays!

I really wanted to go a little off the beaten path with these, meaning adding stuff that usually doesn’t mesh with beef, to try and mesh it, but it was imperative (considering the price of tenderloin) they be eaten, and I knew there might be a few inquiries as to what the blueish white stuff was (blue cheese), along with blanched, seasoned spinach, roasty red peppers, strips of marinated, sauteed portobello mushrooms, and caramelized onions, so I stopped there. The general consensus was that it was rich, but oh, so ambrosial!  You really can’t go wrong with a whole meal in a flaky, buttery package.

Recipe for Individual Beef Wellingtons with Mushroom, Spinach, Roasted Pepper, and Blue Cheese Filling. Decorate them like little gifts for the holidays!

I have a go to recipe for individual beef wellingtons that turns out perfect every.single.time, and I incorporated some of the fillings into the recipe Simone supplied, omitting the mustard, prosciutto and crepes (the blue cheese served as a sog blocker). BUT, then the recipes are almost interchangeable, aren’t they? Well, mine possess a great deal of beefy individuality.  Sorry, couldn’t resist the obvious.  That said, I used some of the leftover, wonderful puff pastry that I had frozen from the Daring Baker’s September challenge, but I had to incorporate some PF puff pastry since I didn’t have nearly enough to cover and decorate six Beef Wellingtons.

Recipe for Individual Beef Wellingtons with Mushroom, Spinach, Roasted Pepper, and Blue Cheese Filling. Decorate them like little gifts for the holidays!

Although it pained me, I had no choice but to cook two of them to preference for two people, and truth be told, cooking beef tenderloin past rare (medium rare is the limit), is sort of like pissing on the Alamo (bonus points for Ozzy reference?).  I used to tell this person I used to know that if he kept ordering good cuts of steak well done, or even medium well, the chef just might spit on it.

On the flip side, the other person likes his beef close to mooing (super rare as in, a really good veterinarian could probably bring it back to life), so I had to pull that one out a little early. Doesn’t look too great, does it? Then again, I do love me some steak tartare, but ground beef is much easier to swallow, raw.

Recipe for Individual Beef Wellingtons with Mushroom, Spinach, Roasted Pepper, and Blue Cheese Filling. Decorate them like little gifts for the holidays!

All in all, this was one tasty challenge and there was not a crumb left (although I’ve got loads of beef tenderloin cuts in my freezer now).  If you’d like the yummy recipes for Salmon en Croute and Beef Wellington, go HERE.

Get the recipe for Individual Beef Wellingtons with Mushroom, Caramelized Onion, Spinach & Blue Cheese Filling (I added chopped roasted red peppers to the filling) –> HERE .

Beef Wellingtons loaded with Mushroom, Caramelized Onion, Roasted Red Pepper, Spinach & Cheese Filling! #beefwellington #individualbeefwellingtons #beef #caramelizedonions #roastedredpepper #cheese #mushrooms
Beef Wellingtons loaded with Mushrooms, Caramelized Onions, Roasted Red Pepper, Spinach & Cheese Filling! #beefwellington #individualbeefwellingtons #beef #caramelizedonions #roastedredpepper #cheese #mushrooms

Bookmark and Share

Posted in Beef, Daring Cooks, Dinner, Pastry, Vegetables | Tagged , , , , , , , , , , , | 51 Comments

LEAVE THE GUN, TAKE THE CANNOLI

Who doesn’t love this line from The Godfather? Classic. Who doesn’t love a good cannoli? Hmm, I’m not 100% on that one. Yet.

How to make Cannoli from Scratch. You'd never believe how easy homemade cannoli is!

As I typed the title to this entry, one thought swam through my brain.  How many others are going to use the above title or ‘Holy Cannoli’? OK, that’s not really relevant here; what’s relevant is, I am the host of this month’s Daring Bakers Challenge! (insert dancing bear).

When Lis asked me last April if I wanted to host, it took me about half a nano-second to shriek “Hell Yeah!” I had so many ideas and so many visions of super daring, albeit amazing, cakes, cookies, breads, etc.  SO, what did I end up choosing? Something not baked, although it can be.

I was excited, thinking “WOW, this is perfect, how many people have actually made cannoli from scratch, shells and all?”

Yep, this could be the epitome of the word daring, especially for those who were not interested in making cannoli from scratch, but did so anyway, and are now cannoli pros, not to mention connoisseurs.  Some who participated never liked cannoli, but are now card-holding cannoli converts.  I love that this challenge broadened the cannoli landscape for some!

Cannoli forms. How to make Cannoli from Scratch. You'd never believe how easy homemade cannoli is!              Commercial cannoli forms (tubes) in various sizes

The night before I posted my challenge at the Daring Kitchen, I suddenly had doubts..

This isn’t baking.  Plus, a lot of people detest deep-frying anything.

Shoot, some have never even heard of cannoli!

Well, after all the research and testing I did with different recipes, and time spent carefully writing out every detail of this challenge, I knew I had no choice since there was not enough time to bake something new and write out another detailed challenge post.  Naturally, there was a lot of trepidation by many at first because cannoli isn’t one of those desserts that most flip over, and as mentioned above, many hate, hate, hate deep-frying.

Now I’m glad I chose cannoli as the Novemeber Daring Bakers challenge because what I’ve seen from these Daring Bakers, diving in head first..even finding ways to make cannoli forms (traditional and unique) if they didn’t want to purchase or couldn’t find them, has completely blown me away.

I am so proud to be part of a group loaded with such talented and creative people!

How to make Cannoli from Scratch. You'd never believe how easy homemade cannoli is!

Growing up, one of my fondest memories was going to Chinatown with my parents and their friends and kids about once a month, usually to one of the hidden Hunan Houses, which were simple, unadorned doors down a few steps off the street that not many knew about.  We would gorge for hours, ordering course after course after course; some of the best Chinese food I had ever had. I remember having some of the best Szechwan chicken (Sichuan Chicken) at some of these places!

For dessert, it was always over to Little Italy, a short walk away.  Cannoli was at the top of our dessert list, and when creating this challenge, I was trying to get as close to some of that cannoli as I could, especially the ones from Ferrara’s.  This is why I ended up with a combo of two recipes, with a few personal tweaks.

Let’s just say, for two weeks, all I did was fry cannoli shells.

How to make Cannoli from Scratch. You'd never believe how easy homemade cannoli is!           Blistering makes for a light and crispy shell.  The telltale sign of a good cannoli.

Before I continue, lookie lookie! I have my own blog checking lines for the big brother bot!  The thing is, do I need to post one since this is MY challenge?  Should I change ‘Lisa’ to ‘ME’, and Parsley, Sage, Desserts and Line Drives to ‘HERE’ or third person speak (which I hate)? I suppose I’ll just post it as if it was someone’s else’s challenge, since I don’t need the bot skipping over this post due to the words not being exactly as written.

Pumpkin Cheese Cannoli! How to make Cannoli from Scratch. You'd never believe how easy homemade cannoli is!

The November 2009 Daring Bakers Challenge was chosen and hosted by Lisa (me) of (what my blog used to be called) Parsley, Sage, Desserts and Line Drives. She chose the Italian Pastry, Cannolo (Cannoli is plural), using the cookbooks Lidia’s Italian-American Kitchen by Lidia Matticchio Bastianich and The Sopranos Family Cookbook by Allen Rucker; recipes by Michelle Scicolone, as ingredient/direction guides. She added her own modifications/changes, so the recipe is not 100% verbatim from either book.

Guess what? If you click the link, you end up HERE, over and over!  I won’t let you leave my humble abode!

Pumpkin Cheese Cannoli! How to make Cannoli from Scratch. You'd never believe how easy homemade cannoli is!

Pumpkin cheese filled cannoli dipped in caramel and pecans, and wrapped with spun sugar; the shell dough rolled around the form using square, rather than circular or oval, cut-outs.

All kidding aside, as mentioned above, I was astounded by all the Macguyvers in this challenge.  Since traditonal cannoli forms are not something most have lying around their kitchen, they would have to purchase them or make their own cannoli forms.  It was amazing what some came up with, from the super traditional Sicilian forms, which is sawing a broomstick, dowel or cane into 6 to 8 inch lengths, then sanding them down and oiling them!

Would you believe a bunch of Daring Bakers actually did this?

Now if that isn’t the true spirit of a Daring Baker, I don’t what is.  Other forms used were oiled cannelloni or manicotti pasta tubes, aluminum foil pans cut and rolled, wooden spoons, butter knives, a tinfoil contraption by an engineer (John), tomato paste cans, a frozen ball of butter for cannoli bowls, copper pipes, a sawed up wooden hanger, the handle of a swimming pool skimmer, a can opener..AND the list goes on! Are the Daring Bakers not some of the most creative and crafty people around?How to make Cannoli from Scratch. You'd never believe how easy homemade cannoli is! Stacked cannoli aka Cannolipoleons, with mini chocolate chip – orange mascarpone filling and raspberries.

On that note, I also gave the DB’ers a choice of simply cutting out shapes similar to a rolled cookie dough, frying them, and stacking them like Napoleons aka Cannolipoleons, with the filling of their choice.  What amazed me was, most chose to make the traditional tube shaped cannoli, whether or not they had metal cannoli tubes, hence all the creative materials used.  Some even managed to make cannoli bowls and ice cream cones!  I’ll say it again – I’m truly in awe of my fellow Daring Bakers.

When choosing this challenge, I had to take into consideration that the month of November was going to be a tough time for many Daring Bakers in the USA due to Thanksgiving preparation.  This is another reason why I chose cannoli over some more challenging ideas..such as a layered dacqouise and sponge cake with a deep caramelized sugar-coffee (or any flavor one wanted to use) syrup, called a Cardinal Slice, or another amazing Italian pastry called Sfogiatelle (Isn’t it beautiful? But, it’s very, very involved),

Since many would be focusing on their Thanksgiving meals, daring, but not too involved, was what I aimed for.  I offered up a pumpkin cheese cannoli filling recipe for those who wanted to add cannoli to their Thanksgiving dessert table, although any cannoli and filling would make a wonderful Thanksgiving dessert or even savory addition to the meal. Some took that savory route..from bacon and egg, to Mexican, to even turkey and vegemite!  You really must check out the Daring Bakers Blogroll for this challenge, because cannoli has been taken to so many different shapes, fillings and levels, it’s utterly mind-blowing

How to make Cannoli from Scratch. You'd never believe how easy homemade cannoli is!

I gave the traditional ricotta filling a whir in the food processor, which resulted in an uber creamy filling..not conducive to a pretty piping, but silky smooth on the palate.

For those of you out there who are not members of the Daring Bakers, I’m going to post the challenge as I did at the Daring Kitchen, verbatim.  Who knows, you just may want to take a daring stab at these rich, lovely Italian pastries.  Enjoy!

Sorry all, we’re not baking this month (this line fooled some, which was the initial intention, I just hope nobody avoided opening the entry to read the rest! lol), so put away your baking pans and get out the deep fry thermometer and oil!

Hi everyone, thanks for baking, err, deep frying with me this month! We’re making Cannoli! This is/was my first time making cannoli from scratch, but it’s well worth it, and a great new experience/dessert to add to your culinary repertoire. I hope you all enjoy this challenge, and I’m looking forward to seeing everyone’s take on this sweet (or savory, if desired) Italian favorite.

Cannoli are known as Italian-American pastries, although the origin of cannoli dates back to Sicily, specifically Palermo, where it was prepared during Carnevale season, and according to lore, as a symbol of fertility. The cannoli is a fried, tube-shaped pastry shell (usually containing wine) filled with a creamy amalgamation of sweetened ricotta cheese, chocolate, candied fruit or zest, and sometimes nuts.

Although not traditional, mascarpone cheese is also widely used, and in fact, makes for an even creamier filling when substituted for part of the ricotta, or by itself. However, cannoli can also be filled with pastry creams, mousses, whipped cream, ice cream etc. You could also add your choice of herbs, zests or spices to the dough, if desired. Marsala is the traditional wine used in cannoli dough, but any red or white wine will work fine since it’s not only added for flavor or color, but to relax the gluten in the dough since it can be a very stiff dough to work with. By the way, the name ‘Lidisano’ is a combination of Lidia, Lisa and Sopranos, even though my contribution was far less than the other two.

How to Make Cannoli from Scratch

Posting Date – November 27, 2009

Equipment:
Cannoli forms/tubes – optional, but recommended if making traditional shaped cannoli. Dried cannelloni pasta tubes work just as well!
Deep, heavy saucepan, enough to hold at least 2-3-inches of oil or deep fryer
Deep fat frying thermometer. although the bread cube or bit of dough test will work fine.
Metal tongs
Brass or wire skimmer OR large slotted spoon
Pastry bag with large star or plain tip, but a snipped ziplock bag, butter knife or teaspoon will work fine.
Cooling rack
Paper bags or paper towels
Pastry Brush
Cheesecloth
Sieve or fine wire mesh strainer
Electric Mixer, stand or hand, optional, as mixing the filling with a spoon is fine.
Food Processor or Stand Mixer – also optional, since you can make the dough by hand, although it takes more time.
Rolling pin and/or Pasta roller/machine
Pastry or cutting board
Round cutters – The dough can also be cut into squares and rolled around the cannoli tube prior to frying. If making a stacked cannoli, any shaped cutter is fine, as well as a sharp knife.
Mixing bowl and wooden spoon if mixing filling by hand
Plastic Wrap/Clingfilm
Tea towels or just cloth towels

Required: Must make cannoli dough and shells. If you don’t have or do not want to purchase cannoli forms, which I would never ask of any of you, you could simply cut out circles, squares, or any shapes you want and stack them with the filling of your choice to make stacked cannoli aka Cannolipoleons (directions below). If desired, you can channel MacGuyver and fashion something heat proof to get traditional shaped cannoli (6-8 inch sawed off lengths of a wooden broom stick or cane, sanded down and oiled, is THE authentic cannoli form!), or non-traditional shapes such as creating a foil form to make bowls, or even using cream horns if you happen to have them. Mini cannoli would be great too, and I’ve provided links to retailers of cannoli forms of all sizes.

Also, for those who don’t like to cook or bake with alcohol – grape juice, cranberry juice, pomegranate juice, apple juice; any sweet juice of a fruit except citrus, especially ones used in or to make wine, can be substituted. Just add a little more vinegar to insure you get enough acid to relax the dough.

Variations: The filling is YOUR choice! Anything you want to fill them with is perfectly fine, sweet or savory, or you can use the filling recipe provided – making whatever changes you want to it. cannoli would make a great addition to a Thanksgiving dessert table/spread. In many Italian households, during the holidays, cannoli is always part of the dessert offerings. You could also make a Thanksgiving themed cannoli, like pumpkin cannoli (I came up with a great pumpkin cheese filling recipe, below) or apples, pecans, walnuts, and/or any dried fruits you like.

Some ideas to gussy up your cannoli would be dipping the rims of the shell in melted chocolate and rolling them in chopped nuts or sprinkles, then letting them set prior to filling, or dipping or pressing mini chocolate chips into the filled ends OR just stirring mini chocolate chips into the filling prior to stacking or filling whatever shaped shells you come up with. All of the above makes a great presentation! The sky is the limit here, so be creative! Naturally, if you have any dietary restrictions, by all means, go with it. I’ve provided a link to a gluten-free cannoli recipe and a slightly savory vegan cannoli recipe to help get you started.

Bonus option: Make your own ricotta and/or mascarpone cheese! https://parsleysagesweet.com/2009/05/04/eating-my-curds-and-ditching…
http://www.bakingobsession.com/2009/05/02/homemade-mascarpone-cheese/

Technically, I know, this is not baking, and if you prefer to steer clear of the deep fry, you can bake the shells. You won’t get the snappy, blistery texture and appearance that make cannoli so special, but I’m sure it’ll taste good nonetheless. Here’s a link for baked cannoli shells: http://italiannotes.com/oven-baked-cannoli-with-dried-fruit/

ALSO, regarding baked or non-fried cannoli, you can make a sort of mock cannoli with pizzelles or tuiles! Just roll either of them around something the size of a broomstick handle, or a large rounded wooden spoon handle, while they’re still warm; let them set, and fill as directed in the recipe.

Lidisano’s Cannoli
Makes approximately 22-24 4-inch cannoli
Prep time:
Dough – 2 hours and 10-20 minutes, including resting time, and depending on whether you do it by hand or machine.
Filling – 5-10 minutes plus chilling time (about 2 hours or more)
Frying – 1-2 minutes per cannoli
Assemble – 20–30 minutes

UPDATE:  I learned that the addition of a little freshly ground or instant coffee to the shell dough is traditional in Sicilian style cannoli and gives the shells more flavor.  I suppose you can add it along with the cocoa or in lieu of it. ALSO, and of utmost importance, the dough must be paper thin when rolled around the cannoli form, and the oil the right temperature, in order to get that snap, crackle, pop bubbled shell that breaks into light and lovely shards with each bite.  To get the dough paper thin, I’d recommend running it through a pasta machine a few times, dialing down with each roll.

UPDATE April, 2015 – Joanne left a comment saying she took a cooking class in Catania, Sicily and the chef was adamant about using Ever Clear 95% alcohol in lieu of the vinegar (1 teaspoon) and lard instead of oil (3 tablespoons). Apparently, the dough is easier to roll, and both of those changes give you really puffy and bubbly cannoli shells. More than worth a try!

UPDATE May, 2015 – After trying the most amazing, crispy, bubbly cannoli shells at an Italian Bakery on Staten Island, I was told the dough should not be too thin in order to get big bubbles and crispy, shattery shells.  I guess another test is in order

CANNOLI SHELLS
2 cups (250 grams/8.82 ounces) all-purpose flour
2 tablespoons(28 grams/1 ounce) sugar
1 teaspoon (5 grams/0.06 ounces) unsweetened baking cocoa powder
1/2 teaspoon (1.15 grams/0.04 ounces) ground cinnamon
1/2 teaspoon (approx. 3 grams/0.11 ounces) salt
3 tablespoons (42 grams/1.5 ounces) vegetable shortening or lard or vegetable oil
1 teaspoon (5 grams/0.18 ounces) white wine vinegar or Ever Clear 95% alcohol
Approximately 1/2 cup (approx. 59 grams/approx. 4 fluid ounces/approx. 125 ml) sweet Marsala or any white or red wine you have on hand
1 large egg, separated (you will need the egg white, but not the yolk, although you can switch and use the yolk instead of the white for easier rolling, I’ve heard.)
Vegetable or any neutral oil for frying – about 2 quarts (8 cups/approx. 2 litres)
1/2 cup (approx. 62 grams/2 ounces) toasted, chopped pistachio nuts, mini chocolate chips/grated chocolate and/or candied or plain zests, fruits etc.. for garnish
Confectioners’ sugar

Note – If you want a chocolate cannoli dough, substitute a few tablespoons of the flour (about 25%) with a few tablespoons of dark, unsweetened cocoa powder (Dutch process) and a little more wine until you have a workable dough (Thanks to Audax).

CANNOLI FILLING
2 lbs (approx. 3.5 cups/approx. 1 kg/32 ounces) ricotta cheese
1 2/3 cups cup (160 grams/6 ounces) confectioner’s sugar, (more or less, depending on how sweet you want it), sifted
1/2 teaspoon (1.15 grams/0.04 ounces) ground cinnamon
1 teaspoon (4 grams/0.15 ounces) pure vanilla extract or the beans from one vanilla bean
3 tablespoons (approx. 28 grams/approx. 1 ounce) finely chopped good quality chocolate of your choice
2 tablespoons (12 grams/0.42 ounces) of finely chopped, candied orange peel, or the grated zest of one small to medium orange
3 tablespoons (23 grams/0.81 ounce) toasted, finely chopped pistachios

Note – If you want chocolate ricotta filling, add a few tablespoons of dark, unsweetened cocoa powder to the above recipe, and thin it out with a few drops of warm water if too thick to pipe.

DIRECTIONS FOR SHELLS:
1. In the bowl of an electric stand mixer or food processor, combine the flour, sugar, cocoa, cinnamon, and salt. Stir in the oil (If using shortening or lard, cut it in with your fingers like you would a pie dough, then add the vinegar and wine), vinegar, egg yolk or egg white (whichever part of the egg you don’t add to the dough, will be used to seal the cannoli dough around the cannoli forms) and enough of the wine to make a soft dough. Turn the dough out onto a lightly floured surface and knead until smooth and well blended, about 2 minutes. Shape the dough into a ball. Cover with plastic wrap and let rest in the fridge from 2 hours to overnight.

2 Cut the dough into two pieces. Keep the remaining dough covered while you work. Lightly flour a large cutting or pastry board and roll the dough until super thin, about 1/16″ to 1/8” thick (An area of about 13 inches by 18 inches should give you that, or use a pasta roller for a quicker route to paper thin dough). Cut out 3-inch to 5-inch circles (3-inch – small shells; 4-inch – medium shells; 5-inch;- large shells. Your choice). Roll the cut out circle into an oval, rolling it larger and thinner if it’s shrunk a little.

3 Oil the outside of the cannoli tubes (You only have to do this once, as the oil from the deep fry will keep them well, uhh, oiled..lol). Roll a dough oval from the long side (If square, position like a diamond, and place tube/form on the corner closest to you, then roll) around each tube/form and dab a little egg yolk or egg white (whichever part of the egg you didn’t use in the dough, as mentioned above) on the dough where the edges overlap. (Avoid getting egg yolk or egg white on the tube, or the pastry will stick to it.) Press well to seal. Set aside to let the egg yolk or egg white dry a little for a good seasl.

4. In a deep heavy saucepan, pour enough oil to reach a depth of 3 inches, or if using an electric deep-fryer, follow the manufacturer’s directions. Heat the oil to 375°F (190 °C) on a deep fry thermometer, or until a small piece of the dough or bread cube placed in the oil sizzles and browns in 1 minute. Have ready a tray or sheet pan lined with paper towels or paper bags.

5. Carefully lower a few of the cannoli tubes into the hot oil. Do not crowd the pan. Fry the shells until golden, about 2 minutes, turning them so that they brown evenly.

8. Lift a cannoli tube with a wire skimmer or large slotted spoon, out of the oil. Using tongs, grasp the cannoli tube at one end. Very carefully remove the cannoli tube with the open sides straight up and down so that the oil flows back into the pan. Place the tube on paper towels or bags to drain. Repeat with the remaining tubes. While they are still hot, grasp the tubes with a potholder and pull the cannoli shells off the tubes with a pair of tongs, or with your hand protected by an oven mitt or towel. Let the shells cool completely on the paper towels. Place shells on cooling rack until ready to fill.

9. Repeat making and frying the shells with the remaining dough. If you are reusing the cannoli tubes, let them cool before wrapping them in the dough.

Pasta Machine method:
1. Divide the dough into 4 equal pieces. Starting at the middle setting, run one of the pieces of dough through the rollers of a pasta machine. Lightly dust the dough with flour as needed to keep it from sticking. Pass the dough through the machine repeatedly, until you reach the highest or second highest setting. The dough should be about 4 inches wide and thin enough to see your hand through

2. Continue rolling out the remaining dough. If you do not have enough cannoli tubes for all of the dough, lay the pieces of dough on sheets of plastic wrap and keep them covered until you are ready to use them.

3, Roll, cut out and fry the cannoli shells according to the directions above.

For Stacked Cannoli (Cannolipoleons):
1. Heat 2-inches of oil in a saucepan or deep sauté pan, to 350-375°F (176 – 190 °C).

2. Cut out desired shapes with cutters or a sharp knife. Deep fry until golden brown and blistered on each side, about 1 – 2 minutes. Remove from oil with wire skimmer or large slotted spoon, then place on paper towels or bags until dry and grease free. If they balloon up in the hot oil, dock them lightly prior to frying. Place on cooling rack until ready to stack with filling.

DIRECTIONS FOR FILLING:
1. Line a strainer with cheesecloth. Place the ricotta in the strainer over a bowl, and cover with plastic wrap and a towel. Weight it down with a heavy can, and let the ricotta drain in the refrigerator for several hours to overnight.

2. In a bowl with electric mixer, beat ricotta until smooth and creamy. Beat in confectioner’s sugar, cinnamon, vanilla and blend until smooth. Transfer to another bowl and stir in chocolate, zest and nuts. Chill until firm.(The filling can be made up to 24 hours prior to filling the shells. Just cover and keep refrigerated).

ASSEMBLE THE CANNOLI:
1. When ready to serve..fill a pastry bag fitted with a 1/2-inch plain or star tip, or a ziplock bag, with the ricotta cream. If using a ziplock bag, cut about 1/2 inch off one corner. Insert the tip in the cannoli shell and squeeze gently until the shell is half filled. Turn the shell and fill the other side. You can also use a teaspoon to do this, although it’s messier and will take longer.

2. Press or dip cannoli in chopped pistachios, grated chocolate/mini chocolate chips, candied fruit or zest into the cream at each end. Dust with confectioner’s sugar and/or drizzles of melted chocolate if desired.

PUMPKIN CHEESE FILLING
1/2 cup (123 grams/4.34 ounces) ricotta cheese
1/2 cup (113 grams/4.04 ounces) mascarpone cheese or cream cheese
1/2 cup (122.5 grams/4.32 ounces) canned pumpkin (not pumpkin pie filling)
1 cup (77 grams/2.70 ounces) confectioner’s sugar, sifted
**1/2 to 1 teaspoon (approx. 1.7 grams/approx. 0.06 ounces) pumpkin pie spice (taste)
1/2 teaspoon (approx. 2 grams/approx. 0.08 ounces) pure vanilla extract
6-8 cannoli shells

1. In a bowl with electric mixer, beat ricotta and mascarpone until smooth and creamy. Beat in confectioner’s sugar, pumpkin, pumpkin pie spice, vanilla and blend until smooth. Transfer to another bowl, cover and chill until it firms up a bit. (The filling can be made up to 24 hours prior to filling the shells. Just cover and keep refrigerated).**

2. Fill the shells as directed above. I dipped the ends of the shells in caramelized sugar and rolled them in toasted, chopped pecans.

** For a smoother filling, place all ingredients in the food processor and run on high until creamy and uniform.

** If you don’t have or can’t find pumpkin pie spice..make your own.  Double recipe to fill a standard spice jar.
2 tablespoons ground cinnamon
1 tablespoon ground ginger
1 and 1/2 teaspoons nutmeg
1 and 1/4 teaspoons ground cloves
Mix all of the above together and store tightly covered in a cool, dry place

TIPS AND NOTES:
– Dough must be stiff and well-kneaded

– Rolling the dough to paper thinness, using either a rolling pin or pasta machine, is very important. If the dough is not rolled thin enough, it will not blister, and good cannoli should have a blistered surface.

– Initially, this dough is VERY stubborn, but keep rolling, covering, resting, rolling, covering, resting.. repeat, it eventually gives in. Before cutting the shapes, let the dough rest a bit, covered, as it tends to spring back into a smaller shapes once cut. Then again, you can also roll circles larger after they’re cut, and/or into ovals, which gives you more space for filling.

– Your basic set of round cutters usually doesn’t contain a 5-inch cutter. Try a plastic container top, bowl etc, or just roll each circle to 5 inches. There will always be something in your kitchen that’s round and 5-inches if you want large cannoli.

– Oil should be at least 3 inches deep and hot – 360°F-375°F, or you’ll end up with greasy shells. I prefer 350°F – 360°F because I felt the shells darkened too quickly at 375°F.

– If using the cannoli forms, when you drop the dough on the form into the oil, they tend to sink to the bottom, resulting in one side darkening more. Use a slotted spoon or skimmer to gently lift and roll them while frying.

– DO NOT crowd the pan. Cannoli should be fried 2-4 at a time, depending on the width of your saucepan or deep fryer. Turn them once and lift them out gently with a slotted spoon/wire skimmer and tongs. Just use a wire strainer or slotted spoon for flat cannoli shapes.

– When the cannoli turns light brown – uniform in color, watch it closely or remove it. If it’s already a deep brown when you remove it, you might end up with a really dark or slightly burnt shell, which happened to a few of mine.

– Depending on how much scrap you have left after cutting out all of your cannoli shapes, you can either fry them up and sprinkle with confectioner’s sugar for a crispy treat, or let the scraps rest under plastic wrap and a towel, then re-roll and cut more cannoli shapes.

– Push forms out of cannoli very gently, being careful not to break the shells as they are very delicate. DO NOT let the cannoli cool on the form, as you may never get it off without it breaking. Try to take it off while still hot. Hold it with a cloth in the center, and push the form out with a butter knife or the back of a spoon.

– When adding the confectioner’s sugar to the filling..TASTE. You may like it sweeter than what the recipe calls for, or less sweet, so add in increments.

– Fill cannoli right before serving! If you fill them a half hour or so prior, you’ll end up with soggy cannoli shells.

– If you want to prepare the shells ahead of time, store them in an airtight container, then (if needed) re-crisp in a 350°F (176 °C) oven for a few minutes, before filling.

– Practice makes perfect. My first batch of shells came out less than spectacular, and that’s an understatement. As you go along, you’ll see what will make them more aesthetically pleasing, and adjust accordingly when rolling. My next several batches turned out great. Don’t give up!!

Links:

Alternative:
Gluten free cannoli recipe that looks great –
http://evilcakelady.blogspot.com/2009/02/annmaries-gf-birthday-cannoli.h…
Vegan cannoli –
https://www.godairyfree.org/recipes/dairy-free-desserts/cannoli-with-ancho-cream-cheese-vegan
http://community.livejournal.com/vegancooking/2307428.html#cutid1

Online resources:
http://www.pastrysampler.com/Questions_and_Answers/cannoli.htm
https://www.seriouseats.com/essential-equipment-for-making-cannoli-at-home

Videos:
http://www.youtube.com/results?search_query=cannoli&search_type=&aq=f – scroll through, loads of videos on the making of the shells. filling, etc. Mario Batali’s are particularly good.

Photos:
http://www.flickr.com/search/?w=all&q=cannoli&m=text – Loads of beautiful and unique cannoli photos along with the traditional. Great way to get some ideas for fillings and décor.

Online retailers for cannoli forms
http://www.fantes.com/cannoli.html#small
https://www.pastrychef.com/CANNOLI-TUBES_p_36-1202.html – If you want to buy a lot of them for one set price.
http://www.amazon.com/s/ref=nb_ss?url=search-alias%3Daps&field-keywords=…

Before I end this entry, remember where I said you can fill your cannoli shell with anything you want?  Well, Zorra from 1x umrühren bitte created a delicious wood filled cannoli that’ll knock your socks..err..teeth out!

The truth is, she used fig branches for cannoli forms, and couldn’t remove them after frying those beautiful shells.  She hates cannoli, but went above and beyond to take part in this challenge.  I absolutely LOVE this photo. and with her permission, had to post it.  I just want to hug her after reading her entry.  Go check it out, but again, those are some beautifully blistered shells so it’s too bad the fig branches didn’t want to budge!

How to make Cannoli from Scratch. You'd never believe how easy homemade cannoli is!Also, one other favorite photo that doesn’t need any explaining.  This brought a huge smile to my face! If this doesn’t scream “I did it!”, I don’t know what does!  Thank you Jenny from Purple House Dirt for letting me share your enthusiasm! Beautiful shells!

How to make Cannoli from Scratch. You'd never believe how easy homemade cannoli is!

In the category of “Cannoli, Incognito” are Rita of Clumbsy Cookie who turned cannoli into fettuccine, ravioli and tortilla chips!  You have to go check out the rest of her photos! She’s one creative lady!

How to make Cannoli from Scratch. You'd never believe how easy homemade cannoli is!

AND…

Simon of the heart of food blew me away with his lemon-mascarpone filled cannoli ‘eggs’ in a toffee nest.   He cut out very small circles of the dough, didn’t dock them so they would puff up in the oil, (reminding me of  pommes de terre souflees), then carefully used a teeny weeny tip to poke a hole and inject them with the cream.  I’m awed, seriously.

Cannoli Eggs in Nests! How to make Cannoli from Scratch. You'd never believe how easy homemade cannoli is!

Finally, the ‘Best Blisters’ award goes to Marcellina from Marcellina in Cucina.  WOW, what amazing shells!

How to make Cannoli from Scratch. You'd never believe how easy homemade cannoli is!

Thanks to all who participated in this challenge with me and a huge thanks to Lis and Ivonne for the hosting gig and their encouragement and patience.  Also, again to Ivonne for doing the metric conversions for me, since I’m metrically stunted and my scale sucks.

Bookmark and Share

Posted in Cheese, Daring Bakers, Dessert, Fruit, Italian, Pastry | Tagged , , , , , , , , | 162 Comments