The Mighty Dobos Torte (I’m Fusing Again)

The funniest thing happened this morning! Last Thursday, I got my camera and lens back, all fixed, just like new!! YAY, right? Well, guess what happened as I was setting up photos for my second and third takes on the Dobos Torte this morning? My cats decided on a game of cat and mouse, and before I could reach for the camera, which was on the table to my right, they came dashing by, knocking both to the hard, wood floor. Lens and camera broken again, but even worse this time.

Was I being sarcastic when I used the word funniest? You betcha! I must have used every 4-letter-word and every combination of 4-letter-words known to man in a span of about 4 seconds, and then I cried like a baby. UGH, NOT AGAIN! I just paid almost half of what the camera was worth, and now the lens was no longer under warranty!

Chocolate Fudge Dobos Torte (sort of Dobos Torte)Failure! I was pulling some of the leftover sugar and decided to give my half- eaten Dobos a tail..or whatever you want to call it.  Kind of phallic..and weird! Ugly and weird. “Why did I leave it on?” weird.

Now I had to use the old point and shoot camera of yore, so please excuse the photos.  In any event, this is why my post is later than usual, but I’ll stop here as I don’t want to waste anymore time bitching about my dumb luck.

The August 2009 Daring Bakers’ challenge was hosted by Angela of A Spoonful of Sugar and Lorraine of Not Quite Nigella. They chose the spectacular Dobos Torte based on a recipe from Rick Rodgers’ cookbook Kaffeehaus: Exquisite Desserts from the Classic Caffés of Vienna, Budapest, and Prague.

I was pretty excited when I saw it was the Dobos Torte.  Layer upon layer of thin genoise (sponge cake), a rich, buttery, chocolate frosting, crispy caramel coated cake and nut toppers, and a gazillion possibilities when it came to flavors and decor.  However, I hit THE BLOCK again.  Cake Block – similar to my earlier Cheesecake Block, with the addition of flour.

I contacted Audax Artifex (I just found out that was his real name, how cool), and he unblocked me like no one has before (that sounds perverted, doesn’t it?). Well matched palate combos, written out in perfect detail, covering every corner of the flavor spectrum. I already knew I was going to take the fusion route again, but now I knew for sure where I was going to take Hungary to; Asia and Mexico!

Matcha Black Sesame Red Bean Dobos Torte. A Japanese take on the classic Dobos Torte! and a Mojito Dobos Torte!

I actually made the last two cakes the night before and day of the challenge. I was rushing, so frankly, I wasn’t happy with the outcome of any of the three cakes in the looks department.  I’m going through one of those ruts where my creative juices and execution are sluggish. and my kitchen endeavors aren’t endeavoring. I think it’s the dog days of August, and the fact that I’m worn out physically from all the knee PT, among other situations that have kept me super busy.  I need a good shot of motivation and time!

Before I get into my fused Dobos Torte creations, I’ll start with the original Dobos Torte recipe, which I made last week, before getting my camera back.  Naturally, I strayed from the norm a little and baked the sponge in sheet pans, except, it wasn’t a sponge. After 2 hours of intense Physical Therapy, plus working out (Yes, I still owe you all the ‘gym’ story. Next entry, I promise!) and a VERY bizarre/disturbing phone call, I was exhausted and completely distracted.

In a semi-asleep stupor, using the ingredients given to us, I executed the cake as if it were a basic yellow cake.  I didn’t separate the eggs, didn’t fold in the flour..just beat everything together in a haste, then divided the batter into two 10 by 15 sheet pans and slid them into the oven haphazardly.  I cut each sheet cake into into 4 rectangles and stacked away.  Naturally, I ended up with 7 thick layers with a tight crumb, instead of 10 to 12 layers of thin, light and airy sponge, which pretty much defines a Dobos Torte.

Matcha Black Sesame Red Bean Dobos Torte with White Chocolate Ginger Buttercream. A Japanese take on the classic Dobos Torte!

SO, I knew I wasn’t making a sponge, yet didn’t care at the time as long as it was tasty and looked good.  It did taste good, (I grew up on those bakery seven-layer cakes, and this tasted similar, so I’m not regretting my lazy snafu) but, again, the cake part was not what you would categorize as a Dobos Torte.

BUT, I did execute the caramel coated cake slices (each one ‘torted’ for a thinner slice) properly since I made them the next day with a clearer head and a little more patience.  I didn’t add any lemon juice, and instead made more of a toffee coating with butter and almonds.

According to some DB’ers, most people left the caramel cake triangles on the side of their plates because the caramel was sticky and hard to bite into, chunks of it getting stuck in their teeth.  My wedges were ‘heath bar’ crisp and well received.  Glad I read about their results before making those toppers.  At least one facet of the first Dobos Torte worked in my favor! Actually, the buttercream was a hit too; lush, silky, creamy, and all that good stuff.

I didn’t get my camera and lens back until the next day, so half the cake was eaten before I was able to take photos, as you can plainly see in the top photo.  I pieced it back together as best I could, and snapped away.  So much for half-assed attempts and a short stint with my camera before it broke again!

Matcha Black Sesame Red Bean Dobos Torte. A Japanese take on the classic Dobos Torte!UGH, back to the very old point and shoot camera. Green Tea-Black Sesame Dobos Torte with Red Bean Paste Filling and Ginger infused White Chocolate Buttercream with two brittles – black sesame-white honey and black sesame with a little 5-spice powder.

Now to the good parts. I was definitely going to take the Dobos Torte in an Asian direction; green tea-black sesame sponge, some kind of red bean paste filling, and a light buttercream infused with a little ginger.  Of course I used the recipe given to us,  adding matcha powder and black sesame to the sponge and using white chocolate and ginger in the buttercream (I added a chunk of fresh ginger to the the egg mixture while whisking and heating it over the double boiler, then removed it before adding the chocolate and butter), then lightening it up with a little unsweetened whipped cream.  I split up the batter and baked it on 12 x 17 sheet pans to insure nice, thin layers this time.

Matcha Black Sesame Red Bean Dobos Torte with White Chocolate Ginger Buttercream. A Japanese take on the classic Dobos Torte!

On a more shapely note; I’m feeling rather ‘rectangular’ this month, so a typical round Dobos Torte wasn’t even a crumb on my brain plate. So all hail the rectangular Dobos Torte!

Since red bean paste was a definite go, I wanted to make it from scratch, so I did! I went light on the sugar and left it slightly chunky, then incorporated it into some of the white chocolate buttercream for easier spreading.  I was never one to salivate over any desserts containing red beans or red bean paste, but I have to admit, it was pretty tasty.

Red bean seems to be as ubiquitous to many Asian desserts as chocolate is to American desserts.  If you’ve never tried it, please give it a shot!

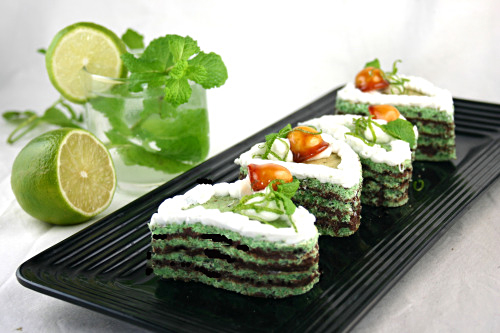
Finally, the creme de la creme, literally.  Miniature Mojito Dobos Tortes cut into whimsical hearts, each layer brushed with white rum simple syrup, filled with dark chocolate-creme de menthe ganache, and piped with white chocolate-lime buttercream.  At first I was going to go for 6 to 8 layers, but once I cut into them, I decided 4 was enough since they’re so small and might come apart when cutting due to the heart shape.

Mojito Dobos Torte

Finally, I’d like to thank Anula, from Anula’s Kitchen for my second Lovely Blog award, and Laura from Tiramisu for the Kreative Blogger Award.  I’ll pass them on and list the ‘7 things about me’ in my next entry!

Mojito Dobos Torte

Dobos Torte Recipe

Since the recipe for the Dobos Torte is really, really long, I’m going to send you HERE  to get it.

Red Bean Paste Filling
2 cups red adzuki beans
3 tablespoons vegetable oil
1/2 cup sugar

1. Cover beans in cold water and soak uncovered, overnight.

2. Drain, transfer back to the pot and cover in 5 cups of cold water. Bring to a boil and simmer for about 1 hour and 15 minutes.

3. Drain and puree with a hand blender or in a food processor.

4. Press through a metal sieve. This is a very time consuming process, but if you want a super smooth paste, it’s worth it. I just mashed/pureed them with the skins on because I wanted a slight bite to it. The pureed beans become a thick paste and it takes some time to press through the fine mesh strainer.  Clean off the underside as you press, and continue pressing until most of the bean puree passes through and the skins are left behind.

5. Heat oil in a medium saucepan over medium-high heat. Add pureed beans and sugar. Stir with a wooden spoon for about 3-5 minutes. Transfer to a bowl, cover with plastic wrap, and allow to cool.

6. After it has cooled, mix in enough of the ‘white chocolate’ buttercream from the recipe in the links above, until it reaches a spreadable consistency.  I doubled the buttercream recipe to insure I would have enough for the last two torte preparations.


Bookmark and Share

Posted in Cakes, Daring Bakers, Dessert | Tagged , , , , , , , , , , , , , , , , , | 116 Comments

Pomegranate Sticks to the Ribs

Before I begin, I’d like to mention that, regrettably, I had to skip this month’s Daring Cooks challenge.  It’s a recipe called Rice with mushrooms, and Cuttlefish, created by Jose Andres, and chosen/hosted by Olga of Las Cosas de Olga and Olgas Recipes.  If you have some time and would like the recipe, go HERE.

BUT..HEY, I’ve got RIBS!

Amazing Dry Rub Oven Roasted 'Fall off the Bone' Ribs and easy homemade BBQ Sauce with a secret ingredient that takes it over the top!

So I was cleaning out my fridge last month, and suddenly, way way in the back a little ruby bottle appeared.  WHAT? How did I not finish that 8-pack of Pomegranate juice that POM Wonderful sent me last February or March? I started to open it, ready to guzzle, but then, being an avid peruser/reader of food blogs, I recalled a recipe I saw a few months ago, created by the lovely couple at Fotocuisine, a food blog with, well, obviously, stunning and mouth-watering photographs. aka Foodtography at its finest!

He’s the chef; she’s the photographer, which is akin to peanut butter and jelly in the macrocosm of food blogs.

Dry Rub for awesome ribs, chicken etc,Dry Rub

In any event, this was a recipe I was dying to tackle, and I remember thinking, ‘Damn, too bad I don’t have any of that POM Wonderful left!’. Well, apparently the people at POM Wonderful read my mind and sent their little ruby red fairy to deposit a bottle into my fridge with a flick of her wand.

The Best BBQ Sauce - with a secret ingredient that takes it over the top! Fantastic on ribs and chicken!

The beginning of a beautiful BBQ sauce with the ‘elusive’ POM Wonderful pomegranate juice

I hadn’t made ribs in a while, and their recipe for grilled, oven-braised POM Pomegranate Barbecue Ribs struck like lightning before the opening of the bottle hit my lips.  I screwed the cap back on and placed it back in the fridge, knowing a trip to the market for some baby back ribs was inevitable.  Just my luck, they happened to have some gorgeous baby backs on sale.  I bought several racks, since I knew I was going to want to make this again..and again.  ‘Highly intuitive’ was something that was always written about me by teachers back in the day.  Too bad I don’t listen to my ‘intuition’ as often as I should.

The Best BBQ Sauce - with a secret ingredient that takes it over the top! Fantastic on ribs and chicken!

So as you may have guessed, my intuition was correct. These ribs are fabulous.  I made a few changes to the dry rub (added some dried chile powders and herbs), the BBQ sauce (added finely diced onions and reduced the cumin and lemon juice), and cooking time/temp, but nothing too drastic.  The sauce was sweet, rich, slightly tart, and zesty, with a kick of heat (I increased the burn by seasoning it with some of the spicy dry rub).  The meat was juicy and tender, sliding off the bone with each bite, almost melting on the tongue.

I’m so glad I made these, and due to popular vote, I have to make them again…and again….and again…

The Best BBQ Sauce - with a secret ingredient that takes it over the top! Fantastic on ribs and chicken!

Now, before I get to their recipe with my changes, I need to ‘veer’ off a bit.  My camera  broke.  I guess it was looking for a little spark in its life.  While uploading some photos this past Monday, there was a power surge, and the wire connected to it blew, little iridescent scintillas literally shocking me and sending some kind of electric sex up into the body of my camera.  When I tried to take some photos on Tuesday, all I got was ERROR this, and ERROR that, the camera shuddering and beeping away every time I pressed the shutter button.

To add insult to injury, when I reached for the Canon manual to troubleshoot, my elbow knocked against my ONE good lens, and KABOOM, it hit the floor and cracked in half.

Why? Why?

I carefully wrapped my critically injured camera and lens in bubble wrap, placed them gingerly in a cloth bag, and brought it to a local camera shop.  The proprietor told me *sniff* they had to be sent away for repair, and he wasn’t quite sure they would *sniff* make it – aka it might not be worth the price to repair either of them.  OH NO, what was I going to do?  I asked if he had an XSi, XTi or XT I could rent until we received the final diagnosis.  He did, but it didn’t have any X’s attached to it.

To put it simply, I could hear the faint heartbeat of the alternative/grunge rock movement coming from it.

Amazing Dry Rub Oven Roasted 'Fall off the Bone' Ribs and easy homemade BBQ Sauce with a secret ingredient that takes it over the top!

But, it was better than nothing, and I didn’t want to use my old, crappy point and shoot (see photos from May, June and July of ’08).  Unfortunately, I also had to revert back to the lens that came with my camera, so since the tragic accident, the photos I’ve taken have been more than less than stellar.  Remember, I have no natural light to begin with, so I need all the help I can get/afford when it comes to photographing my food.

Amazing Dry Rub Oven Roasted 'Fall off the Bone' Ribs and easy homemade BBQ Sauce with a secret ingredient that takes it over the top!

     The ribs with ancho (chile) and lime butter corn on the cob, minus the white cheese because it was a last minute idea.

So, that’s why these photos are pretty awful.  I sort of tried to emulate some of the photos of the rib preparation and ingredients at Fotocuisine.  HA! What was I thinking?

Amazing Dry Rub Oven Roasted 'Fall off the Bone' Ribs and easy homemade BBQ Sauce with a secret ingredient that takes it over the top!

Pomegranate BBQ Ribs
Prep time: 
Cook time: 
Total time: 
Yield: 4 servings
 
Adapted from Fotocuisine
'Slide off the bone' tender, extremely moist, and chockful of flavor!

By the way, you can also make these with beef short ribs, braising the short ribs in the pomegranate juice sauce! Email me if you're interested!
ingredients:
  • 1 rack pork baby back ribs
Dry Rub
  • 1½ teaspoons kosher salt (or 1 teaspoon table salt)
  • 1½ teaspoons paprika
  • 1½ teaspoons onion powder
  • 1½ teaspoons garlic powder
  • 1¼ teaspoons dried thyme
  • 1¼ teaspoons dried oregano
  • 1 teaspoon black pepper, ground coarsely
  • 1½ teaspoons ancho powder (optional)
  • 1 teaspoon cayenne pepper (optional)
Pomegranate BBQ Sauce *
  • 2 cups pomegranate juice
  • 1 small can tomato paste
  • 3 tablespoons molasses
  • 3 tablespoons dry mustard
  • 1 teaspoon cumin powder
  • 4 cloves garlic, minced
  • Half a medium onion, finely diced
  • ¼ cup honey **
  • ½ of a cherry or jalapeno pepper, minced (optional)
  • 1 lemon, juiced
  • Some of the dry rub to taste or just salt and pepper
directions:
Prepare the Ribs
  1. Peel the thin, silver skin off the back of the ribs, if you can. This is how you do it.
  2. Combine all of the ingredients for the dry rub. Sprinkle on and rub into both sides of the ribs until well coated. If desired and/or you have the time, you could wrap the dry rubbed pork in plastic wrap, tightly, and let marinate in the fridge for several hours prior to cooking.
Make the Sauce
  1. In a medium to large sauce pan,combine the garlic, onions, tomato paste, dry mustard, cumin, pomegranate juice, molasses and honey.
  2. Whisk it while bringing it to a boil, then reduce the heat to a simmer, and let cook, whisking occasionally, until thickened and reduced by one third to one half. Squeeze/stir in the lemon juice.
  3. Add some of the dry rub OR salt and pepper to taste - NOT all three. Set aside until ready to baste.
Cook the Ribs
  1. Preheat oven to 225 or 250 F. Heat a large grill pan, your outdoor grill or BBQ (bricks or coal) until very hot. Sear the ribs on both sides until you've got color, but that's it - don't go any further.
  2. Place the ribs on a foil lined sheet pan and paint/mop both sides, generously, with some of the sauce. Cover with another sheet of foil and place in the preheated oven. If using your grill or BBQ, apply the sauce to both sides until well coated, but wrap the ribs in foil and lower/close the cover of the BBQ or Grill.
  3. This is where I differ in cooking time and temp. I let these ribs go for anywhere from 2-4 hours (depending on the weight/thickness of the ribs) at 225 or 250 F, lifting up the foil covering the sheet pan and basting both sides of the ribs every 30 minutes with the sauce, then replacing the foil to cover the sheet pan. On a BBQ or Grill, you would unwrap and baste, then wrap again. 160 F means DONE, but you can go a bit further, just not too much. I didn't use a thermometer, I just went by taste and feel with a fork.
  4. When the ribs are done to your liking ('falling off the bone' tender is what you want), preheat your broiler, and let broil for about 2 to 5 minutes until bubbling and a deeper brown in color (of course you want those crispy areas!). **Cook down the remaining sauce for about 5 minutes on medium-high heat. Serve the ribs with the extra sauce on the side.
    Have plenty of napkins and moist towelettes on hand, and enjoy these finger lickin' phenomenal ribs!!
notes:
*- I doubled the recipe for extra sauce to serve with the ribs. Also, make life easier and avoid cross-contamination by dividing the sauce in half..one half for basting, the other half for serving. If you run out of sauce during basting, just pour some of the other half into the basting bowl. When time to serve, just heat up the remaining sauce, with no worries of cross-contamination since none of it touched the brush that was used to baste the pork as it cooked..
**If you like your BBQ sauce even sweeter, increase the honey. Less sweet, reduce it.

On a final note, I WILL be telling the story of the two women plus men ‘gym experience’ in my next entry..I promise!  Also, I was incredibly flattered to receive this award from Lauren at Celiac Teen.

one-lovely-blog

She’s a sweetheart of a girl, and her blog is one to check out, especially considering how she has to adjust her eating habits and cooking/baking due to Celiac Disease.  She’s incredibly creative and has such a positive attitude!  That said, now I have to pass this on to 13 people and in turn, you guys pass this on to 13 people.  Spread the sentiment!

Jill at Jillicious Discoveries
Julia at Melanger to Mix
Marta at Just call me Marta
Juliana at Simple Recipes
Mandy at What the Fruitcake?!
Megan at Feasting on Art
Valerie at The Chocolate Bunny
Sophie at Sophies Foodiefiles
Pat at Mille Fiori Favoriti
Isa at Eat My Cake Now
Laura at shore (house) chic.
Claire at Cooking is Medicine
Rose at The Bite Me Kitchen

The best homemade dry rub for ribs and chicken, plus an amazing BBQ sauce recipe!

Bookmark and Share

Amazing Dry Rub Oven Roasted 'Fall off the Bone' Ribs and easy homemade BBQ Sauce with a secret ingredient that takes it over the top! #ribs #babybackribs #BBQsauce #POM #ovenribs
Posted in Appetizers, Dinner, Lunch, Pork | Tagged , , , , , , , , , , | 83 Comments

The umm..Best Peanut Butter Cheesecake Chunk Brownies

The “umm” in the title refers to the fact that I don’t believe there is a ‘best’ of anything, especially when it comes to food, but it’s a term that’s used quite often to spark one’s curiosity enough to take a look at and maybe try.  The word ‘best’ is entirely subjective, so what may be the best for some, may not be best for others.  To me, these peanut butter cheesecake brownies are the best in comparison to other peanut butter cheesecake brownies I’ve tried (because they have chunks, not swirls, of peanutty butter cheesecake!)

Peanut Butter Cheesecake Chunk Brownies

My quest for perfect peanut butter cheesecake chunk brownies came about when I wanted to create something for someone I used to know who loved peanut butter, cheesecake, dark chocolate, and brownies.  Well, that someone is no longer a someone in my life, so, if you want to look at it in a spiritual sense, that batch of brownies not turning out the way I had hoped was for a reason.

Brownie kismet, perhaps?

Now it was time to literally start over and give these brownies another few shots.  Another few shots is actually an understatement, since it took 4 more tries before I was satisfied enough to proclaim them the perfect peanut butter cheesecake chunk brownies; maybe ever.

Peanut Butter Cheesecake Chunk Brownies

This was my first attempt back in April. WHERE’S THE CHEESECAKE? They tasted good and were super fudgelicious, but it wasn’t even close to what I was striving for.

The first attempt was back in late March-early April; the last 4 attempts were in a span of one week.  I usually keep a clean work space (well, try to) when cooking and baking, but by the 4th attempt, as you can see below, I said “Fruck it!” and basked in a heavenly mess of chocolate, peanut butter, empty cartons, egg shells.. ad whaddamessitum!  I was getting peanut butter in my chocolate and chocolate in my peanut butter, yet I wasn’t even close to perfect peanut butter cheesecake chunk brownies, much less brownies in general.

Yes, it can happen in baking, but it’s a little far-fetched when some dude is walking down the street eating peanut butter from a jar and a gorgeous woman comes flying out of nowhere and slams into him, spiking her chocolate bar into his jar of peanut butter.  They fall in love, invent the peanut butter cup, and become multimillionaires, until he leaves her for the hot, young blonde in his office who turns him on to SKITTLES. Taste the rainbow, bitch.

I even stepped on a few empty, cracked egg shells that hit the floor and ignored the smashed little white bits of *calcium, some of which stuck to my shoes, occasionally leaving a trail of little white specks for my cats to swat. I was in a zone! The world could have ended, and I would have still been melting, mixing, beating, marbling, as I disintegrated into ash.

Peanut Butter Cheesecake Chunk Brownies

What I wanted was an obvious cheesecake bite and texture in these brownies; heavy on the peanut butter flavor in the cheesecake batter.  In a lot of cheesecake or cheesecake marble brownies, the cheesecake batter kind of melts into the brownie batter, a swirl or bit here and there, along with a moist, supple bite, which isn’t a bad thing at all, BUT, I wanted a big bites of cheesecake.  Think of a cheesecake with a brownie crust, but divide and marble both together; creamy chunks of cheesecake easily distinguishable visually, texturally, and palatably throughout a dense and fudgy brownie.

Peanut Butter Cheesecake Chunk Brownies

I searched online, and was surprised to see that there weren’t many PEANUT BUTTER cheesecake chunk, swirl or marble brownie recipes.  In fact, I found just three along the lines of what I envisioned; one from Bon Appetit, which was just a layer of brownie topped with a peanut butter cheesecake-chocolate marble…so, no.  The second was from Anna at Cookie Madness, which look great, but no chunks, and the last one at Baking Blonde’s Weblog, which are topped with Reese’s peanut butter cups. As mentioned above, I wanted cheesecake chunks and more peanut butter.

From there, I decided to just look for plain cheesecake brownies ( 1 TRILLION hits), and ended up at David Lebovitz’s Cheesecake Brownies, which was exactly what I was looking for; a good amount of thick, creamy cheesecake distributed throughout the brownies. Now the conundrum, how was I going to incorporate the peanut butter seamlessly, and what adjustments do I need to make to get that same bite and effect, with a distinct peanut butter flavor, in the cream cheese batter? This is where my journey to the last four attempts began.

The BEST Fudgy Peanut Butter Cheesecake Chunk Brownies - not swirls, CHUNKS!

I tried several different amounts of peanut butter and cream cheese, and whole eggs versus egg yolks, until I finally reached what I think is pretty close to the ultimate pan of peanut butter cheesecake chunk brownies.  One trick to get those lovely and distinct  marbled chunks of cheesecake, is to pour half the brownie batter into the bottom of the pan, then spoon several large spoonfuls of the peanut butter cheesecake batter on top.  DO NOT swirl/marble them together.

Yep, you read that right, no marbling/swirling allowed in step one!

Step two; gently pour/scrape the remaining brownie batter on top of those spoonfuls of peanut butter cheesecake batter, spreading it delicately, and top the remaining brownie batter with more large spoonfuls of the remaining peanut butter cheesecake batter.  NOW you can marble away.  Just the top though, although it’s OK if the first layer gets marbled/swirled a bit, just not too much, since you want those cheesecake chunks (well, I know I do.).

Peanut Butter Cheesecake Chunk Brownies
I brought some of my attempts, and the final brownies, to my gym.

Veering wayyy off topic for a moment.

I’m now doing my PT in this awesome, state of the art gym.  Heat treatment and deep knee massages prior to getting my booty whipped, vibrating electrode ice treatments after getting my booty whipped.  Top of the line work-out machines, all with digital cable TV’s and Ipods, (although the music they blast in the gym is awesome, a lot of classic rock) loads of great classes (just signed up for Pilates and Kickboxing), a driving range out back, along with one of my favorite games (sports?) to play..ever, miniature golf.

Is mini golf considered a sport?

That said, knee massages sound great, right? Well, it’s painful while it’s happening, but in a good way.  It’s what you feel the next day that isn’t good.  The first three sessions, the post massage mornings were hell.  They’re manipulating my knee in ways it’s never been manipulated, not to mention my quad, which needs to be built up again to support my knee, since it was pretty much atrophied for quite a while. The pain doesn’t last too long, and is starting to ease up, depending on which Physical Therapist massages it, so no problemos here since……

I can WALK again!

We’re talking without a brace, walker or cane! So what if I walk like Herman Munster for now, and it isn’t easy yet; I can finally freakin’ walk!!  I’ll touch on that more in my next entry, along with a funny story regarding two women, one of them moi, and most men’s obsession with two women.

Peanut Butter Cheesecake Chunk Brownies
Back to the brownies.

Everyone who tasted them, especially the final pan of brownies, said I should sell them, so I’ll take that as a good sign that maybe they could be the ‘best’? On the anti ‘nothing is best’ side; they’re really, really, really good, if you love a sinfully rich brownie loaded with chunks of peanut butter cheesecake.

If you refrigerate these brownies before eating them, the peanut butter cheesecake really pops texture wise, but flavor wise, any which way; warm, room temp, etc, is explosively fudgy, super peanut buttery, and creamy.  I prefer these made with milk chocolate, but as I’ve mentioned in previous entries, I usually bake with dark chocolate since it seems to be a favorite of many. I mostly bake for others, not myself, except when I crave peanut butter and chocolate in the wee morning hours.

Yes, a Peanut Butter Freak, I Am.

* One of my favorite Julia Child ‘gems’ used to come after she or a guest chef cracked an egg and a piece of shell fell into whatever they were preparing – “Oh, just leave it in there for extra calcium.”

Peanut Butter Cheesecake Chunk Brownies

Peanut Butter Cheesecake Chunk Brownies
Prep time: 
Cook time: 
Total time: 
Yield: About 12 brownies, depending on how big or small you cut them
 
Brownie batter adapted from David Lebovitz
ingredients:
Brownie Batter
  • 6 tablespoons unsalted butter, cut into pieces
  • 4 ounces milk chocolate, or bittersweet chocolate or semisweet chocolate, chopped
  • ⅔ cup sugar
  • 2 large eggs, at room temperature
  • ½ cup flour
  • 1 tablespoon unsweetened cocoa powder
  • ⅛ teaspoon salt
  • 1 teaspoon vanilla extract
Peanut Butter Cheesecake Chunk Batter
  • 8-ounces cream cheese, room temperature
  • ½ cup creamy peanut butter *
  • 1 teaspoon vanilla extract
  • ½ cup sugar
  • 1 whole, large egg OR 1 egg yolk.. if you want a really dense cheesecake batter **
directions:
Make the Brownie Batter
  1. Preheat oven to 350F. Line an 8-inch square pan with foil or parchment paper, making sure it goes up all four sides. Use two sheets if necessary. Mist with non-stick spray or grease lightly.
  2. Stir chocolate and butter in medium saucepan over low heat until smooth; cool 10 minutes. Using electric mixer on low speed, or stir in with a wooden spoon - sugar, eggs, and vanilla into cooled chocolate mixture, until uniform. Stir together flour, cocoa and salt, then stir or beat it into the butter, chocolate, sugar, egg mixture. Spread half of this brownie batter in pan.
Make the Peanut Butter Cheesecake Batter
  1. In a separate bowl, beat together the cream cheese, peanut butter,whole egg or egg yolk, sugar, and vanilla until smooth. DO NOT OVER BEAT!
Assemble and Bake
  1. Drop large spoonfuls of the peanut butter cheesecake batter across the top of the first layer of brownie batter. Do not swirl them together. Cover the spoonfuls of peanut butter with the remaining brownie batter and the remaining peanut butter cheesecake batter in large spoonfuls, then take a knife, spatula, spoon handle, or whatever you have on hand that can 'swirl' well, and swirl the TOP layer of peanut butter cheesecake batter with the brownie mixture. Lift up some of the brownie batter to insure the brownie mixture swirls in as much as possible, since it can be little heavier than the peanut butter cheesecake batter, depending on whether you use a whole egg or just the yolk. As mentioned above, it's ok if some of the first layer of both batters swirl together, just not too much.
  2. Bake for 35-40 minutes, or until the batter in the center of the pan feels just set, or a skewer contains a few moist brownie crumbs sticking to it (you would stick the skewer in a center chocolate area).
  3. Let cool, then lift the brownies up and out using the foil or parchment paper and peel it away/off. Cut the brownies into equal squares.
notes:
* Although I didn't use it, I think Natural and/or Organic peanut butter would give you a better texture and pure peanut butter flavor, minus all those additives in your basic (rhymes with Blippy, Bif or Beter Ban) supermarket PB.
** The first photo of the cheesecake and last photo are the brownies in which I used 1 egg yolk in the peanut butter - cream cheese batter. All other brownie photos (including the unbaked swirl photo) were made using one whole egg in the peanut butter - cream cheese batter. The whole egg produces a smoother, creamier peanut butter cheesecake texture, whereas using just the yolk produces a more dense peanut butter cheesecake texture, like NYC cheesecake, as you can clearly see in the photos.

Peanut Butter Cheesecake Chunk Brownies


Peanut Butter Cheesecake CHUNK fudge brownies. Not swirls of peanut butter cheesecake; CHUNKS of creamy peanut butter cheesecake are dispersed throughout the brownie!


Bookmark and Share


Posted in Bars/Brownies, Cheese, Dessert | Tagged , , , , , , , , | 92 Comments