Stuffed Cabbage Rolls – Like My Grandmother Used To Make

Even if you’re not a fan of cabbage, these AMAZING stuffed cabbage rolls just might make you one! It’s turned many cabbage loathers into cabbage lovers!

One of my fondest recollections from childhood is the Saturday visits from my maternal grandparents. They would arrive bearing bags loaded with gifts and food, eyes twinkling as we grabbed the bags from their hands and started rifling through them, staking claim on anything we could get our hands on.

Amazing Stuffed Cabbage Rolls. Tender leaves of cabbage stuffed and rolled with beef, garlic, onion and rice, simmered in a rich tomato sauce.

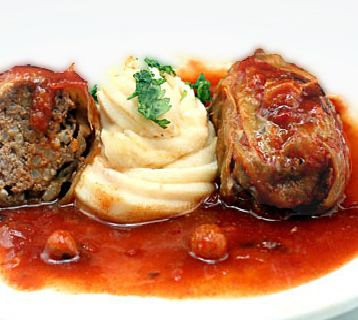
We always served the stuffed cabbage with mashed, silky smooth, not one lump, potatoes.  No explanation why, it was just tradition.  It was the perfect sauce soaking vessel.  I love them with fluffy, wide egg noodles too.

The ‘usuals’, as far as food went, were: humongous TURQUOISE peppers jam-packed with rice and beef, cooked until delicately soft, in a lush tomato sauce (my mother’s favorite), these fabulous, fluffy, yeasty rolls from a bakery near them, assorted cold-cuts, herring in cream sauce (Blechhh, I steered clear of that one, but my grandparents and mother loved it! Still hate it to this day, soo fishy to me, in a bad way.), homemade noodle kugel, and homemade chocolate chip cookies. But, there was one dish that trumped all of the above for me, one that my grandmother must have fed me from birth because I loved it more than anything at an age when all things leafy or green was gross.

Stuffed cabbage rolls (aka Holishkes, Golumpki (Golabki, Golubsti) Sarma, or Prakas).

I still remember digging deep into each bag, feeling for the familiar, large plastic Chinese soup container; the tender green cabbage rolls flush against the sides, crammed within a bright orangey red, sweet and sour tomato sauce with raisins and more bits of cabbage.  The moment I hit it, I would yank it out with impassioned glee, and the understanding that it was MINE, MINE, ALL MINE.

Amazing Stuffed Cabbage Rolls. Tender leaves of cabbage stuffed and rolled with beef, garlic, onion and rice, simmered in a rich tomato sauce.

I used the whole cabbage, even the darker outer leaves because it was grown in a friend’s garden and I didn’t want to waste a bit of it! But, it’s the inner lighter leaves (below) that are sweeter, tender, and just well, better, when cooked.

Amazing Stuffed Cabbage Rolls. Tender leaves of cabbage stuffed and rolled with beef, garlic, onion and rice, simmered in a rich tomato sauce.

When my grandmother passed, her stuffed cabbage rolls recipe went with her.  I never asked for it because I thought she would live forever.  You have these moments in youth where everyone seems immortal, and death is just an eventual speck on the horizon that you don’t acknowledge.  No one was gonna die on you, no matter what older people said.

Amazing Stuffed Cabbage Rolls. Tender leaves of cabbage stuffed and rolled with beef, garlic, onion and rice, simmered in a rich tomato sauce.

I had attempted ‘my version’ of her stuffed cabbage rolls only once before, but was completely unsuccessful.  It turned out okay, but it just wasn’t HERS, and I think you all know what I mean by that. It was missing that something something, but I couldn’t quite place what that something something was. I finally decided that I wasn’t going to even attempt it for a while and just occasionally bask in the memory of her magic whenever I encountered it elsewhere.  A few Jewish delicatessen’s came close, but no dice; her stuffed cabbage rolls were much, much better.  There was always something missing, and I don’t think it was a secret ingredient.

Amazing Stuffed Cabbage Rolls. Tender leaves of cabbage stuffed and rolled with beef, garlic, onion and rice, simmered in a rich tomato sauce.

When this month’s Daring Cooks challenge was announced, the first thing I saw was stuffed grape leaves.  I’ve never been a huge fan of them, although I try to like them because they’re such a huge presence in some of best Greek salads I’ve ever had.  I always end up taking one bite, chewing it with a sour face, then eventually spitting it out into a napkin like a 5-year-old.  I suppose we were just not meant to be, but that doesn’t mean I won’t keep trying (UPDATE: 2018, I’ve finally begun to like them. A friend of a friend made some, and I couldn’t stop eating them! SO GOOD. Hooray!).  I have this thing about waste, and it seems such a waste to let those amazing little rolls hit the trash with tiny bits of Greek salad residue clinging to them. (Yes, I know dolmades are not only an occasional part of Greek salads, but it’s the only time I encounter them).

Amazing Stuffed Cabbage Rolls. Tender leaves of cabbage stuffed and rolled with beef, garlic, onion and rice, simmered in a rich tomato sauce.

Our October 2010 hostess, Lori of Lori’s Lipsmacking Goodness, has challenged The Daring Cooks to stuff grape leaves. Lori chose a recipe from Aromas of Aleppo and a recipe from The New Book of Middle Eastern Food.

Scrolling further down, I noticed there were a few people stuffing cabbage leaves.  Alright, so it’s not exactly what the blog checking lines state, but this recipe is of Jewish origin (little factoid – Jewish stuffed cabbage rolls are usually sweet and sour), and Israel is in the Middle East.  Yep, trying to crawl through loopholes here. Regardless, this was a sign; it was now time to take on my grandmother’s stuffed cabbage rolls again.  It couldn’t have come at a better time since 1) the weather is getting cooler, and 2) I was really starting to miss and crave it immensely.

Amazing Stuffed Cabbage Rolls. Tender leaves of cabbage stuffed and rolled with beef, garlic, onion and rice, simmered in a rich tomato sauce.

No fancy pants plating for a dish like this – just load up your plate with comforting goodness.  OK, so I piped the potatoes with a pastry bag; it was just a brief whim thing aka I’m a food blogger, and I take photos of almost everything I make.

So, here’s what I did.  I took a traditional Jewish stuffed cabbage recipe from Joan Nathan, and another stuffed cabbage recipe from CHOW.com, then combined them and adjusted it according to what I remember my grandmother’s stuffed cabbage tasting like, which seemed to take forever! A little of this, a little of that, wait, no, subtract that and add more of this instead. It probably took me about two weeks and five pans of stuffed cabbage to get to what I felt was close to hers! And I even ended up with a crunchy bottom on one pan!

It made me cry a little. BUT, as I said, I finally got there!

So, the only thing I did differently from my grandmother was oven simmering the stuffed cabbage in lieu of simmering it stove top in a dutch oven, a method Joan Nathan recommends in her recipe.  Just the thought of having to keep running to the stove to stir so the cabbage rolls didn’t stick to the bottom and burn, like my grandmother did, wasn’t something I relished.  In fact, I don’t think she ever left the stove when she was simmering her lovely cabbage rolls!

Update:  Sue left a comment saying that if you want to cook this stove top, line the bottom of the pot with cabbage leaves and  it will prevent the rolls from scorching.  Thank you, Sue!

Final verdict? Closest to her stuffed cabbage that I’m ever going to get.  My mother was the true test, and she said they tasted exactly like hers.  Stuffed cabbage success!

Amazing Old-Fashioned Stuffed Cabbage Rolls. Tender leaves of cabbage stuffed and rolled with beef, garlic, onion and rice, simmered in a rich tomato sauce.

Stuffed Cabbage Recipe

This amazing stuffed cabbage roll recipe can also be assembled, wrapped tight, and frozen for up to 3 months, then reheated! Just add an extra 15 to 25 minutes to the baking time.

Leftover cabbage from your GARGANTUAN head? Fried Kielbasa and Cabbage or Haluski.

Amazing Stuffed Cabbage Rolls
Prep time: 
Cook time: 
Total time: 
Yield: 6 to 8 servings
 
Tender leaves of cabbage stuffed and rolled with beef, garlic, onion and rice; simmered in a rich tomato sauce.
The preparation time entirely depends on which method you use to soften your cabbage leaves. It can be anywhere from 30 minutes to an hour to 24 hours plus if you freeze it.
ingredients:
Cabbage Rolls
  • 1 large head green cabbage, about 2 to 2¼ pounds
  • 2 pounds ground beef
  • 2 eggs (not necessary, you can leave them out, but they bind and make the meat fluffier)
  • 1 medium onion, grated or minced
  • 2 garlic cloves, minced
  • 2 teaspoons salt
  • 1 teaspoon black pepper
  • ½ cup uncooked white rice (I like using long-grain) *
Tomato Sauce **
  • 2 tablespoons butter or vegetable oil (I use 1 tablespoon of each)
  • 2 cloves garlic, finely chopped
  • 1 medium onion, chopped (medium dice)
  • 2 15-ounce cans tomato sauce or one 32-ounce can whole tomatoes, pulsed in a food processor with juice until pureed.
  • juice of one lemon or 2 tablespoons (or more to taste) apple cider vinegar
  • 2 tablespoons to ¾ cup light brown sugar (Depending on amount of sweetness you prefer. Start with 1 to 2 tablespoons and taste the sauce, adding if you like it sweeter. If you prefer it completely savory, add only 1 tablespoon brown sugar and the juice from half a lemon)
  • Salt and pepper to taste
  • ½ cup golden raisins (optional)
  • Chopped parsley, for garnish
directions:
  1. Fill a large pot with water and bring it to a rolling boil. When the water comes to a boil, fill a large bowl with ice water. Cut out as much of the core as you can from the bottom of the cabbage, then drop the whole, cored head into the boiling water for 3 to 4 minutes. Once the leaves separate and are pliable, immediately remove and drop the blanched leaves that separated (keep the pot of water boiling) in the ice water. Once cooled down, remove and pat the leaves dry. Repeat with any leaves still attached to the head and not pliable, until you've gotten all the leaves off the head, and they are all soft and pliable.
    Alternatively, If you've got time on your hands, you can freeze the wrapped head of cabbage for two days then defrost. Cut out as much of the core as you can, then wrap tightly and freeze. When defrosted, the leaves will peel off easily and be soft enough to roll.
    Here's some other ideas from readers, although I have yet to try them so I cannot confirm that they work. 1. Place the cabbage in the microwave for 6 minutes. The core will slip right out and the leaves will be perfect for rolling. 2. Cut out the core, fill the hole with water, then tie it up tightly in a microwave safe plastic bag. Microwave it for 6 minutes, then remove it from the microwave and let it steam in the bag for about a half hour.
  2. Set aside about 16 of the largest leaves (these will be your cabbage rolls. If you can only get 14 leaves, it's fine) and slice off any thick parts of the vein on each of them, or just cut out the thick vein since that part will be covered once the cabbage leaf is rolled. Chop some of the remaining cabbage leaves to make 1 cup of chopped cabbage, and reserve.
  3. Make the sauce (recipe below). Set aside to let cool. IMPORTANT: Taste the sauce as you add the brown sugar, anywhere from 2 tablespoons to ¾ cup as stated in the ingredient list above, starting with only 2 tablespoons so you sweeten it to YOUR preference. Some like it very sweet and sour, and some do not.
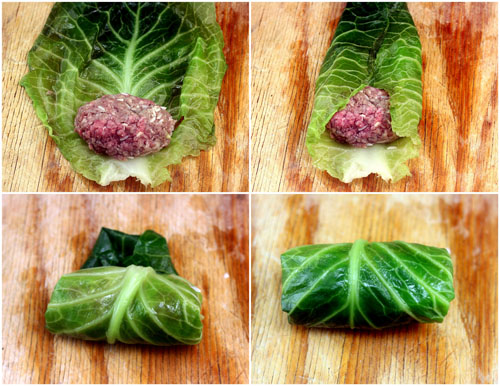
  4. In a large bowl, mix the ground beef with the eggs, grated onion, chopped garlic, salt, pepper, and rice. (If you use cooked rice, you can test the seasoning of the meat mixture to your liking by frying up or microwaving a piece of it and tasting, if desired). Divide the meat mixture into sixteen equal pieces, or 14 equal pieces, about 2 to 3 oz each, depending on whether you have 16 or 14 cabbage leaves. Using slightly moistened hands (or not, since it rarely sticks to my hands), form the pieces into thick cylinders. Place a cylinder of filling near the bottom of a cabbage leaf (if the vein in the leaf is really thick, shave it down with a knife before placing the beef on it, being careful not to cut a big hole through the leaf itself OR, cut the thick vein out completely in a narrow V. When you roll the cabbage, that V will be covered sufficiently, as mentioned above).
  5. Roll the meat filled cabbage leaf up, folding both sides over the filling, (like you see in the above photos) and finish rolling to enclose the filling, like a burrito. Continue, filling and rolling all the cabbage leaves. Line the bottom of a 13 x 9 roasting pan or glass dish with a layer of sauce. Place cabbage rolls, seam side down, on top of sauce.
  6. Top cabbage rolls with remaining sauce then cover the whole pan with tin foil. Bake for 2 hours in a preheated 350 F oven.
Sauce Directions
  1. Over medium heat, melt the butter and/or oil in a heavy, non-reactive saucepan. Sauté the second onion until soft and golden. Add the garlic and saute for 2 more minutes, then add the reserved 1 cup chopped cabbage and sauté for about 30 seconds to 1 minute more.
  2. Add the tomato sauce, lemon juice, brown sugar, salt and pepper to taste, and stir to combine. Increase the heat until it comes to a boil, then lower it and simmer for 5 minutes. Add raisins now, if using. Set aside to cool while making the cabbage rolls.
notes:
* You can cook the rice before adding it to the meat mixture, if desired (just follow the rice manufacturer's directions for cooking ½ cup of rice, which should give you about 1½ cups cooked rice), but my grandmother used uncooked rice, and I've never ended up with even one uncooked grain when my cabbage rolls are done. The rice always cooks to perfection. Either way, it's up to you!

** Sauce can be made 2 days ahead; just cover and chill. Also, if you like a lot of sauce, just double or add another half of the original recipe.

Amazing Stuffed Cabbage Rolls. Tender leaves of cabbage stuffed and rolled with beef, garlic, onion and rice, simmered in a rich tomato sauce.

For the recipes for stuffed grape leaves provided by our sexy lips hostess, click HERE.  Thanks for a great challenge, Lori!

Amazing Stuffed Cabbage Rolls. Tender leaves of cabbage stuffed and rolled with beef, garlic, onion and rice, simmered in a sumptuous, velvety tomato sauce!#stuffedcabbagerolls #stuffedcabbage #cabbage #beef #rice #tomatosauce


Posted in Beef, Daring Cooks, Dinner, Lunch, Vegetables | Tagged , , , , , , , , , , , , , , , , , | 531 Comments

Decorating Cookies – Bugs, Flowers, and Baseball

Decorating Cookies

..with royal icing.

Hmmm.

There are few things in life that one is 100% sure about when it comes to oneself, and as you grow and learn, they start to add up.  For one, I know I’ll never be a blonde because I love being a brunette, and the only time I will ever dye my hair is when the gray starts to creep in, but only brunette.  Two, I will never eat veal because of how they treat those poor, baby calves.  Three, I will never, ever try Balut. Baby chicks!! Okay, I could fill a novel with ‘I will nevers‘, so I’ll stop at three.  #3 – I know I will never be or make a cent as a cookie decorator because I suck at it.

Decorated Sugar Cookies

The September 2010 Daring Bakers’ challenge was hosted by Mandy of “What the Fruitcake?!” Mandy challenged everyone to make Decorated Sugar Cookies based on recipes from Peggy Porschen and The Joy of Baking.

Decorated Sugar Cookies

I cannot say enough about Mandy. We became fast friends via Daring Bakers, and we can just talk for hours on end about anything and everything.  She is truly a special gal, and when her turn to host the Daring Bakers challenge came up, I couldn’t have been more excited for her. PLUS, I knew she’d give us a goody, and she did.  It’s just too bad I’m such a royal icing slob with shaky hands, not to mention my blog stage fright.

Decorated Sugar CookiesExample of ‘flooding’ the cookie.  Outlining with a thick to medium consistency icing, filling (or flooding in cookie decorator speak) with a looser consistency icing, then using a skewer to drag it into the corners and even it out.  This gives you a nice, crisp and neat border.  Not on mine, of course, because I can’t do neat borders.

As always, I left the challenge to the last minute, and as I type this entry, I still have gel paste all over my hands and crusty remnants of royal icing decorating my t-shirt.  You don’t even want to see the table where I worked on these cookies.  It looks a hurricane of technicolor shit ran over it about 8 times.  I’m so, so dreading cleaning up this disaster.  I envy people who can work neat when it comes to cake and cookie decorating and more than two colors of frosting or royal icing.

Decorated Sugar Cookies

Also, as always, I had loads of great ideas running through my head when Mandy asked us to pick a theme that ‘said’ September to us.  I knew instantly where I was going.  September is the stretch before the baseball post season starts, and YES, it’s looking like my World Series defending champion NY Yankees will be in again (although they’re not looking like they’ll go past the first round at this time). Boo.

Decorated Sugar CookiesNo idea why I didn’t leave well enough alone with just the yellow stripe and one red dot.  The caterpillar looks like it has a festering, pus-filled infection of some sort.

I had round cookie cutters for the baseballs, but that’s it, so I went ahead and ordered a baseball bat cookie cutter, a t-shirt cookie cutter that I could morph into a Yankee pinstripe jersey, and bid on a great baseball cap cookie cutter on ebay.  I lost the baseball cap at the very last second, (who are these ebay’ers who are able to sneak in a bid with 1 second left?? Let me at ’em! – I was the only bid prior!).  I couldn’t find another one like it locally and didn’t like the other caps I saw online, so I begrudgingly decided to just cut out a cookie circle, color it with navy royal icing, pipe the Yankee logo on it, and boom, pretend you’re looking at the baseball cap super close up – your chin resting on the bill.  Thank you.

I made four bats, but two broke, and one was eaten, so I only had one left for photos.  I also made four Yankee ‘authentic’ jerseys, two of which sucked, I mean really sucked, so much so that I don’t even want you to see them.  The two that made the cut suck too (I had no idea how hard it is to squeeze out perfectly thin pinstripes and a teeny, tiny interlocking NY).  A friend thought it was a jail uniform and I completely concur that it could be Black Bart’s daily wear.

In any event, my ball cookies turned out the best, so I will proudly showcase them and slip the other stuff in flattering positions that hide how hideously crappy they are.  Ooops, it didn’t work, crap on full display.  Even the interlocking NY on the baseball cap looks like crap, and I initially thought I nailed it.

Again, I will never, ever be a cookie decorator.

Yankee baseball decorated Sugar CookiesWhy did I outline the baseball bat with black royal icing? Where in baseball are there bats with black trim? God I really really suck at this cookie decorating thing.

On to part two.  I perused through Flickr to see what other cookie decorators do, and as far as I’m concerned, they’re all freakin’ professionals.  Why aren’t there flaws in their designs and dents in their royal icing? The perfection and awe factor is just mind- blowing!  So talented!

I knew there was no way I was even coming to close to that kind of artistry with my cookies, but I really wanted to do ladybugs..and flowers..and more bugs.  I saw a gal who did just that and decided to do a take on her gorgeous, flawlessly royal iced ‘Spring’ cookies.  I know; not a September theme here in the Northeast US, but I don’t care.  Just pretend I live down under, k?  Hey mates, put another caterpillar on the barbie!  More crappy decor is on its way!

Baseball Decorated Sugar Cookies

To decorate the flower and bug cookies, I purchased squeeze bottles for the royal icing colors.  It just seemed so much easier and less messy than pastry bags and tips..plus, these bottles are equipped with couplers and tips aka jackpot!  Well..I was wrong.  Maybe a teeny bit easier, but the mess is no different once you’ve got the bottles loaded and ready to go, especially since I had to use pastry bags to fill the small necked bottles!  Mess doubled, but I was pumped; how hard can using a squeeze bottle be? I always use them to decorate plates with sauces, and it always turns out beautiful.

Well, when you’re trying to pipe intricate stuff onto small cookies, and your hand is shaking, not to mention bottle clog when you’re in the middle of an attempt at a perfectly straight border or line, it doesn’t matter what you use.  I should have just finger-painted the damn cookies.  Most would think I did by the look of my cookies….and hands.

Decorated Sugar Cookies

Here’s some notes from my cookie decorating (baking the cookies was the waaaay easy part):

  • Adding the food color to the royal icing can be deceiving.  The bright red with a bit of orange for the ladybugs looked too light as I was mixing it in, so I kept adding more until it was perfect.  It looked great freshly piped, but dried into an almost dull maroon. Apparently, gel paste colors take a bit of sitting to fully morph into the color you want, so adding more will screw you every.single.time.  No maroon ladybugs in nature.
  • My flowers obviously also do not exist in nature, but it would be cool if they did.  I did try to give the yellow flowers (sunflowers, possibly?) some shading with orange powdered food color, but it looks more like someone spilled Tang on them.
  • My caterpillars looked great, but I had to keep adding and adding, ending up with bloody, pus filled, festering wounds instead of the pretty dots I was going for.
  • Trying to pipe the Yankee logo freehand is near impossible; you need some kind of stencil, unless you’re good at piping or a pro.  Note to self: Next time find and use a stencil.

All in all, I LOVE, LOVE, LOVED this challenge because it was like being back in HS art class; minus the teacher breathing over my shoulder and telling me to go easy on the color. However, I probably won’t be decorating cookies again because I suck at it.

To get the recipe for the yummy sugar cookies and royal icings, click HERE.

As for sugar cookies, I think I’ll stick to my favorite kind of sugar cookie; AMISH SUGAR COOKIES! *NO royal icing*.


Bookmark and Share

Posted in Baseball, Cookies, Daring Bakers, Dessert | Tagged , , , , , , , , , , | 47 Comments

Baked Alaska – Cake and Ice Cream Again!

Yes, cake and ice cream again, in one post.  I think that’s pretty unusual for a food blog, but again, it’s cake and ice cream; cake and ice cream in Baked Alaska; a 1970’s throwback dessert that still elicits awe when brought to the table aflame, so no objections here!

So, this is the latest I’ve ever been with a Daring Bakers challenge..almost a week late.  I was going to skip it when I realized I wouldn’t make it on time, but since I’d started it at the beginning of the month, and had the cake and ice cream for the Baked Alaska in the freezer, I decided to forge ahead and get it done.

My freezer sees more action than Leonardo DiCaprio.

Nevertheless, life has a way of getting in the way at the worst times, so I wasn’t able to get this post up by the due date, and then some.

To make matters worse, the past two weeks have been riddled with a humidity SO thick and damp, that I was unable to whip up a decent meringue (tried all three..French, Italian, and Swiss, and NOTHING prevented weepy, droopy meringue that refused to hold shape)  to give my Baked Alaskas beautiful swirly swirls and whirls. This why they all look so sad until I finally gave up and just scraped lines into them with a butter knife (below, UGH.).

Baked Alaska with Roasted Brown Sugar Peach and Macadmia Brittle Ice Cream on Brown Butter Pound Cake         I was going for an igloo effect with the meringue, but I ran out of meringue before I could do the top. FAIL. The irony is, this was the only batch of meringue to hold shape before the dastardly humidity hit. It figures.

The August 2010 Daring Bakers’ challenge was hosted by Elissa of 17 and Baking. For the first time, The Daring Bakers partnered with Sugar High Fridays for a co-event and Elissa was the gracious hostess of both. Using the theme of beurre noisette, or browned butter, Elissa chose to challenge Daring Bakers to make a pound cake to be used in either a Baked Alaska or in Ice Cream Petit Fours. The sources for Elissa’s challenge were Gourmet magazine and David Lebovitz’s “The Perfect Scoop”.

You see that little widget in the right hand column of my blog that says Sugar High Fridays (Update: No longer there, but it was a fun challenge of yore)?  Well, that’s THE Sugar High Fridays that’s partnered up with Daring Bakers for this challenge.  I’m pointing this out because it was the first challenge I ever took part in when I started this blog, and it’s been ages since I participated.  I’m glad to get back into the swing, and I hope this brings more people into the SHF posse so it can prosper once again.

Buttery Roasted Brown Sugar Peaches for Baked Alaska with Roasted Brown Sugar Peach and Macadmia Brittle Ice Cream on Brown Butter Pound Cake

Now for the challenge.  I decided to nix the ice cream petit fours and just make a Baked Alaska or some individual Baked Alaskas.  Baked Alaska conjures up ’70’s’ to me, a la polyester suits, disco, tye-dye, swingers etc.  I was a wee thing in the 70’s, but I’ve read about the ‘mode’ of that period.  Wasn’t Baked Alaska the IN dessert of the 70’s? Was there a restaurant or swinger’s party that didn’t offer Baked Alaska in their dessert repertoire? OK, maybe the latter is pushing it, but one would need to cool off after one of those, no?

Macadamia Brittle for Baked Alaska with Roasted Brown Sugar Peach and Macadmia Brittle Ice Cream on Brown Butter Pound Cake                            Macadamia Nuts for brittle courtesy of OhNuts.com.

Whenever I hear “Baked Alaska”, I think of the book Wifey by Judy Blume.  Sounds weird, right? Just hear me out.  In the 1980’s, when I was no longer hooked on phonics, I would devour several books a week.  When I finished my ‘age-appropriate’ books, including Judy Blume’s tween sagas, I used to sneak into my parent’s bedroom to see what books my mother had taken out from the library. Sometimes the book(s) were mature/adult reads, but that just made it all the more exciting to me.  As you may have already guessed; one of those books was Wifey, a somewhat sordid tale of marriage and sex in suburbia circa 1970-something.

Baked Alaska with Roasted Brown Sugar Peach and Macadmia Brittle Ice Cream on Brown Butter Pound Cake

I’m not going to get into a whole synopsis of the book, but there’s a chapter where the married ‘heroine’, if you’d call her that, runs into an old boyfriend she fantasizes about on a pretty daily basis, at some couple’s nuptials.  They end up in some back chill room off the kitchen, getting it on next to the Baked Alaska.  To this day, that’s the first thing that comes to mind when I hear Baked Alaska.  Yeah, I know.  Weird.

Baked Alaska with Roasted Brown Sugar Peach and Macadmia Brittle Ice Cream on Brown Butter Pound Cake

Meringue doesn’t hold shape because of horrid humidity? Butter knife surrender.

I digress.

For my Baked Alaska, I used David Lebovitz’s amazing vanilla bean ice cream recipe that Elissa provided for us.  I mixed buttery brown sugar roasted peaches, pureed and chopped, into two thirds of the vanilla base, and in the other third of the vanilla base, finely chopped homemade salted, toasted macadamia brittle.  I guess it’s a peaches and creamy theme, albeit a little more complex and nutty.

Luscious, buttery, sweet roasted peach ice cream surrounding a center of vanilla bean salted macadmia brittle ice cream. It doesn’t get much better than that! I always strive for texture and contrast, and the bits of brittle gives a nutty, caramel crunch to the creamy, while the buttery, brown sugar roasted peaches lend a soft, summer fruity tone to it.

Baked Alaska with Roasted Brown Sugar Peach and Macadmia Brittle Ice Cream on Brown Butter Pound Cake

The only caveat (Is there ever NOT a caveat for me?) was that I had to torte the delicious brown butter pound cake cut-outs from the recipe in the challenge, horizontally. This was due to the awesome mousse rings I used for each Baked Alaska. They weren’t as tall as I originally thought, so to make room for both ice creams, it was the only choice I had. Nonetheless, I served extra cake along with the Baked Alaska so no one lost out on cake. It’s a great pound cake recipe, albeit a bit dry, but I think it was the extra minute or two I added to the baking time when it didn’t look brown enough.

That said, how can you go wrong with brown butter aka beurre noisette, in the cake base of a Baked Alaska, or anything for that matter? Nutty, rich HEAVENLY, palate pleasing.. OK, I could go on, but I’d eventually run out of adjectives.

For the full Daring Bakers version of Baked Alaska and Ice Cream Petit Fours, Click HERE.

Baked Alaska Recipe

Buttery Brown Sugar Roasted Peach and Salted Macadamia Brittle Baked Alaskas
Prep time: 
Cook time: 
Total time: 
Yield: 4 individual Baked Alaskas
 
Preparation time does not include freezing time for the ice cream, so allow for that when making this.
Vanilla Ice Cream Base by David Lebovitz
ingredients:
Brown Butter Pound Cake
  • 19 tablespoons (9.5 oz) (275g) unsalted butter
  • 2 cups (200g) sifted cake flour (not self-rising; sift before measuring) *
  • 1 teaspoon (5g) baking powder
  • ½ teaspoon (3g) salt
  • ½ cup (110g) packed light brown sugar
  • ⅓ (75g) cup granulated sugar
  • 4 large eggs
  • ½ teaspoon pure vanilla extract
Buttery Roasted Brown Sugar Peaches - eat these as is for a low calorie dessert! **
  • 4 to 6 fresh peaches, cut in half and pitted (4-6 depending on size of peaches)
  • ⅓ cup butter, (5 tablespoons plus 1 teaspoon) melted
  • ⅓ cup brown sugar
Salted Macadamia Brittle
  • 1 cup sugar
  • 1 cup water
  • 1 tablespoon unsalted butter
  • 1 cup or a little more whole salted macadamia nuts, toasted
Vanilla Ice Cream Base
  • 1 cup (250ml) whole milk
  • A pinch of salt
  • ¾ cup (165g) sugar
  • 1 vanilla bean, split lengthwise OR 2 teaspoons (10ml) pure vanilla extract
  • 2 cups (500ml) heavy (approx 35% butterfat) cream
  • 5 large egg yolks
  • 1 teaspoon (5ml) pure vanilla extract
Swiss Meringue
  • 6 egg whites
  • 1 cup granulated sugar
directions:
Make the Brown Butter Pound Cake
  1. Preheat the oven to 325°F/160°C and put a rack in the center. Butter and flour a 9”x9” (23cmx23cm) square pan.
  2. Place the butter in a 10” (25cm) skillet over medium heat. Brown the butter until the milk solids are a dark chocolate brown and the butter smells nutty. (Don’t take your eyes off the butter in case it burns.) Pour into a shallow bowl and chill in the freezer until just congealed, 15-30 minutes.
  3. Whisk together cake flour, baking powder, and salt.
  4. Beat the brown butter, light brown sugar, and granulated sugar in an electric mixer until light and fluffy, about 2 minutes. Beat in the eggs one at a time, mixing well, and then the vanilla extract.
  5. Stir in the flour mixture at low speed until just combined.
  6. Scrape the batter into the greased and floured 9”x9” (23cmx23cm) square pan. Smooth the top with a rubber spatula and rap the pan on the counter. Bake until golden brown on top and when a toothpick inserted into the center comes out clean, about 25 minutes.
  7. Cool in the pan 10 minutes. Run a knife along the edge and invert right-side-up onto a cooling rack to cool completely.
Make the Buttery Brown Sugar Roasted Peaches
  1. Preheat the oven to 375 F. Combine the melted butter and brown sugar until uniform. Split each peach horizontally, removing the pit, then roll the cut side of each peach half in the butter-sugar mixture. Alternatively, you can rub the mixture on the cut sides with your fingers, making sure you have a decent coating on each one. Place the peaches, butter sugar coated cut side down on a lightly greased foil lined or non-greased parchment lined baking sheet (silpat is fine too). Drizzle any leftover butter-sugar mixture over the top of the skin side up peaches.
  2. Roast for 30 - 35 minutes until soft and caramelized.
  3. For the ice cream - puree half the roasted peaches in a food processor, skins and all. Skin and chop the remaining roasted peaches. Set aside to cool until ready to add to ice cream base.
Make the Salted Macadamia Brittle
  1. In a medium saucepan, boil the sugar and water together until amber to light brown, to make a caramel. Test the color of the caramel on a white plate to make sure it's amber-light brown.
  2. Stir in the butter with a wooden spoon (it will bubble up - so be careful!) then stir in the toasted macadamia nuts. Pour onto a silpat and let cool. Break up into chunks (for ice cream add-in, chop or crush with the bottom of a pan, bottle, or with a mallet in a ziploc bag). Store in an airtight container until ready to eat or use in ice cream.
Make the Vanilla Ice Cream Base
  1. Heat the milk, salt, and sugar in a medium saucepan until the liquid steams. Scrape out the seeds of the vanilla bean with a paring knife and add to the milk, along with the bean pod. Cover, remove from heat, and let infuse for an hour. (If you do not have a vanilla bean, simply heat the milk, salt, and sugar in a medium saucepan until the liquid steams, then let cool to room temperature.)
  2. Set up an ice bath by placing a 2-quart bowl inside a large bowl partially filled with water and ice. Put a strainer on top of the smaller bowl and pour in the cream.
  3. In another bowl, lightly beat the egg yolks together. Reheat the milk in the medium saucepan until warmed, and then gradually pour ¼ cup warmed milk into the yolks, constantly whisking to keep the eggs from scrambling. Once the yolks are warmed, scrape the yolk and milk mixture back into the saucepan of warmed milk and cook over low heat. Stir constantly and scrape the bottom with a spatula until the mixture thickens into a custard which thinly coats the back of the spatula.
  4. Strain the custard into the heavy cream and stir the mixture until cooled. Add the vanilla extract (1 teaspoon if you are using a vanilla bean; 3 teaspoons if you are not using a vanilla bean) and refrigerate until thoroughly chilled, preferably overnight.
  5. Remove the vanilla bean and freeze in an ice cream maker. If you don’t have an ice cream maker, you can make it without a machine.See the instructions at David Lebovitz's site.
For the roasted peach and macadamia brittle add-ins:
  1. When the vanilla ice cream is done churning in your ice cream maker (it will still be slightly soft), remove one third of the vanilla ice cream base to one bowl, and two thirds of the vanilla ice cream base into another bowl. Stir the macadamia brittle into the bowl with one third of the vanilla ice cream base, then stir the roasted peach puree (until uniform) into the bowl with two thirds of the vanilla ice cream base. When uniform, gently fold in the chopped roasted peaches,. Wrap each bowl tightly with plastic wrap or place each in a freezer bag, and place both bowls in the freezer until ready to assemble.
Make the Swiss Meringue
  1. Over a double boiler (prefebly using bowl you will beating whites and sugar in) over medium heat, heat egg whites and sugar, whisking constantly until sugar is completely dissolved.
  2. Transfer to the bowl of an electric mixer fitted with the whisk attachment (or just use mixer bowl as mentioned above) ; mix on high speed until you get medium peaks (the whites slightly bend at tip when lifted with beater).
Assemble the Baked Alaskas
  1. Using four 3-inch mousse rings or cut PVC pipe, cut out 4 circles of the pound cake and place in the bottom of each ring.
  2. Scoop about ½ cup roasted peach ice cream over cake, then make a well in the middle for salted macadamia brittle ice cream, pushing the peach ice cream up the sides to the top. Freeze.
  3. Remove rings with frozen peach ice cream from the freezer. Place a small scoop of salted macadamia brittle ice cream into each well, then cover the tops evenly with remaining peach ice cream..pressing down (to prevent air bubbles) and smoothing the tops. Cover tightly with plastic wrap and freeze overnight.
  4. About 15 minutes before serving thge Baked Alaskas; unmold each Alaska one at time, keeping the others frozen until ready to pipe on and torch meringue. Wrap a warm, wet towel for a minute or two around the mold in case you have trouble unmolding them.
  5. In a pastry bag with the tip of your choice; pipe each Baked Alaska decoratively with the swiss meringue, or just frost them with a rubber spatula, lifting upwards to get peaks, and making sure they're completely covered. Place Alaskas (on a baking sheet) in a preheated 500°F oven for 1 to 2 minutes until the peaks are golden brown, or brown with a kitchen or propane torch (much easier and more room to be creative). Serve immediately.
notes:
* To make your own cake flour, click HERE.

** These peaches can be used in many dessert batters before baking, or just serve peaches with cake and/or ice cream or eat them as is since they're very low in calories and taste like the super soft candy! They're sticky/gooey and amazing! I love them with Greek yogurt!

Buttery Roasted Brown Peaches for eating as is, or for Roasted Brown Sugar Peach Ice Cream!

Bookmark and Share

Posted in Cakes, Daring Bakers, Dessert, Frozen, Fruit | Tagged , , , , , , | 46 Comments