Is it quiche or a cool pie? Read to find out how this self-crusting vegetable cheese ‘omelet’ quiche – pie started as a quiche and morphed into something even more amazing!
Where did all the blue/purple potatoes go? All summer long, every single local supermarket or farmer’s market was either out of them, didn’t sell them, or “will be getting a delivery in soon”, yet those deliveries never came, unless there were people lined up for miles right on time for the delivery, with the same thought as me; ‘Where did all the blue/purple potatoes go?’
The reason I’m waxing on about purple/blue potatoes is, for this month’s Secret Recipe Club, I was assigned the blog Cooking with Chopin, Living with Elmo, by Ginny. Isn’t that a cute blog name? I skimmed through Ginny’s lovely blog, feeling very ‘savory’, and this quiche struck me. I have not made or had quiche in a long, long time. I wanted quiche..period.
I digress…
I love rainbows, have always loved rainbows, have always wanted to make those very cool rainbow vanilla cakes I see all over the food blogosphere. But, I have a problem, and that problem is the amount of food color used. I just haven’t been able to wrap my baking brain around all that food color in one cake. So, rainbow food using natural ingredients is what I strive for.
Will I ever get to the point?
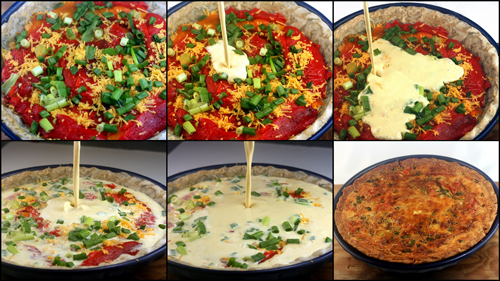
I love pouring photos.
When I saw this quiche recipe, it hit me; I could turn this spinach quiche into a delicious rainbow. Roy G. Biv quiche. Roasted red, orange and yellow peppers, along with the spinach and green onions in the recipe. BUT, since it was a breakfast quiche, how about a layer of purple potato hash browns or latkes beneath the spinach?
An immeasurable amount of excitement hit me at that moment; this was gonna be pretty cool, and delicious. Well..it was not meant to happen, because purple potatoes now ceased to exist within 20 miles of me, every which way. It would just have to be a Roy. G B quiche.
Quiche fail in a rectangular tart pan.
Here’s the funny part. I tried to shove this quiche of many layers, due to my zany ‘rainbow’ idea, into 14 x 4 x 1.5-inch rectangular tart pan. I love rectangle tarts, and hadn’t used that tart pan in a while. Ha..the joke’s on me. Both a 9-inch pie dish and a 14 x 4-inch rectangular tart pan take 4 cups of liquid, but I forgot to factor in my extra layers. You should have seen me trying to will all the custard to soak into the layers, pressing them down with a huge spoon as rivers of custard spilled out of the pan from the top, sides and bottom.
I even used a bench scraper to scoop some of the spilled custard up and pour it back on top, which resulted in more seepage. I finally gave up and just stuck it in the oven as is. Imagine if there had been a layer of purple potatoes? Quiche custard tsunami. Well, I didn’t get a rainbow, more like a mushed tri-color bar of quiche which I over-baked, but it was tasty nonetheless.
I had to make it again, and this time I was going to use a deep dish pie plate because I was determined to get my rainbow. There was now plenty of room for all the layers; plenty of room for all the custard, albeit, still no blue/purple potatoes. It baked up perfect and it looked beautiful, until I cut into it.
Apparently, the orange and yellow peppers disappeared into the cheese and custard, so instead of a rainbow, I got the Italian flag..or Christmas. It separated into red, cheesy orange, egg yellow and spinach green layers on its own! Did it matter? No, because not only was it cool, but because the egg middle was exactly like a cheesy, custardy omelet! Like the first quiche, it tasted great, and honestly, I like the rustic/cheesy omelet look of it. This is what I really love about this recipe; the amount of cheese is just enough to get a fondue like drip in the omelet middle, unlike most quiches where the cheese blends into the custard giving you flavor, but no cheesy ooze.
BUT, BUT, BUT, here is the best part! The combination of cheese and custard formed a top crust! SO, from quiche to a layered vegetable cheese omelet pie!
Oh..I almost forgot, I did something some might consider sacrilege, including myself. I….I left out the bacon (I think I hear a few gasps). The first time, I simply forgot, but loved the flavor as is. The second time I forgot on purpose. SO, this omelet pie/quiche is officially vegetarian (or is it ova vegetarian?). My ‘vegetarian’ category finally gets a shot of life! A low-fat post and now a vegetarian post, all in one week? Awesome, but I still love butter, and I still love meat. Just sayin’.
In conclusion, I ended up magically creating a layered pie instead of a quiche (but I’m still partially calling it a quiche), probably due to pouring the custard over each layer while layering. I love happy accidents! This time I got two; a gooey, cheesy omelet in and between the veggies, and a self-crusting top crust!
If you want to make this quiche in a 14 x 4 rectangle tart pan, reduce recipe by half, all the ingredients (not pie crust – just filling), including the custard, to avoid major flooding. Bake for 35-45 minutes.
Self-Crusting Cheese Vegetable Omelet Pie – Quiche
Combine the flours, flax-seed and salt in a large bowl. Add the butter and shortening. Using your fingers, blend until the mixture resembles a coarse meal. Add the water and mix with your fingertips or large fork just until the dough comes together. (You can also use a food processor for this, but just quick pulses, do not run it on full speed, you want your dough to remain raggedy with bits of butter and shortening showing) Turn the dough out onto a well-floured board, form it into a disk with your hands, wrap in plastic wrap and refrigerate until ready to use..
Remove dough from refrigerator and roll out to fit a 9-inch springform pan (if using a springform pan, grease it first) or very deep dish pie pan. Crimp the edges if using a pie pan, and freeze for 15-20 minutes.
This dough can be refrigerated for up to 2 days or frozen for up to 3 months.
Make Filling, Assemble and Bake Pie
Preheat oven to 375 degrees.
Remove pie crust from freezer, then brush with egg white and prick all over with a fork. Place pie crust in oven and bake for 10 to 15 minutes, then remove and cool.
Place all three peppers under the broiler and broil until charred black on each side, turning as each side chars. Place in a bowl and cover tightly with plastic wrap so they steam, about 15 minutes, making the skins easy to peel off. Seed and skin each pepper, then chop roughly. Put each roasted, chopped pepper in a bowl lined with a paper towel, blot to dry.
Heat 1 tablespoon of olive ol in a pan, then add the garlic and saute until soft but not brown, Dump all the spinach in the pan and wilt it in the garlic oil for a few minutes. Add some red pepper flakes, of desired. Remove from pan into a bowl lined with paper towels, and blot it dry.
In a bowl or large glass measuring cup, whisk together the eggs, cream, salt, black pepper, and Worcestershire sauce.
Sprinkle the bottom of the crust with the 2 tablespoons of Parmesan cheese. Spread the garlic spinach over the parmesan cheese; top with green onions and a little of the custard. Next spread the chopped yellow bell pepper over the spinach and green onions. Top that with the cheddar cheese, and chopped orange bell pepper, and a little more custard. Press down if need be, and top with chopped red bell pepper. Pour the custard over the filling, and sprinkle the top with Parmesan cheese and any extra cheddar or green onions that are left over. IMPORTANT: season each layer with a little kosher or sea salt and pepper before topping with the next layer.
Bake in the preheated oven until the top is lightly puffed and browned, and a knife inserted into the center of the quiche comes out clean, 45 to 55 minutes.
Please be sure to check out Cooking with Chopin, Living with Elmo! While you’re at it, can you click on the blue frog below to see what other SRC’ers chose to make from their assigned blogs? You will not be disappointed!
About two months ago, Catherine Bowen Brophy, a consultant at Greencore/Weight Watchers, contacted me, asking if I wanted to review a new line of Weight Watchers fresh meals and delicatessen salads. My first thought was…
‘Umm..has she seen my blog?’
My blog is probably the last place one would look for weight loss or healthy eating. I think I have maybe one ‘healthy/low-fat’ post, and any others that may or could be good for you, are purely accidental or coincidental. This had to be some kind of mistake, right?
I like Weight Watchers. As I’ve said before, I will not review or talk about any product on my blog that I don’t like or believe in. I’ve turned many products down, but this one I couldn’t. Truth be told, I think Weight Watchers is one of the few, if not only, diet plans that’s sensible, convenient, doesn’t deprive you, and is most likely to keep weight off once you lose it. I have friends who have succeeded on it, and back in HS, even though we didn’t need to lose weight at the time, a friend and I used to buy some of the Weight Watchers desserts (along with Rotel tomatoes and Velveeta for that Rotel Dip. Speaking of, is there really a Velveeta chocolate fudge out there?) for munchies, simply because they tasted really good. Of course we’d eat like 4 desserts each, but again, they were munchies food after a party or a night out – not a diet.
If you’ve ever seen Sex and the City, there’s an episode where Miranda is ready to purchase a stack of diet books in a desperate attempt to take off her baby weight. The cashier flips through the books as she rings them up, and these are not exact quotes,, but it went something like this..”This one I lost 40 lbs on, then gained back 60″ – “This one made me sick, and I didn’t lose weight” and so on and so forth. She then tells Miranda to go with Weight Watchers, the only one that ever worked because, as I mentioned above, they don’t deprive you of the foods you like to eat. I know, I know..Weight Watchers probably paid for that little scene, but one part definitely isn’t BS; the food IS good and it does fill you up.
Photos in collage courtesy of Weight Watchers. Top Row – BBQ Chicken with Mashed Sweet Potatoes and Turkey and Stuffing. Bottom Row – Three Cheese Macaroni and Meat Loaf with Garlic Mashed Potatoes
After devouring a half pan of the baklava I made in June, and endless candy testing/tasting throughout the month of July, I wasn’t feeling too hot. Bloated, lethargic, and well, jiggly. I had already been through many ‘blog’ over–noshings in late 2010 (remember the pots of cassoulet?), so I wasn’t helping my cause by eating more than a bit of my super rich dishes and desserts again.
I received a huge ice packed box filled with 7 fresh meals and three delicatessen salads. I decided then and there that if I was going to review this properly, I was going to do it right. Never having been on any weight loss plan my entire life (I dieted in many unhealthy ways, which I won’t get into now, when I needed to lose weight), I was now officially on one. I gave myself the month of August to see what would happen by sticking to a Weight Watchers meal plan. I even purchased more of these meals and salads when I ran out of the ones sent to me free of charge, because, again, I wanted to do it right.
This is what it looks like in natural light and when it’s not melting – photo courtesy of Weight Watchers.
Every day I’d have fresh fruit or a little cereal for breakfast, along with my usual spirulina carrot apple ginger juice, then a bit of one of the salads they sent, for lunch (I received the chicken salad with dried cranberries, the potato – egg white salad, and the macaroni salad, but there’s more, which you can see HERE), and one of the fresh meals for dinner. The fresh meals are not as small as you would think, and they’re delicious; they taste fattening. I especially loved the meat loaf with garlic mashed potatoes, the three cheese macaroni, and the BBQ chicken. The delicatessen salads tasted just like the stuff you get from a deli! The only criticism I have is, the egg whites in the potato salad were a tad rubbery and need to be cut smaller. LOVE, LOVE, LOVED the chicken salad!
Verdict. I try not use a scale, as I prefer to go by how my clothes fit and how I feel. However, I did this time. I dropped 6 lbs barely doing anything other than sticking to these meals. Whether you need to lose a little, or a lot of weight, I one hundred percent recommend you give these fresh meals and delicatessen salads a shot.
Having said all that, here’s the best part..they’re cheap! Fresh Meals are only $2.99 each, and delicatessen salads are $1.99-$2.99! You can find them in the refrigerated areas of the delicatessen or meat sections at most supermarkets. Once again, you can see the various selections of Fresh Meals and Delicatessen salads, HERE.
Now, of course I’m not done. Weight Watchers did not send me any desserts, so you’re probably wondering what the photos of the fattening looking chocolate thing with whipped cream, chocolate syrup and candy pieces is. It’s a Weight Watchers recipe! There’s no way I’m going to review anything without making something, and this was one of the desserts I chose to satisfy my sweet cravings. It tastes like a rich, chocolate – minty pudding pop or fudgesicle..and again..it tastes fattening!
Speaking of pudding pops, I miss pudding pops! Do any of you? At a restaurant in Delaware, a few years back, they had strawberry cheesecake pudding pops that were okay, but it wasn’t those chocolate and vanilla swirled pudding pops of yore. If anyone is listening, please bring them back!!
So, this frozen minty (or almond) chocolate dessert looks pretty good doesn’t it? It takes 5 minutes to put together, and after two hours of freezing, you can eat the whole dessert without guilt! I’m going to post the recipe, verbatim, with a few italicized tips of my own, from weightwatchers.com.
How quicketh it melteth..
The Weight Watchers Fresh Meals are currently available in the Northeast, Mid-Atlantic and Mid-West regions, at nearly all major grocery stores as well as online at Peapod.com. Soon Fresh Meals will be available in stores in North and South Carolina, Georgia and Florida, as well.
By the way, this blog will remain a 99% rich, fattening blog, as it’s always been; I just wanted to make that perfectly, crystal clear.
Recipe from Weightwatchers.com PointsPlus® Value: 3
ingredients:
1 oz chocolate wafer(s), about 5 cookies
¼ teaspoon mint extract (I used peppermint extract)
1 teaspoon unsweetened cocoa
7 oz fat-free whipped topping, about 1 whole aerosol can
¼ cup(s) fat-free skim milk
3 piece(s) Weight Watchers by Whitman's Mint patties, frozen, chopped
2 tablespoons chocolate syrup
6 tablespoons whipped topping, light or fat-free, vanilla or chocolate
directions:
Line six muffin holes with foil muffin liners. (I used paper liners)
In a blender, combine wafers, extract, cocoa, fat-free whipped topping and milk; blend until completely combined. Divide mixture among prepared muffin liners; freeze for at least 2 hours. (Fill each cup half way. Anymore and you won't get 6 desserts, and your points will go up on each one.)
Just before serving, top each with ⅙ of mint patties, 1 teaspoon chocolate syrup and 1 tablespoon whipped topping. Yields 1 dessert per serving.
notes:
This easy chocolate dessert can be made in several flavors. For a pure chocolate treat, replace the mint extract with chocolate or vanilla extract and swap the mint patties for an ounce of mini chocolate chips (could affect PointsPlus values). My note : You can also make it a chocolate - almond dessert by using almond extract instead of mint, and Weight Watchers almond patties.
I reached 100 posts today. It’s actually kind of sad since I’ve been blogging for almost 3 1/2 years. I should have triple that amount, or more! Regardless, candy is a great way to celebrate it!
What?? Candy making during the scorching hot dog days of August? This is also known as my initial reaction to this challenge.
Lucky me, a severe heat wave hit when I started making my variety of candy, and continued on and off throughout July. To add insult to injury, the AC in the room next to the kitchen that cools the kitchen, broke. I can’t even begin to tell you how many failures I had and how many times I had to start over. But in the end, it was well worth it.
Halloween begins less than two months from today, and then the holiday season is upon us, can you believe it? This is actually a good time to learn some new candy making techniques you may have never tried so you have plenty of time to practice and perfect it by the holidays! You could all be expert chocolate and sugar mamas and papas, presenting gift boxes/bags of gorgeous candy and chocolates of all sorts, wowing your recipients, come holiday time!
Sponge (aka Sea foam aka Honeycomb)toffee without gelatin. Notice the large air pockets and scorching. Scroll down to see the sponge toffee with gelatin. Huge difference!
Ouch. I suddenly have a severe case of writer’s block, and there’s a lot to be written. Please bear with me since this is going to be a long, long post, but, it’s candy; how can anything about candy ever be too long? Well, luckily, I have a lot of what I wrote for this candy challenge on hand, not to mention a lot of technical info about tempering chocolate by the amazing and talented Mandy, to help me out.
The August 2011 Daring Bakers’ Challenge was hosted by Lisa (me) of Parsley, Sage, and Sweet and Mandy of What the Fruitcake?!. These two sugar mavens challenged us to make sinfully delicious candies! This was a special challenge for the Daring Bakers because the good folks at http://www.chocoley.com offered an amazing prize (a $250.00 gift certificate to use at their site) for the winner of the most creative and delicious candy!
Plus, Mandy generously donated a second prize..a small hamper to the runner-up, which includes a $30 Visa card thrown in by Lis, and a fantastic dessert recipe book, plus some other fun goodies. I didn’t throw in a prize because I’m currently poor. Scratch that, I just added a third prize. THIS book. It’s pretty amazing!
Anyway, Hmm..me? A sugar maven? I guess so, since I couldn’t stop making candy once I started!
So, here’s how I ended up hosting my third Daring Kitchen challenge, as I’m sure some are thinking ‘Hasn’t she already hosted several DK challenges, as well as Mandy? Yes, we both have, but I digress.
Lis, the lovely co-founder of the Daring Kitchen, and my future betrothed, texted me one day in early July. She asked if I knew anyone who knew how to temper chocolate, but it had to be a tempering method in which a thermometer is used (There are other techniques that do not need a thermometer, but it’s something that takes a lot more practice to get ‘just right’). I sent her some links of Daring Kitchen members who certainly had or looked to have this fun and sort of scientific (a lot of chocolate crystal behavior at a molecular level schtuff), skill down pat. Unfortunately, none were able to host.
I tweeted “Does anyone know how to temper chocolate?”. I did get one response, but it was instructional, which makes sense since my question could be construed as asking for help. I tweeted a few more times, rewording it several different ways, but no more responses.
Then the question from Lis….
“If I can’t find anyone to host, do you think…”
Yes, I know how to temper chocolate, and I enjoy it, but maybe not during the summer. I’ve been SO lazy this summer, and the humid heat waves were/are brutal. I could feel my lazy self rebelling, but my love of all things edible me, succumbing.
During a phone call with the wonderful and talented Mandy, of What the Fruitcake?, I told her about my dilemma. Suddenly, she started talking about all aspects of chocolate tempering, from the methods to every.single scientific facet of it. Just as I was ready to offer up my firstborn to get her to partner with me, she offered to do so. I was elated, so elated, I threw out a couple rah-rah fist pumps to an empty room.
SO, about the candy..Lis wanted (from me and Mandy) chocolate tempering demos and at least one chocolate candy using tempered chocolate and one non-chocolate candy. She threw some ideas at us, two being chocolate bark and the popular, French, fruity jewels you see all over the food blogosphere, pate de fruits. Mandy opened up a Google doc, and away we went. We each chose three candies and a chocolate tempering method.
Mandy:
White and Milk Chocolate tempering using a marble slab
Milk Chocolate & Hazelnut Praline Truffles
Candied Orange & Pistachio Marzipan White Chocolates aka Bonbons
Chocolate Bark
Lisa:
Dark, White and MilkChocolate tempering using the seeding method
Sponge (Sea Foam) Toffee
Paté de Fruits
Passion Fruit Caramel Filled Chocolates aka Bonbons
Before I get to the chocolate tempering and my candies (please be sure to go to Mandy’s blog and check out her three gorgeous and mouth-watering candies), I have to say, I couldn’t have done this without Mandy, especially on such short notice. It’s been a tough time for me, and my brain has literally been a mass of scrambled eggs. I scribble scrabbled into our doc, while she neatly, clearly and concisely added a fantastic explanation of chocolate tempering, along with charts with temperatures and conversions, and cleaned up my messy, rambling paragraphs in blue. I’d spend an hour scribbling, then wake up each morning to a beautifully organized doc. Thank you, Mandy, you are truly amazing.
Mandy tempering white chocolate using the marble slab method, Check out her blog to see the rest! Her photos are absolutely beautiful!
OK..Let’s temper some dark chocolate using the seeding method;
How to Temper Chocolate
Wait, wait, wait..first you need to know why tempering chocolate is a really good thing when it comes to dipping/enrobing candies and molding chocolates, filled or solid. You’ve all opened up a box of chocolates and seen the lovely shine. That’s one. You take a bite, and the thin coating snaps nicely then melts beautifully on the tongue. That’s two. When you’re dipping or molding chocolates, if you just melt the chocolate without tempering, you usually end up with dull, streaky, often too thick, chocolate coatings. That’s three and that’s as simple an explanation as it gets. For a more detailed, scientific explanation, follow the link at the end of this post to our challenge.
But, I can show you the difference between a strawberry dipped in just regular melted chocolate and a strawberry dipped in tempered chocolate. CLICK HERE to see the difference.
Having said that, couverture chocolate is the only chocolate you get a really good temper with. Valrhona is a good brand, for example. There are some supermarket brands that are ‘okay’, and we listed them in the linked challenge url at the end of this post, but couverture chocolate is the best way to go.
Remember one thing as I take you through this; ‘seeds’ are the reserved chopped chocolate or chunks of chocolate used to cool down your melted chocolate and help bring it into temper.
You can use the small seeding method, which I used in this demo (In my photos, those are chocolate calets; DO NOT use chocolate chips, which contain paraffin to hold their shape). or the large seeding method, where your seed(s) are large chunks or just one large chunk of chocolate, so it’s easier to remove once the chocolate is in temper. If you use the small seeding method and all the seeds aren’t melted once you’ve reached temper, you can either put the bowl back over the heat on and off for a few seconds at a time, stirring, until they are melted, or take an immersion blender to them.
IMPORTANT: Make sure that your bowl fits snuggly into the saucepan so that there’s no chance of steam forming droplets that may fall into your chocolate. If water gets into your chocolate it will seize!
How to Temper Dark, Milk and White Chocolate - Seeding Method
Yield: 1 lb tempered chocolate
ingredients:
At least 1 lb (16 ounces) dark, milk, or white chocolate*
directions:
Finely chop chocolate if in bar/slab form (about the size of almonds).
Place ⅔ of the chocolate in a heatproof bowl
Set aside ⅓ of the chocolate pieces (again, these are your seeds)
Place bowl over a saucepan of simmering water (once again, make sure the bowl does not touch the water)
Using a rubber spatula, gently stir the chocolate so that it melts evenly. Place candy thermometer in melting chocolate.
Once it’s melted, keep an eye on the thermometer. As soon as it reaches between 115°F-120°F, remove from heat. Milk and white chocolate need to reach a temperature between 110°F-115°F.
Add small amounts of the reserved ⅓ of chocolate (seeds) at a time, stirring to melt before adding more seeds.
Continue to add small additions of chocolate (seeds) until you've brought the chocolate down to 82°F (78°F for milk or white chocolate) (You can bring the chocolate down to 88°F -91°F for dark chocolate or 84°F to 87°F for milk or white chocolate, the working temperatures - and stop there. Your chocolate is now in temper. However, I prefer bringing it below temper then back up to temper. I find it gives you a more fluid chocolate)
Put it back on the double boiler and bring the temperature back up until the chocolate reaches its working temperature; 88°F - 91°F. Milk and white chocolate needs to be between 84°F-87°F.
If you still have a few unmelted bits of chocolate, put the bowl back over the simmering water, stirring gently and watching the thermometer constantly, or, as mentioned above, smooth out the unmelted chocolate bits with an immersion blender.
IMPORTANT: You really need to keep an eye on the temperature so that it doesn't go over its working temperature. Oh, and you should be using a chocolate or instant read thermometer. It has to be a thermometer that goes below 100°F and your basic candy thermometer does not.
To test if the chocolate is in temper; spread a little chocolate on a piece of parchment paper and place in the refrigerator for a few minutes to quickly cool it. When the chocolate appears to have a slight shine and is set, remove from the parchment paper and snap in half. The chocolate should break cleanly and should not melt when touched.
Your chocolate is now tempered and ready to use
notes:
*DO NOT use chocolate chips for cookies Tip #1: If you’re using the chocolate to dip a lot of truffles etc. which means the chocolate will be sitting off heat for a while so it will naturally start to thicken as it cools. To keep it at an ideal viscosity for even coating, put the bowl over steam for 30sec-1min every 5-10mins. Do not let the temperature go over the working temperature! Tip #2: Having the chocolate in a warmed glass bowl and wrapped in hot kitchen towel or on top of a heating pad set on low can also help keep the chocolate at its working temperature for longer. Tip #3: It is also easier to keep the heat if you work with larger amounts of chocolate rather than small amounts. Any leftover chocolate can be kept to be used later and then re-tempered. Tip #4 - When molding tempered chocolate, it's messy work. There's no way you're getting away clean, even if you use an itty-bitty spoon or paint the molds with chocolate. Put on an apron and deal with it.
Painted Passion Fruit Caramel Filled Chocolates aka Bonbons
Now, let’s make something with this silky, shiny, tempered dark chocolate. We’ll start with the passion fruit caramel filled Bonbons, but first a little story about an evil pastry chef.
I had a tried and true passion fruit caramel recipe that was fantastic, but wanted one with a more intense passion fruit flavor. I went to a chef’s forum and asked if anyone had a ‘formula’ for a really intense passion fruit caramel..in the ‘professional’ thread since I wanted a professional formula. Well, I had no idea that if you’re not an actual pastry chef, they eff with you. When he asked if I was a chef and/or worked in the industry, I mistakenly told the truth..no, no training, never worked as one, no degree in anything culinary. I apologized and moved on to another thread. A day later, much to my surprise he answered with a formula, and seemed very nice. Great, right?
Welll..whaddya know..he gave me a recipe where the measurements were completely off; too much cream and passion fruit puree. I could tell by looking at the recipe, but tried it anyway since it was given to me by a supposedly trained pastry chef. Due to the heat wave, all candy was placed in the fridge, so when I bit into one, of course it was firm’ish’, meaning instead of spilling out, it just oozed slowly. At room temp, which I found out about a week into the challenge via an attempt by a Daring Baker, Mary, it was completely liquid. I didn’t want anyone else to try it and fail, so I immediately put up my tried and true recipe. I curse your next batch of souffles, Chef Froo Froo!
When I popped my painted Bonbons out of the molds and left them at room temperature, the humidity seeping through my walls resulted in condensation, which in turn mottled my temper and pretty cocoa butter painting (sniff).
Painted Passion Fruit Caramel Filled Chocolates aka Bonbons
Prep time:
Cook time:
Total time:
Yield: Depends on size chocolate molds you use
Equipment needed: A small brush (for painting the molds with colors, optional) Chocolate molds Bench or plastic scraper Ladle OR A small brush or spoon Silicon Mat or Parchment Paper Trays / Baking Sheets Pastry Bag fitted with Small to Medium Plain Tip OR Ziploc Bag with corner cut off OR a plastic squeeze bottle OR A Teaspoon
ingredients:
Tempered Chocolate (at least 1 lb)
Various colored cocoa butters OR food grade cocoa butter, melted and colored with powdered food colorings, which I used. It's not as vibrant as the 'pricey' bottled stuff (optional)
Passion Fruit Caramel Filling
1 cup (225g / 8oz) granulated white sugar
½ cup (125ml / 4 fluid oz) light corn syrup
½ cup (125ml / 4 fluid oz) water
4 tablespoon (60g / 2 oz) unsalted butter
2 tablespoons (30ml / 1 fluid oz) heavy cream
¼ cup (60ml / 2 fluid oz) passion fruit puree
1 teaspoon salt
directions:
For Painted Chocolate Wells
If using colored cocoa butter and plastic molds, paint designs at the bottom of the wells in each mold. Let dry. You can also use lustre dusts mixed with a bit of extract or vodka, instead of colored cocoa butters for a nice sheen. Let painted molds dry.
When coating the molds with the tempered chocolate, I like to do it how the chocolate pro’s do it (much faster and a lot less tedious). While holding mold over bowl of tempered chocolate, take a nice ladle of the chocolate and pour over the mold, making sure it cover and fills every well. Knock the mold a few times against a flat surface to get rid of air bubbles, then turn the mold upside down over the bowl of chocolate, and knock out the excess chocolate. Turn right side up and drag a bench or plastic scraper across so all the chocolate in between the wells is scraped off cleanly, leaving you with only chocolate filled wells. Put in the fridge to set, about 5 to 10 minutes. Alternatively, you could take a small brush and paint the tempered chocolate into each mold, or spoon it in if you’d like.
Remove from refrigerator and fill each well with the filling of your choice. Again take a ladle of chocolate and pour it on top of the filled chocolate wells, knocking against a flat surface to settle it in. Scrape excess chocolate off the mold with the bench scraper then refrigerate until set.
When set, pop your beautiful filled chocolates out of each well and enjoy!
For Passion Fruit Caramel Filling
Place the sugar, corn syrup and water in a medium saucepan. Set over medium-high heat and stir to combine.Bring the mixture to a boil and cook until dark amber in color 310°F-315°F / 155°C-158°C, about 5 minutes. Use a pastry brush, dipped in water, to wash down sides of pan to prevent crystallization as the mixture boils.
Remove saucepan from the heat and gradually whisk in the passion fruit puree, heavy cream and butter. Transfer to a medium bowl and let cool.
Transfer cooled caramel to a pastry bag or snipped ziploc fitted with a medium tip - or a squeeze bottle, which I prefer.
Sponge Toffee (also called Sea Foam Candy or Honeycomb Toffee)
Sponge toffee with gelatin. Notice less air pockets and a tighter ‘crumb’.
After trying two recipes for sponge toffee, one that used baking soda and vinegar, which resulted in a bit of a scorched flavor in the very middle, and one that used too much baking soda and tasted like it; I came across the one below, which is fabulous! As you can see in the photos, the gelatin really makes a difference! The gelatin also gives it a softer crumble when bitten into, just like a Crunchie or Violet Crumble bar!
½ cup honey (or corn syrup or ¼ cup corn syrup plus ¼ cup honey))
½ cup water
1 tablespoon baking soda (sifted)
directions:
Line a 9x9-inch pan with parchment paper, allowing it to extend over the edges.
In a small bowl, sprinkle gelatin over 1 teaspoon water and allow to bloom for 5 minutes.
In a medium pot with high sides, combine sugar, honey (or corn syrup or mix of both) and ½ cup water. Heat and stir over medium heat until sugar dissolves and mixture comes to a boil. Wash down any sugar crystals from the sides with a wet pastry brush. Clip on candy thermometer and heat to 300° F. This should take about 7 to 10 minutes.
Remove from the pot from the heat and let sit for two minutes, bubbling should subside (temperature needs to fall to around 275° F). At this point, microwave the gelatin for 30 seconds to melt. Add gelatin and whisk it in. Be careful, the sugar syrup will bubble up!
Return sugar syrup to the heat and bring temperature back up to 280° F (the temperature will have fallen upon addition of the gelatin). Sprinkle baking soda over syrup and whisk vigorously for 30 seconds. The sugar will rise up to the top of the pot, bubbling like crazy. Again, be careful!!
Quickly pour the bubbling mixture into prepared pan. Do not spread the mixture, just let it settle into the pan. Allow to cool completely (about 2 hours or overnight) before removing from the pan.
Either break into odd pieces or cut into squares (this is a messy process!). To cut into squares - using a serrated knife, score the candy at 1-inch intervals. Snap the candy apart at the score lines.
Dip sponge candies in tempered chocolate, tap off excess. Chill in the fridge to set the chocolate shell. Enjoy!
notes:
- Any leftovers will keep for a week if you store the candy between layers of parchment in a sealed container in the refrigerator.
I spent two weeks making pate de fruits. I gotta tell ya, the weather seemed to affect many DB’ers outcomes, like it did during my first trial runs. When the heat wave broke for a few days (promptly returning several days later to ruin my chocolate bonbons), and I purchased a new basic candy thermometer, I finally had some success. I made 6 pate de fruits – the strawberry recipe below, blackberry, lemon, lime, orange (for the all citrus pate de fruits, I added food color so you could distinguish each flavor) and a strawberry-mango (I used the strawberry recipe below, but split the amount of strawberry puree with mango puree).
All in all..not as easy as you would think; long cooking, persnickety setting , sometimes barely any setting, but well worth it flavor wise. You can always turn it into jam if it doesn’t cooperate. My mantra is…when in doubt, add more pectin!
When most of us see photos of or encounter Paté de Fruits (pronounced pat de fwee, which translates to fruit pastes), we think of the sugared, overly sweet orange slices and artificially flavored jelly candies we grew up on. Paté de Fruits couldn’t be further from that.
They are bite-sized pieces of real fruit puree jellies (sometimes with the addition of jam and/or dried fruit) rolled in sugar. When you bite into one, it tastes like what I called ‘jellied jam’. The texture is jam like, and the taste; intensely fruity. Technically, you’re making a jam with your puree, but cooking it close to or at the soft ball stage to solidify it.
Some recipes call for liquid pectin to set the jellies, some call for powdered pectin. Some call for apple or yellow pectin, and some call for powdered or leaf gelatin. There are even some that do not need any of the above, as the natural pectin in some fruits, plus sugar, are all that’s needed to set the jellies when cooked to temperature, but this must be done without caramelizing or scorching the paste. There are also recipes that call for tartaric acid and glucose, but it’s entirely up to you and the ingredients you have easy access to.
Try combining different fruit purees, add jam (Jacques Pepin’s recipes, linked in our challenge, use jam and puree, along with pureed dried fruits), juice, dried fruits, liqueurs, extracts, citric acid for a sour bite, etc to the puree(s). Cut into shapes other than squares (aspic and miniature cookie cutters are great for this), or pour into molds. Let your creativity soar! You’ll love these sugary crisp, sweet and/or tart bites of bright, fruit jam/jellies!
We’ve supplied you with two recipes for Paté de Fruits, one base recipe for citrus Paté de Fruits, since you can plug-in any citrus juice and zest. We don’t have a base recipe for non-citrus fruits that are pureed, since the amount of pectin or setting agents vary with each fruit due to how much natural pectin that fruit already contains.
IMPORTANT: Sometimes the pate de fruits take a long time to cook down to a paste that will set firm – anywhere from 30 minutes to 1 hour, depending how much water was in the fruit, the type of pot your cooking the puree, sugar and pectin in, and even the weather (humidity). The recipe says to cook it to 225 to 230 F on a candy thermometer, but it isn’t always thick enough at that temperature. You want the mixture to be the consistency of a paste, meaning all the water is cooked out; a bit thicker than jam is a good marking point. To test to see if the paste is ready, freeze a plate, then place a drop of the mixture on the plate and put it back in the freezer for about 40 seconds. If it’s not sticky, but sets up soft, it’s ready to pour into the 8 x 8 pan to set.
What if my pate de fruits don’t seem to be setting?
Pour the mixture back into a clean pot and bring to a boil. Spoon 1 cup of the hot mixture into a bowl or measuring cup and stir in 1 packet of plain gelatin until the gelatin is dissolved. Pour this back into the pot and stir through, then pour back into the parchment lined 8×8 pan to set.
Strawberry, Blackberry or Raspberry Pate de Fruits
Prep time:
Cook time:
Total time:
Yield: Makes about 40-64 squares depending on size cut, recipe easily doubled or halved
Recipe by Elizabeth LaBau, About.com Guide
ingredients:
3 cups (16 oz/450 gm) hulled and quartered strawberries (can use raspberries or blackberries too, or a combo of two or all three berries! to make 3 cups)
1 tablespoon (15 ml) fresh lemon juice
2 cups (16 oz/ 450 gm) granulated white sugar plus another ½ cup sugar for coating the pate de fruits
¼ cup Liquid Pectin (might need more, depending on all kinds of conditions)
a drop or two of red gel food color to make it more vibrant in color, like mine, if desired, but not necessary. If making pure blackberry pate de fruits, none needed as the color is always perfectly deep purple.
directions:
Prepare an 8”x8” (20cmx20xm) pan by lining it with aluminium foil or parchment paper and spraying it with non-stick cooking spray.
Place the strawberries (or blackberries or raspberries) in a blender or food processor and process until very well pureed (liquefied).
Pour the pureed berries through a mesh strainer into a medium saucepan, discarding any remaining fruit chunks and seeds. Stir in the lemon juice and ½ cup of the sugar. Place the pan over medium-high heat, and insert a candy thermometer.
Cook the mixture, stirring constantly, until it is hot, around 140°F/60°C. Add the remaining 1.5 cups of sugar and the liquid pectin, then lower the heat to medium.
Continue to cook, stirring frequently, until the mixture registers 200°F/93°C. At this point, turn the heat to low and hold it at 200°F/93°C for 2-3 minutes. After this, return the heat to medium and bring it up to 225°F/107°C. This process will take some time, (anywhere from 30 to 50 minutes) especially with the heat on medium, so have patience and be diligent in stirring frequently so the bottom doesn't scorch. The mixture will have reduced to half or more its volume, meaning all the water has evaporated, which is what you want.
Once the fruit paste reaches 225°F/107°C, turn the heat to low and keep it at that temperature for an additional 2 minutes.
Remove the pan from the heat and stir in red food color, if using,,then scrape the strawberry pate de fruit mixture into the prepared pan, smoothing it into an even layer.
Allow the pate de fruit mixture to set at room temperature for several hours, until completely cool and firm or refrigerate after letting it come to room temperature, to set faster. Use a sharp knife and ruler to cut it into very small squares (about 1-inch). While cutting you will have to rinse the knife under hot water and dry it when it gets too sticky.
Roll the individual squares in granulated sugar, but before doing that, rub your fingers in the sugar and use a small knife to pull up each pate de fruit square as you pull the parchment beneath it, away from it. This way you'll have an easier time pulling each square off, without it sticking to your fingers or the parchment paper.
Place each sugar coated pate de fruits on a parchment paper lined baking sheet to dry and until ready to serve.
The strawberry pate de fruits can be served immediately, or refrigerated in an airtight container for up to a week. If refrigerated, the pieces may need to be re-rolled in granulated sugar before serving. Read important message below.
What if my pate de fruits doesn't seem to be setting?
Pour the mixture back into a clean pot and bring to a boil. Spoon 1 cup of the hot mixture into a bowl or measuring cup and stir in 1 packet of plain gelatin until the gelatin is dissolved. Pour this back into the pot and stir through, then pour back into the parchment lined 8x8 pan to set.
notes:
In order for pate de fruits to set properly, unless using gelatin instead of pectin, the puree, sugar and pectin must be cooked down close to a paste. The only problem is, once it reaches 225 F or the temperature given, it's not a paste yet, and it's still quite liquid. You'd have to cook it at least another 15 minutes to get to 'paste consistency', which in turn would bring the temperature up higher. Unless it scorches, I don't see a problem with it - just keep cooking and stirring until you get to paste like consistency that is a bit thicker than jam.
Yield: Makes about 40-64 squares depending on size cut, recipe easily doubled or halved
Recipe created by Jen King and Liz Gutman Oprah.com | From the October 2010 issue of O, The Oprah Magazine
ingredients:
½ cup (120 ml) citrus juice (orange, lemon, lime; etc.)
1½ cups (360 ml) applesauce, plain (no sugar added)
2 teaspoons (10ml/10 g) powdered pectin
2½ cups (600 ml/20oz/560gm) granulated white sugar
Zest – zest 2 small lemons for lemon pate de fruit, 2 small limes for lime pate de fruit, or 1 medium to large orange or tangerine for orange pate de fruit
Gel or paste food coloring, yellow, green or orange depending on the citrus you're using, optional
directions:
Lightly oil (or line with parchment paper) an 8”x8” (20cmx20xm) square pan; set aside.
Combine citrus juice and applesauce in a medium, deep saucepan. In a small bowl, whisk together the pectin and ½ cup sugar, and blend into the citrus mixture. Clip a candy thermometer onto the side of the saucepan and bring mixture to a boil. Add remaining sugar and boil, stirring, until mixture reaches 225°F / 107°C (you may need to stir constantly toward the end to prevent burning). Remove from heat and stir in lime zest and coloring (optional).
Pour into prepared pan. When slightly cool, allow to set about 2 to 4 hours. Cut into 1-inch (25 mm) squares, or use a lightly oiled cutter to make other shapes. Dredge in sugar and dry on a cooling rack or parchment lined baking sheet, overnight. Scraps can be re-melted and reset.
Store in a box or paper bag at room temperature for up to two weeks or in a container in the fridge for longer. Will need to reroll in sugar if using the latter to store it. Read important message below.
What if my pate de fruits doesn't seem to be setting?
Pour the mixture back into a clean pot and bring to a boil. Spoon 1 cup of the hot mixture into a bowl or measuring cup and stir in 1 packet of plain gelatin until the gelatin is dissolved. Pour this back into the pot and stir through, then pour back into the parchment lined 8x8 pan to set.
notes:
In order for pate de fruits to set properly, unless using gelatin instead of pectin, the puree, sugar and pectin must be cooked down close to a paste. The only problem is, once it reaches 225 F or the temperature given, it's not a paste yet, still quite liquid. You'd have to cook it at least another 15 minutes to get to 'that consistency', which in turn would bring the temperatue up higher. Unless it scorches, I don't see a problem with it - just keep stirring.
Welll, that’s all folks; it’s time to come down from my sugar high. Please take a few moments to check out our FULL candy challenge, HERE,where you’ll get ALL 6 (there’s also a recipe for thermometer-free fudge, given to us by Lis) recipes, plus loads of info on chocolate tempering and candy making.
Also, again, check out Mandy’s blog, as she’s my other half in this challenge! While you’re at it, you have to see my fellow Daring Baker’s amazing chocolate and candy creations Daring Bakers and Daring Kitchen no longer exists, so all the recipes you need for this challenge are in my this post and the link to Mandy’s blog, above)! They will blow your mind! They’re such a talented group of great people, and I’m so proud to be a part of this group because of them!


 This is what it looks like in natural light and when it’s not melting – photo courtesy of Weight Watchers.


 Candy")


