
This post runs the gamut from one melty berry disaster, to another melty berry success. Well, sort of.
It’s been extremely hot and humid here in NYC for the past couple weeks, so I haven’t done much baking, much less cooking in general. I had a million ideas I wanted to try, but even though the central air was on full blast, the humidity just seeps through the walls, no matter how thick they are. Due to that, baked goods never seem to turn out as they should, especially anything containing beaten egg whites!
When the humidity finally broke, I was out perusing the Farmer’s Market at Union Square and came across an abundance of gorgeous berries. The raspberries, blueberries and blackberries were spectacular so I couldn’t resist getting several pints of each. Imagine my surprise when I checked to see what the Sugar High Friday’s, (run by Jennifer of The Domestic God-dess, and hosted by Susan of Foodblogga) theme for this month was. It was BERRIES! Talk about perfect timing!
With my plump and juicy berries just waiting to be turned into something delightful, I toggled a few different ideas through my head, and finally decided on an old standby I’ve been baking for years. It’s an Upside Down Nectarine Cake with an amazing nutty, granola streusel baked into the center of the cake, created by Mary Bergin, for the PBS series and book ‘Baking with Julia’ by Dorie Greenspan. However, being one to rarely follow a recipe, (meaning I always change certain flavors and add or subtract something or the other depending on what’s in season and what I, or those close to me, are craving or in the mood for), I nixed the nectarines for the aforementioned berries I was dying to use.
This recipe calls for a chiffon cake, which as most know, contains no butter, but a whole lot of beaten egg whites which are folded into a base of egg yolks, sugar, oil, flour, leaven, salt, and whatever extract or extracts the recipe calls for. Lo and behold, as I was arranging the berries over the gooey and luscious amalgamation of brown sugar and butter in the pan, even  going as far as pushing a blueberry into each raspberry to enhance the topping aesthetically, the HUMIDITY returned in full force.
Due to the this, I couldn’t get the egg whites to the perfect soft peak stage to fold into the cake batter. After several unsuccessful and pointless attempts to remedy this (Weather-3 Lisa-0), I ended up folding them in as is, with liquid seeping from what meager peaks I’d produced. I poured off the liquid, but knew deep down it wasn’t going to work, and unless the humidity suddenly subsided, there was no point in starting over.
Obviously, this resulted in a far from perfect, somewhat dense and flat, cake, instead of the light and fluffy cake I usually get. The lovely strip of granola that defines this cake was barely noticeable beneath the berries since there was not enough height in the cake to showcase it. To add insult to injury, my perfect wheel of berries, blue in red, surrounded by circles of juicy blackberries, turned into a mess of purple-blue goo as it sat out on the counter to cool. Furthermore, I accidentally used too much butter on the bottom of the pan, so I also ended up with some lovely globules of solidified fat in between the bluish goo. YUM!
BUT, don’t let my struggle with the weather turn you off to trying this recipe. As I mentioned above, I’ve been using it for years with perfect results. If you buy the book, or know someone who has it, just substitute berries for the nectarines, and light brown sugar for the dark brown sugar. Serve it with creme fraiche or lightly sweetened whipped cream.
OK, ONLY due to the work I put into the cake..I must honor it a bit by posting a few ugly photos.

So now I had to come up with something new for Sugar High Fridays. As mentioned several times already, it’s hot and humid here, so what better than some ‘berrylicious’ ice cream or sorbet? The most humidity could do to berry ice cream or berry sorbet is melt it, but when put together right before serving, the evil muggy beast couldn’t obliterate it.
SO, I decided to use some of the phyllo I had left from a chicken double cheese phyllo dish (coming soon, hopefully) I made last week, to make berry sorbet vessels of some sort.
Well, it seems that evil muggy beast prevailed after all. When I opened the package of phyllo, some of the edges of the phyllo were practically glued together, making it impossible to get the amount of full sheets needed, without tearing. YIKES..time to rethink this.
Then I remembered a Gale Gand recipe where she sliced the roll of phyllo into fettuccine like strips, mounded them on a pan, spattered each mound with butter and sugar, then baked them to layer vanilla ice cream and fruit. Thank goodness, I was saved! I rolled the phyllo back up in the paper, and started slicing away; all ‘gluey’ pieces, discarded.
I ended up with a nice, fluffy bunch of separate phyllo strips aka phyllo fettuccine aka phylloccine! I portioned the bunch of strips into 12 separate mounds, spattered with butter and sugar, but also added some ground almonds to each for extra crunch and flavor.


For the filling, and the berry part, I put together a luscious homemade Tri-Berry sorbet with a little orange liqueur added to keep it slightly soft and melt-in-your-mouth smooth, I then lightly smashed and cut up some of the fresh berries and added those to the sorbet mixture for added texture and flavor, and of course, it didn’t hurt aesthetically. The mixture was chilled until it was ready to be churned and frozen in my ice cream maker. A drizzle of rich chocolate sauce, raspberry coulis, some lightly whipped dark brown sugar cream, and I had my SHF entry;
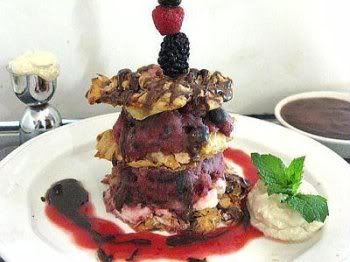
Tri-Berry Sorbet-Phyllo ‘Sundae’ Towers
Phyllo ‘Fettuccine’ Nests
adapted from Gale Gand in ‘Baking with Julia’ by Dorie Greenspan
Ingredients
- 1 half 16 oz box phyllo, thawed (1 8 oz roll)
- 1/2 cup melted butter, or clarified butter
- 2 tablespoons sugar
- 1/4 cup finely ground almonds
Directions
Preheat oven to 400 F
1. Remove the phyllo from the box and bag (leave the paper around the roll). Place the roll on a cutting board and slice into 1/4 to 1/2-inch slices.
2. Toss the cut phyllo to separate the strips and remove the paper. Line a sheet pan with parchment paper and make nests of the strips about 3 inches in diameter. Spatter with the melted butter (if you brush it on, it flattens the fluffy ‘fettuccine’ strips into one uniform mound, which you don’t want) and sprinkle with 1/2 teaspoon sugar and 1 teaspoon ground almonds per nest. Bake for 10-15 minutes until golden brown. If not using immediately, let cool, then store in an airtight container, stacked between sheets of parchment or wax paper, for up to 2 days.
Makes 12 ‘nests’
Tri-Berry Sorbet
Ingredients
- 1 1/2 pints fresh raspberries * **
- 1/2 pint fresh blackberries* **
- 1/2 pint fresh blueberries* **
- 1 1/4 cups sugar
- 2/3 cup water
- 1 tablespoon fresh lemon juice
- 1 tablespoon orange liqueur such as Grand Marnier or Cointreau, or a berry liqueur such as Kirsch or Framboise (optional).
- Extra berries, whole, chopped or smashed to add to the sorbet prior to freezing, the amount depending on personal preference.
Directions
1. Heat the sugar and water in a small saucepan over medium heat, stirring from time to time, until the sugar dissolves completely and is clear and slightly thickened, about 5 minutes. Do NOT overcook, as you don’t want caramel. Remove from heat, and let cool (I like to pour it into a glass measuring cup).
2. In a blender or food processor, puree the raspberries, blackberries, and blueberries. Pour the puree through a fine mesh strainer into a bowl, pressing on the solids with a spoon or spatula to remove as much liquid as possible (do not push the seeds through). Discard the seeds and solids.
3. Stir the cooled sugar syrup into the puree.. Add the lemon juice, and orange or berry liqueur (if using). Stir or smash in extra berries. Chill in the refrigerator until cold then freeze in an ice cream maker according to manufacturer’s instructions. Transfer the sorbet to a container. Cover tightly and place in the freezer until ready to use, at least 5 hours.
You can also pour the cooled sorbet into a bowl or loaf pan, cover tightly with plastic wrap, and freeze in the freezer, although I highly prefer and recommend using an ice cream maker, as the texture won’t be as soft and fluffy.
* You should have approximately 5-7 cups of berries
**3 cups of fresh berries is about the equivalent to one 12-oz. bag frozen berries, thawed. Both fresh and frozen in those amounts, pureed and strained, yield 2 cups puree.
Chocolate Sauce
Ingredients
- 7 oz of good quality chocolate, chopped (milk, semisweet, or bittersweet – your preference)
- 1 cup heavy cream
- 1 tablespoon light corn syrup
Directions
1. Place chopped chocolate in a medium bowl
2. Heat heavy cream and corn syrup in a small saucepan until it comes to a boil, then pour into bowl over chopped chocolate. Let sit for several minutes, then stir until uniform, smooth and silky. If you aren’t using it immediately, it will firm up a little. Just reheat over a low flame or in the microwave for a few seconds.
Raspberry Coulis
Ingredients
- 1/4 cup sugar
- 1 tablespoon water
- 1 tablespoon lemon juice
- 1/2 lb (8 oz) fresh raspberries, or half of one 12 ounce bag frozen raspberries, thawed
- 1 teaspoon Kirsch, Framboise, or Chambord (optional)
Directions
1. Heat the sugar and water in a small saucepan over medium heat, stirring from time to time, until the sugar dissolves completely, about 5 minutes. Let cool.
2. Place the raspberries and the sugar syrup in a blender and puree. Strain through a fine mesh sieve to remove the solids and seeds (discard those), then stir in the lemon juice, and the Kirsch, Framboise or Chambord, if using. Refrigerate until ready to use.
Makes about 3/4 cup of coulis.
Brown Sugar Whipped Cream (I place the bowl and beaters in the freezer prior to whipping the cream, so it whips up quicker).
Ingredients
- 2 cups heavy cream
- 2 to 3 tablespoons lightly packed dark brown sugar
Directions
1. Pour heavy cream into the chilled bowl, along with the brown sugar.
2. Whip until you get soft peaks. Don’t go any further than that, as you want a soft, very slightly ‘flowing’ cream.
Berry Skewers
loosely adapted from Gale Gand in Baking with Julia By Dorie Greenspan
- 4 wooden skewers, 10-12 inches in length
- 8 raspberries
- 8 blueberries
- 8 blackberries
- 1/4 cup of the raspberry coulis
Directions
Gently mix berries with the coulis, then slide two of each berry, alternating them, onto each skewer.
To serve, place a spoonful of the whipped cream on four separate dessert plates. Place a phyllo nest on top of the whipped cream to secure it. Place another spoonful of whipped cream on top of the phyllo nest, then a quenelle or scoop of the berry sorbet on top of the whipped cream. Top with another phyllo nest, then another spoonful of whipped cream, the quenelle or scoop of berry sorbet, and finally one more phyllo nest (3 per tower). Take a berry skewer and spear it through the middle of the stack. Drizzle the chocolate sauce over the whole stack, letting it fall wherever it may on the plate. Drizzle some of the raspberry coulis around the plate, and serve with the brown sugar whipped cream and extra chocolate sauce on the side.
Unfortunately, in conjunction with my lack of expertise in photography (only one photo showcased the tower as it should be, prior to morphing into the Leaning Tower of Lisa, and just my luck, it was the dullest and least focused/sharp of them all, which you can see directly below this paragraph), the towers started to melt and sink into a massacre of sorbet and sauces as I was taking photos, which you can plainly see in the closeup photo, following the aforementioned blurry ones.
Putting it in the freezer and trying to ‘fix’ it didn’t work out very well. But, when putting these together for service, they won’t sit around long enough to melt or keel over, and will look beautiful when presented to your guests..the only melting and keeling over occurring when they dig in!

Note -Sometimes it’s tough to get the towers to remain upright, even with the skewers through them, due to the weather and/or the smooth but icy, slippery/melty texture of the sorbet. If you have any problems, just sandwich the berry sorbet using only two nests of phyllo, and one large scoop of sorbet, along with all the ‘fixins’. In this case, you’ll get 6 servings.

This recipe makes 4 individual sundae towers, although two people can share one, as there is more than enough on each plate for that. Not to mention, you can feel less guilty about splurging since the berry sorbet IS fat-free!
![]()


 And yet another note – as you can see, I accidentally over-baked the tart by about 7 minutes. There was this thing on TV about (you guessed it) Chernobyl, and I forgot to set the timer. I’m obviously not the most organized kitchen witch.


